- Ansible Tower – a Hello World Example
- Salt Hello World
- Ansible Hello World – Ansible vs. Salt vs. Chef vs. Puppet
This is part 1 of a little Ansible Hello World example, an IT automation tool.
The post has the following content:
- Comparison of the popularity of Ansible, Salt, Chef, and Puppet
- Installation of Ansible based on Docker
- Simple Example Playbooks (i.e. tasks) and Inventories (i.e. groups of targets)
- How to invoke remote shell script execution
As a convenient and quick way of Ansible installation on Windows (or Mac), we are choosing a Docker Ansible image on a Vagrant Ubuntu Docker Host that has won a java performance competition against CoreOS and boot2docker (see this blog post).
Try it out: Ansible Hello World on Katacoda!
Get a feeling for Ansible in a real console without the need to install anything!
- Quick sign-in to Katacoda via Github, LinkedIn, Twitter Google or email
- click the console below or on https://www.katacoda.com/oliverveits/scenarios/ansible-bootstrap
Posts of this series:
- Part 1: Ansible Hello World (this post) with a comparison of Ansible vs. Salt vs. Chef vs. Puppet and a hello world example with focus on Playbooks (i.e. tasks), Inventories (i.e. groups of targets) and remote shell script execution.
- Part 2: Ansible Templating Hello World focuses on templating; we will create and upload template files based on jinja2.
- Part 3: Ansible Tower Hello World: investigates Ansible Tower, a professional Web Portal for Ansible
- Part 4: Salt Hello World example: same content as part I, but with Salt instead of Ansible
Versions
2015-11-09: initial release
2016-06-08: I have added command line prompts basesystem#, dockerhost# and container#, so the reader can see more easily, on which layer the command is issued.
2017-01-06: Added linked Table of Contents
2018-09-10 Removed static Table of contents, since it is now created by a plugin; removed some typos and grammatical errors
Why Ansible?
For the „hello world“ tests, I have chosen Ansible. Ansible is a relatively new member of a larger family of IT automation tools. This InfoWorld article from 2013 compares four popular members, namely Puppet, Chef, Ansible and Salt. Here you and here find more recent comparisons, if not as comprehensive as the InfoWorld article.
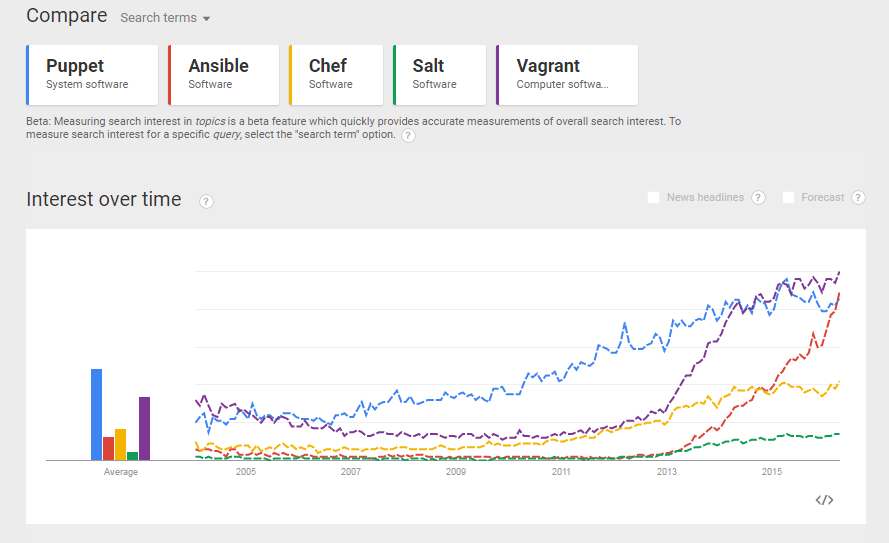
In order to explore the popularity of the software, let us look at a google trend analysis of those four tools (puppet/ansible/chef/salt + „automation“) (status November 2015; for a discussion of the somewhat more confusing recent results, please consult Appendix F below):

Okay, in the google trends analysis we can see that Ansible is relatively new and that it does not seem to replace Puppet, Chef or Salt. However, Ansible offers a fully maintained, RESTful API on the Ansible Web application called Ansible Tower (which comes at a cost, though). Moreover, I have seen another article stating that Ansible is very popular among docker developers. Since I have learned to love docker (it was no love at first sight), let us dig into Ansible, even though Puppet and Chef seem to be more popular in google searches.
For a discussion of REST and Web UI capabilities of the four tools, see Appendix D.
Ansible Hello World Example – the Docker Way
We plan to install Ansible, prepare Linux and Windows targets and perform simple tests like follows:
- Install a Docker Host
- Create an Ansible Docker Image
- Download an Ansible Onbuild Image from Docker Hub
- Start and configure the Ansible Container
- Locally test the Installation
- Remote Access to a Linux System via SSH
- –> Create a key pair, prepare the Linux target, access the Linux target
- Note: we will use the Docker Host as Linux Target
- Working with Playbooks
- Ansible „ping“ to a single system specified on the command line
- Run a shell script on single system specified on the command line
- Working with Inventory Files
- Ansible „ping“ to inventory items
- Run a shell script on inventory items
1. Install a Docker Host
Are you new to Docker? Then you might want to read this blog post.
Installing Docker on Windows and Mac can be a real challenge, but no worries: we will show an easy way here, that is much quicker than the one described in Docker’s official documentation:
Prerequisites:
- I recommend having direct access to the Internet: via Firewall, but without HTTP proxy. However, if you cannot get rid of your HTTP proxy, read Appendix B.
- Administration rights on your computer.
Steps to install a Docker Host VirtualBox VM:
Download and install Virtualbox (if the installation fails with error message „Setup Wizard ended prematurely“ see Appendix A: Virtualbox Installation Workaround below)
1. Download and Install Vagrant (requires a reboot)
2. Download Vagrant Box containing an Ubuntu-based Docker Host and create a VirtualBox VM like follows (assumed a Linux-like system or bash on Windows):
(basesystem)$ mkdir ubuntu-trusty64-docker ; cd ubuntu-trusty64-docker
(basesystem)$ vagrant init williamyeh/ubuntu-trusty64-docker
(basesystem)$ vagrant up
(basesystem)$ vagrant ssh
Now you are logged into the Docker host and we are ready for the next step: to create the Ansible Docker image.
Note: I have experienced problems with the vi editor when running
vagrant sshin a Windows terminal. In case of Windows, consider to follow Appendix C and to use putty instead.
2. Create an Ansible Docker Image
1. Download an Ansible Onbuild Image from Docker Hub
In order to check that the docker host has Internet access, we issue the following command:
dockerhost# docker search ansible
This command will lead to an error if you work behind an HTTP proxy since we have not (yet) configured the docker host for usage behind an HTTP proxy. I recommend getting direct Internet access without HTTP proxy for now. However, if you cannot get rid of your HTTP proxy, read Appendix B.
Now we download the ansible image:
dockerhost# docker pull williamyeh/ansible:ubuntu14.04-onbuild
2. Start and configure the Ansible Container
dockerhost# docker run -it williamyeh/ansible:ubuntu14.04-onbuild /bin/bash
The -it (interactive terminal) flags starts an interactive session in the container. Now you are logged into the Docker Container and you can prepare the Ansible configuration files, namely the inventory file (hosts file) and the playbook.yml:
3. Locally test the Installation
container# ansible all -i 'localhost,' -u vagrant -c local -m ping
Note that the -i is a CSV list of target hosts and needs to end with a comma. With -u, we define the remote user, and the private key file needs to be specified. The response should look as follows:
localhost | success >> {
 "changed": false,
 "ping": "pong"
}
3. Remote Access to a Linux System via SSH
Now let us test the remote access to a Linux system.
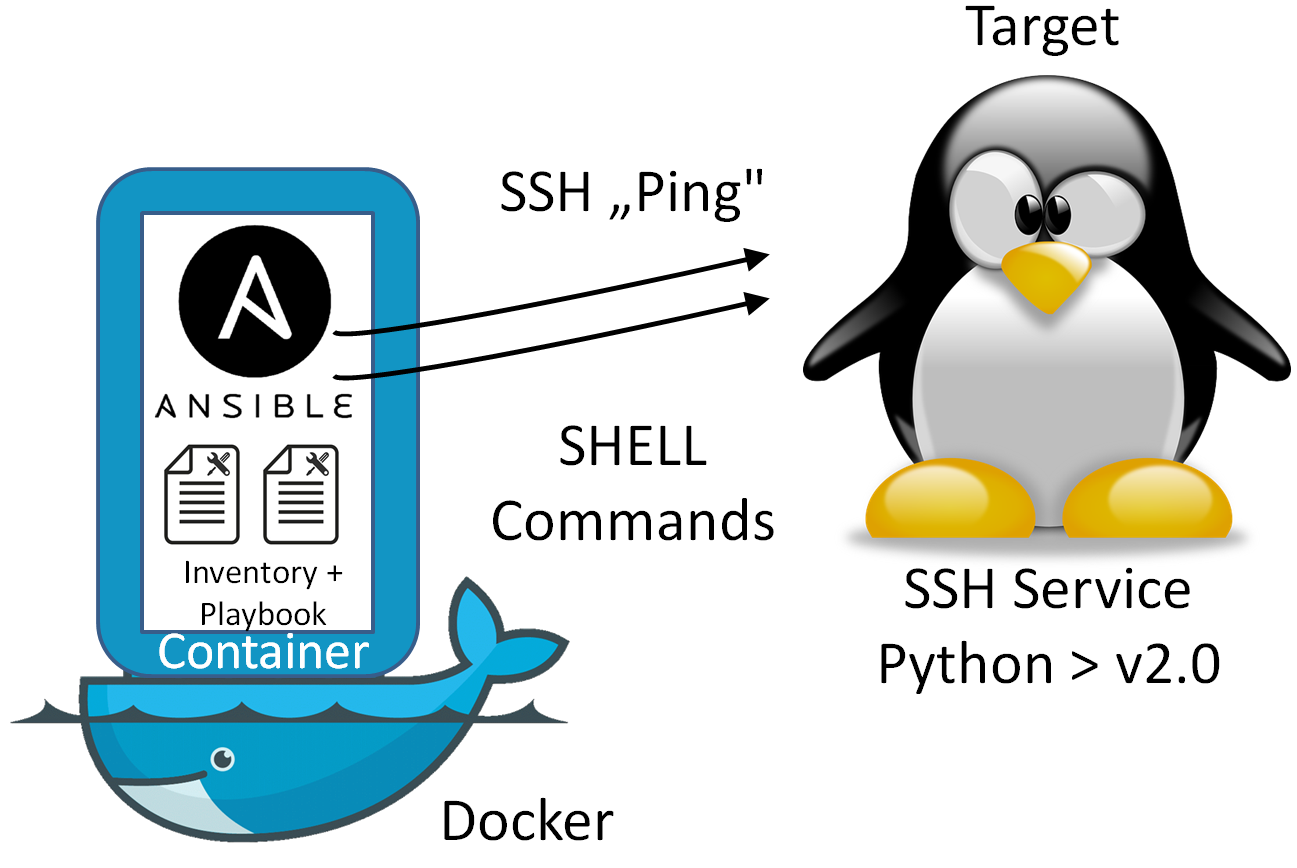
We could perform our tests with any target system with a running SSH service and installed Python >v2.0 on /usr/bin/python (see the FAQs). However, the Ubuntu Docker host is up and running already, so why not use it as a target system? In this case, the tested architecture looks as follows:
Ansible is agent-less, but we still need to prepare the target system: Ansible’s default remote access method is to use SSH with public key authentication. The best way is to create an RSA key pair on the Ansible machine (if not already available) and to add the corresponding public key as „authorized key“ on the target system.
1. Create an RSA key pair on the Ansible container:
container# ssh-keygen -t rsa
and go through the list of question. For a proof of concept, and if you are not concerned about security, you can just hit <enter> several times. Here is a log from my case:
root@930360e7db68:/etc/ssh# ssh-keygen -t rsa

Generating public/private rsa key pair.
Enter file in which to save the key (/root/.ssh/id_rsa):
Enter passphrase (empty for no passphrase):
Enter same passphrase again:
Your identification has been saved in /root/.ssh/id_rsa.
Your public key has been saved in /root/.ssh/id_rsa.pub.
The key fingerprint is:
fe:eb:bf:de:30:d6:5a:8c:1b:4a:c0:dd:cb:5f:3b:80 root@930360e7db68
...
On the target machine (i.e. the ubuntu-trusty64-docker system), create a file name /tmp/ansible_id_rsa.pub and copy the content of ansible’s ~/.ssh/id_rsa.pub file into that file. Then:
dockerhost# cat /tmp/ansible_id_rsa.pub >> ~/.ssh/authorized_keys
2. test remote access via SSH:
Now, we should be able to access the target system from the ansible container using this key. To test, try:
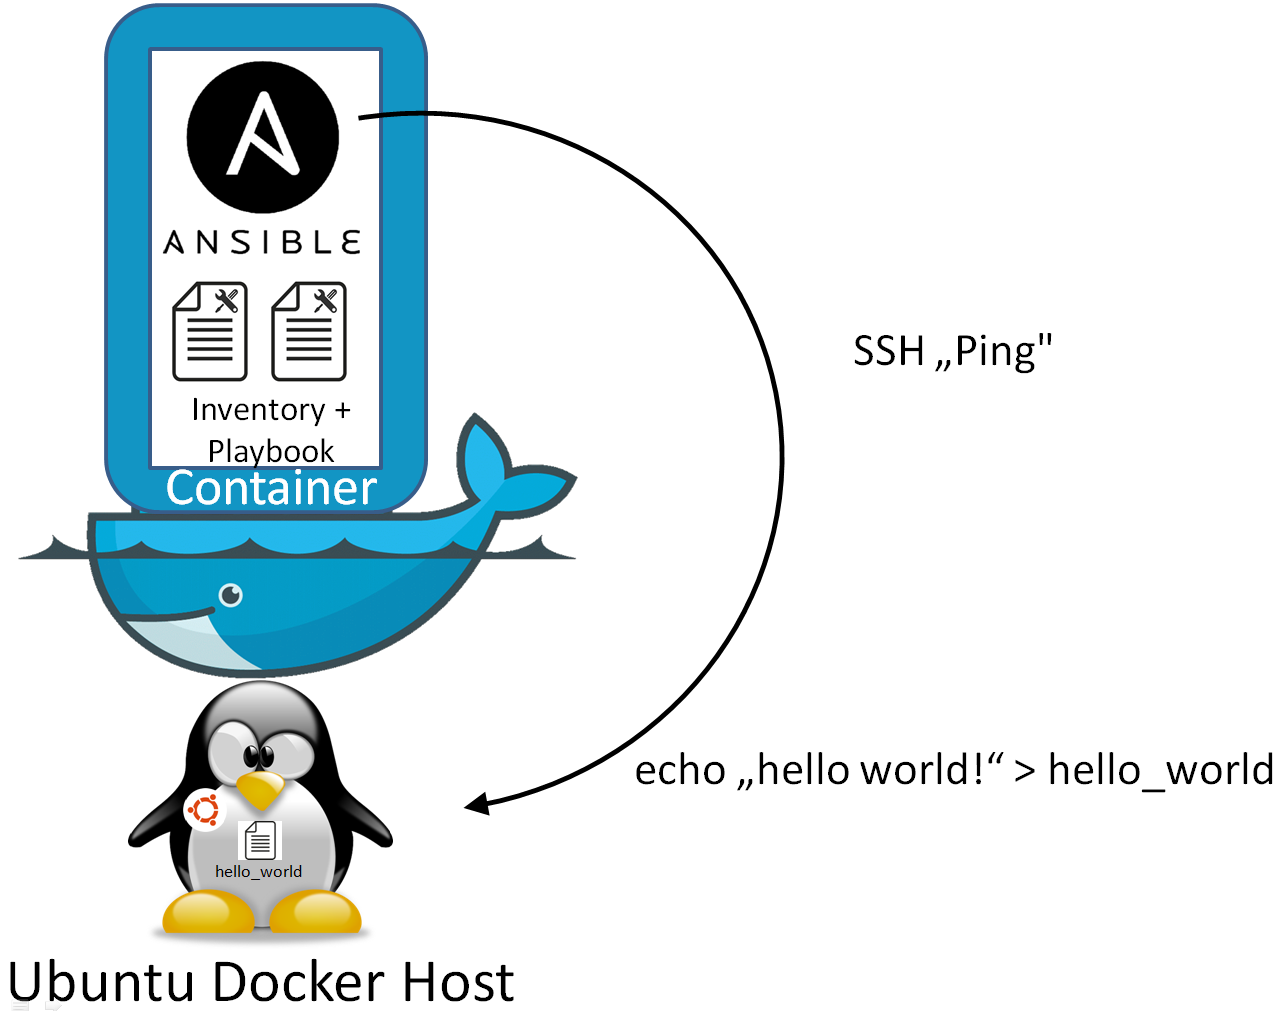
container# ssh vagrant@192.168.33.10 -C "echo hello world"
This should echo a „hello world“ to your screen. Here 192.168.33.10 is a reachable IP address of the docker host (issue ifconfig on the docker host to check the IP address in your case). For troubleshooting, you can call ssh with the -vvv option.
3. Remote access via Ansible:
Check that Python version > 2.0 (better: > 2.4) is installed on your target machine. In our case of the ubuntu-trusty64-docker image, this is a pre-installed package and we get:
dockerhost# python --version
Python 2.7.6
Now also a remote Ansible connection should be possible from the container:
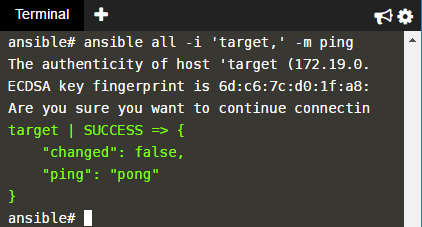
container# ansible all -i '192.168.33.10,' -u vagrant -m ping
which results in the following output:
192.168.33.10 | success >> {
 "changed": false,
 "ping": "pong"
}
This was your first successful Ansible connection via SSH. Now let us also perform a change on the remote target. For that, we perform a remote shell command:
container# ansible all -i '192.168.33.10,' -u vagrant -m shell -a "echo hello world\! > hello_world"
This time the module is a „shell“ and the module’s argument is an echo ‚hello world‘ command. We should get the feedback
192.168.33.10 | success | rc=0 >>On the target, we can check the result with:
dockerhost# cat hello_world
hello world!
4. Working with Playbooks
This was your first remote shell action via Ansible. Now we want to have a look at playbooks, which are the Ansible way to document and automate the tasks.
1. Create a playbook
On the ansible container terminal, we create a playbook.yml file:
container# vi playbook.yml
and we add and save the following content:
---
# This playbook uses the ping module to test connectivity to Linux hosts
- name: Ping
  hosts: 192.168.33.10
  remote_user: vagrant

  tasks:
  - name: ping
    ping:
  - name: echo
    shell: echo Hello World! > hello_world
Note: If you have problems with the formatting of the characters in the terminal (I have experienced problems in a Windows terminal), then I recommend to use a putty terminal instead of using vagrant ssh. For that, see Appendix C.
Note also that the number of white spaces is relevant in a .yml file. However, note that the ‚!‘ does not need to be escaped in the playbook (it was necessary on the command line, though). Now, we perform the following command on the Ansible container:
container# ansible-playbook -i '192.168.33.10,' playbook.yml
This time, the -u flag is not needed (it is ignored if specified) since we have specified the user in the playbook. We get the following feedback:
PLAY [Ping] *******************************************************************

GATHERING FACTS ***************************************************************
ok: [192.168.33.10]

TASK: [ping] ******************************************************************
ok: [192.168.33.10]

TASK: [echo] ******************************************************************
changed: [192.168.33.10]

PLAY RECAP ********************************************************************
192.168.33.10 : ok=3 changed=1 unreachable=0 failed=0
Let us check the result on the target machine again:
dockerhost# cat hello_world
Hello World!
We see that the file hello_world was overwritten („Hello World!“ with capital letters instead of „hello world!“).
5. Working with Inventory Files
Instead of specifying singular hosts in the playbook.yml, Ansible offers the more elegant way to work with groups of machines. Those are defined in the inventory file.
More information about inventory files can be found in the official documentation. However, note that this page describes new 2.0 features that do not work on the Docker image (currently ansible 1.9.4). See Appendix E for more details on the problem and for information on how to upgrade to the latest development build. The features tested in this blog post work on ansible 1.9.4, though; so you do not need to upgrade now.
1. Now we do the same as before, but we use an inventory file to define the target IP addresses:
container# vi /etc/ansible/hosts
and add the following lines:
[vagranthosts]
192.168.33.10
In the playbook.yml we replace 192.168.33.10 by a group name, e.g. vagranthosts
---
# This playbook uses the win_ping module to test connectivity to Windows hosts
- name: Ping
  hosts: vagranthosts
  remote_user: vagranthost

  tasks:
  - name: ping
    ping:
  - name: echo
    shell: echo HELLO WORLD! > hello_world
In order to see the difference, we also have changed the hello world to all capital letters.
Now we perform:
container# ansible-playbook -i /etc/ansible/hosts playbook.yml
Here, we have replaced the list of hosts by a reference to the inventory file.
The output looks as follows:
PLAY [Ping] *******************************************************************

GATHERING FACTS ***************************************************************
ok: [192.168.33.10]

TASK: [ping] ******************************************************************
ok: [192.168.33.10]

TASK: [echo] ******************************************************************
changed: [192.168.33.10]

PLAY RECAP ********************************************************************
192.168.33.10 : ok=3 changed=1 unreachable=0 failed=0
We check the result on the target machine again:
dockerhost# cat hello_world
HELLO WORLD!
We see that the file hello_world was overwritten again (all capital letters). Success!
Summary
We have shown, how you can download and run Ansible as a Docker container on any machine (Windows in my case). We have prepared the Ansible container and the target for SSH connections and have shown, how to perform connectivity tests and shell scripts on the remote system. In addition, we have introduced Playbooks as a means to document and run several tasks by one command. Moreover, Inventory files were introduced in order to manage groups of target machines.
Next steps
Following topics are looked at in the next two parts of this series:
- Part II: Ansible Hello World reloaded will show
- how to upload files with Ansible
- how to create dynamic file content with Ansible using jinja2 templates
- bind it all together by showing a common use case with dynamic shell scripts and data files
- Part III: Salt Hello World example: same content as part I, but with Salt instead of Ansible
- Part IV: Ansible Tower Hello World: investigates Ansible Tower, a professional Web Portal for Ansible
Open: Windows support of Ansible
Appendix A: Resolving Virtualbox Installation Problems
- Download the installer. Easy.
- When I start the installer, everything seems to be on track until I see „rolling back action“ and I finally get this:
„Oracle VM Virtualbox x.x.x Setup Wizard ended prematurely“
Resolution of the „Setup Wizard ended prematurely“ Problem
Let us try to resolve the problem: the installer of Virtualbox downloaded from Oracle shows the exact same error: „…ended prematurely“. This is not a docker bug. Playing with conversion tools from Virtualbox to VMware did not lead to the desired results.
The Solution: Google is your friend: the winner is:https://forums.virtualbox.org/viewtopic.php?f=6&t=61785. After backing up the registry and changing the registry entry
HKEY_LOCAL_MACHINE\SYSTEM\ControlSet001\Control\Network -> MaxFilters from 8 to 20 (decimal)
and a reboot of the Laptop, the installation of Virtualbox is successful.
Note: while this workaround has worked on my Windows 7 notebook, it has not worked on my new Windows 10 machine. However, I have managed to install VirtualBox on Windows 10 by de-selecting the USB support module during the VirtualBox installation process. I remember having seen a forum post pointing to that workaround, with the additional information that the USB drivers were installed automatically at the first time a USB device was added to a host (not yet tested on my side).
Appendix B: HTTP Proxy Configuration
If you need to work behind an HTTP proxy, you need to consider several levels that need to know of it:
- the physical host for both, your browser as well as your terminal session (http_proxy and https_proxy variables) for successful vagrant init commands and download of the vagrant boxes.
- the docker host (if it differs from the physical host) for both, in the docker configuration files as well as on the bash. Note that the configuration files differ between CoreOS, boot2docker, and Ubuntu.
- the docker client for the terminal session; needed for apt-get update+install.
Ubuntu Docker:
sudo vi /etc/default/docker
add a proxy, if needed like follows (adapt the names and ports, so it fits your environment):
export http_proxy='http://proxy.example.com:8080'
export https_proxy='http://proxy.example.com:8080'
then:
sudo restart docker
CoreOS:
sudo mkdir /etc/systemd/system/docker.service.d
sudo vi /etc/systemd/system/docker.service.d/http-proxy.conf
and add something like (adapt the names and ports, so it fits your environment):
[Service]
Environment="HTTP_PROXY=http://proxy.example.com:8080"
Then:
sudo reboot
or try:
sudo sysctl docker restart
Appendix C: Using putty for accessing Vagrant Boxes
What is to be done:
- locate and convert the vagrant private key to .ppk format using puTTYgen.
- locate the vagrant private key of the box. In my case, this is C:\Users\vo062111\.vagrant.d\boxes\williamyeh-VAGRANTSLASH-ubuntu-trusty64-docker\1.8.1\virtualbox\vagrant_private_key
- start puTTYgen -> Conversions -> import -> select the above path.
- press „Save private key“ and save vagrant_private_key as vagrant_private_key.ppk
- In putty,
- create a connection to vagrant@127.0.0.1 port 2201 or port 2222 (the port vagrant uses is shown in the terminal during „vagrant up“)
- specify the .ppk key Connection->SSH->Auth->(om the right)Private key file for authentication
- Click on Session on the left menu and press Save
- Press Open and accept the RSA fingerprint -> you should be able to log in without a password prompt. If there is still a password prompt, there is something wrong with the private key.
Appendix D: Comparison of the REST APIs of Ansible, Puppet, Chef, and Salt
Here, I have made a quick research on the RESTful interfaces and Web UI Interfaces of Ansible, Puppet, Chef, and Salt. I have not found this information on the Feature comparison table on Wikipedia:
- Ansible offers
- a REST server API with a nice and comprehensive browseable API via the Web UI called „Ansible Tower„.
- The Web UI called „Ansible Tower“ is an enterprise-grade tool and it is not free of charge.
- REST client requests from Ansible to other REST services are sent via a core module called „uri“.
- Puppet offers
- REST APIs for querying the database, but its scope is not yet clear to me: it seems to allow inventory management and reporting, but no ad-hoc provisioning functions.
- There are several Web UIs, some of them free and open source.
- Puppet’s REST client capability is unclear to me: I have only found a forum request about it, but the answer has either not been given or is not easy to locate.
- Chef offers
- a REST Server API independent of the Web UI.
- The open source UI of Chef is deprecated and its proprietary replacement not available yet.
- REST client requests from Chef to other REST services are sent via http_request module.
- Salt offers
- a REST server API in three flavors (cherrypy, tornado, and wsgi), all part of the netapi module. It allows for ad hoc provisioning (e.g. POST /run).
- REST client capability is unclear to me
Appendix E: Install the latest Ansible Development Version
The Ansible version in the docker image has the problem that it has a version 1.9.4 (currently), but the Ansible documentation is describing the latest v2.0 features. E.g. in version 1.9.4, variables in the inventory file described in the documentation are ignored (see e.g. the example „jumper ansible_port=5555 ansible_host=192.168.1.50″) and this leads to a „Could not resolve hostname“ error; see also this StackOverflow post).
Here, we will show, how to install the latest Ansible version in the container. For that, run the container:
docker -it williamyeh/ansible:ubuntu14.04-onbuild /bin/bash
ansible --version
will result in an output similar to:
ansible 1.9.4
If you get a version >=2.0, you might not need to upgrade at all. In all other cases, perform the following steps:
If you are behind a proxy, perform sth. like:
export http_proxy=http://proxy.example.com:8080
export https_proxy=http://proxy.example.com:8080
apt-get update; apt-get install git
git clone git://github.com/ansible/ansible.git --recursive
cd ./ansible
source ./hacking/env-setup
ansible --version
should give you some output like:
ansible 2.0.0 (devel 9b9fb51d9d) last updated ...
Now also the v2.0 features should be available. If you want to update the version in future, you will need to perform the git command
git pull
In the /ansible directory.
Appendix F: Confusion about Google Trends
(chapter added on 2016-04-11)
In order to explore the popularity of the software, we have looked at a google trend analysis of those four tools (puppet/ansible/chef/salt + „automation“) (status November 2015):
Note that the google trends page has shown a result that looks quite differently five months later (2016-04-11). Google seems to have changed their source data and/or algorithm. With the same search terms as we had used in Nov. 2015 (puppet/ansible/chef/salt + „automation“; note that the link works only if you are logged into your google account), in April 2016 we got following non-convincing graph:

Especially the analysis of Salt’s and Chef’s popularity for 2011 and before does not look very convincing.
If we are searching for „Software“ instead of via this google trends link (works only, if you are logged into your google account), we get something like the following:
Also, this data does not look reliable: according to Wikipedia’s Vagrant page, Vagrant’s initial version was March 2010. Why do we see so many search hits before that time? That is not plausible. The same with Puppet, which has started 2005 and has many hits in 2004.
To be honest, google trends analysis used to (at least) look reliable in November 2015, but it does not look reliable anymore. What a pity: I used to work a lot with google trends in the past for finding out, which technology is trending, but looking at the more recent results, I have lost the confidence that I can rely on the data. If you know an alternative to google trends, please add a comment to this blog post.
In any case; for the time after 2013, it looks like the popularity of Ansible is rising quickly (if we believe it).

Thank you for your sharing. I am worried that I lack creative ideas. It is your article that makes me full of hope. Thank you. But, I have a question, can you help me?