This is part 4 of a blog post series, in which we explore how to automate Amazon Web Services (AWS) using the Terraform open source software by HashiCorp. Similar to Cloudify, Terraform is a versatile way to codify any type of infrastructure and to spin up a production-like demo or staging environment on any IaaS cloud like AWS, Azure or Google Cloud within minutes.
In this blog post, we will compare Terraform with Vagrant (providing links to other comparisons like Cloudify along the way), before we will use Terraform to spin up a single Ubuntu virtual machine instance on AWS. In the Appendix, we will also show, how to access the instance using SSH.
The series is divided into four parts:
- In Part 1: AWS EC2 Introduction, introduces Amazon Web Services EC2 (AWS EC2) and will show how to sign into a free trial of Amazon, create, start, shut down and terminate a virtual machine on the AWS EC2 console.
- Part 2: Automate AWS using Vagrant will lead you through the process how to use Vagrant to perform the same tasks you have performed in part 1, but now we will use local Vagrantfiles in order to automate the process. Please be sure to check out part 4, which shows a much simpler way to perform the same using Terraform.
- Part 3: Deploy Docker Host on AWS using Vagrant shows, how Vagrant helps you to go beyond simple creation, startup, shutdown and termination of a virtual machine. In less than 10 minutes, you will be able to install a Docker host on AWS. With a few additional clicks on the AWS EC2 console, you are ready to start your first Docker container in the AWS cloud.
- Part 4: Automate AWS using Terraform (this post) is showing that spinning up a virtual machine instance on AWS using Terraform is even simpler than using the Vagrant AWS plugin we have used in part 2 and 3. Additionally, Terraform opens up the we will be able to use the same tool to provision our resources to other clouds like Azure and Google Cloud.
Document Versions
- 2016-09-22: initial published version
Contents
In this blog post we will explore, how to get started with Amazon Web Services (AWS). After signing in to a free trial of Amazon, we will show how to create, spin up and terminate virtual machines in the cloud using Amazon’s AWS EC2 web based console. After that, a step by step guide will lead us through the process of performing the same tasks in an automated way using Terraform.
While the shown tasks could also be performed with AWS CLI commands, Terraform potentially allows for more sophisticated provisioning tasks like Software Installation and upload & execution of arbitrary shell scripts.
- Why Terraform?
- Why this Guide?
- Why Amazon Web Services?
- Getting started with AWS
- AWS Automation using Terraform (step by step guide)
- Appendix
- Summary
Why Terraform?
In part 2 of this series, we had chosen the Vagrant AWS provider plugin to automatically spin up a virtual machine instance on Amazon AWS. Developers are used to Vagrant, since Vagrant offers a great way to locally spin up the virtual machines developers need to perform their development tasks. Even though Vagrant is most often used for local VirtualBox provider, the AWS plugin allows Vagrant to spin up virtual machine instances on AWS EC2, as we have demonstrated in the blog post.
One of the differences between Vagrant and Terraform is the language used: While Vagrant requires Chef-like Ruby programming (developers like it), Terraform Terraform uses a language called HashiCorp Configuration Language (HCL). Here is an example:
# A variable definition:
variable "ami" {
  description = "the AMI to use"
}

# A resource definition:
resource "aws_instance" "web" {
  ami               = "${var.ami}"
  count             = 2
  source_dest_check = false

  ...(AWS credential management skipped here)

  connection {
    user = "myuser"
  }
}
The same code would look similar to following in a Vagrantfile:
AMI = "ami-1234567"
$instance_name_prefix = "myinstance"
Vagrant.configure("2") do |config|
  (1..2).each do |i|
    config.vm.provider :aws do |aws, override|
      config.vm.define vm_name = "%s-%02d" % [$instance_name_prefix, i] do |config|
      aws.ami = "#{AMI}"
      ...(AWS credential management skipped here)
      override.vm.box = "dummy"
      override.ssh.username = "myuser"

    end
  end
end
We can see that a Vagrantfile is a Ruby program, while the Terraform language reads more like a status description file. It is a matter of taste, whether you prefer the one over the other. I assume that Ruby programming gives you more fine-grained possibilities to adapt the environments to your needs, while Terraform potentially offers the possibility to gain a better overview on the desired state.
In my opinion, the biggest difference between Vagrant and Terraform is the scope of those tools: according to HashiCorp, Vagrant is not designed for production-like environments. HashiCorp’s Terraform Intro is pointing out the following:
Modern software is increasingly networked and distributed. Although tools like Vagrant exist to build virtualized environments for demos, it is still very challenging to demo software on real infrastructure which more closely matches production environments.
Software writers can provide a Terraform configuration to create, provision and bootstrap a demo on cloud providers like AWS. This allows end users to easily demo the software on their own infrastructure, and even enables tweaking parameters like cluster size to more rigorously test tools at any scale.

We could argue that all of that can also be done with Vagrant and its AWS plugin. However, the big difference is that Terraform comes with a long, long list of supported providers as seen on the right-hand side of this page. We find all major IaaS Providers like AWS, MS Azure, Google Engine, DigitialOcean and SoftLayer but also an important PaaS provider like Heroku. Moreover, we find support for local virtual infrastructure providers like OpenStack and some „initial support“ for VMware tools like vSphere and vCloud. Unfortunately, VirtualBox is missing in the official list, so developers either keep working with Vagrant locally, or they could try using a third party Terraform VirtualBox provider. Also Docker support is also classified as „initial support“ and Docker Cloud as well as Kubernetes or OpenShift Origin are missing altogether.
Terraform tries to codify any type of resources to its list, so we even can find interfaces to DNS providers Databases, Mailproviders and many more. With that, it can spin up a whole environment including virtual machine instances, DNS services, networking, content delivery network services and more. HashiCorp’s Terraform introductory web page about use cases tells us that Terraform can spin up a distributed sophisticated demo or staging environment in less than 30 sec.
Further Reading about Terraform vs XYZ: You may also want to check out Terraform’s comparison page or an informative slideset of Nati Shalom, GigaSpaces or this CloudFormation vs Terraform comparison.
Why offering yet another ‚Hello World‘ for Amazon Web Service Automation via Terraform?
The Terraform web portal is providing an AWS hello world example already. The reason I am offering yet another ‚Hello World‘ example is, that the other guides assume that you already have created an AWS user with the appropriate rights. In this guide, we will describe, how this is done. Moreover, we will show in an Appendix, which steps are necessary to access the created virtual machine instance via SSH.
Why Amazon Web Services?
According to Gartner’s 2015 report, Amazon Web Services is the leader in the IaaS space, followed by Microsoft Azure. See below the Gartner’s magic quadrant on IaaS:

Source: Gartner (May 2015)
There are many articles out there that compare AWS with Microsoft Azure. From reading those articles, the following over-simplified summary has burnt its traces into my brain:
Amazon Web Services vs. Microsoft Azure is like Open Source Linux world vs. the commercial Microsoft Software world. For a long time, we will need both sides of the world.
Now that we have decided to begin with the open source side of the world, let us get started.
Signing into Amazon Web Services
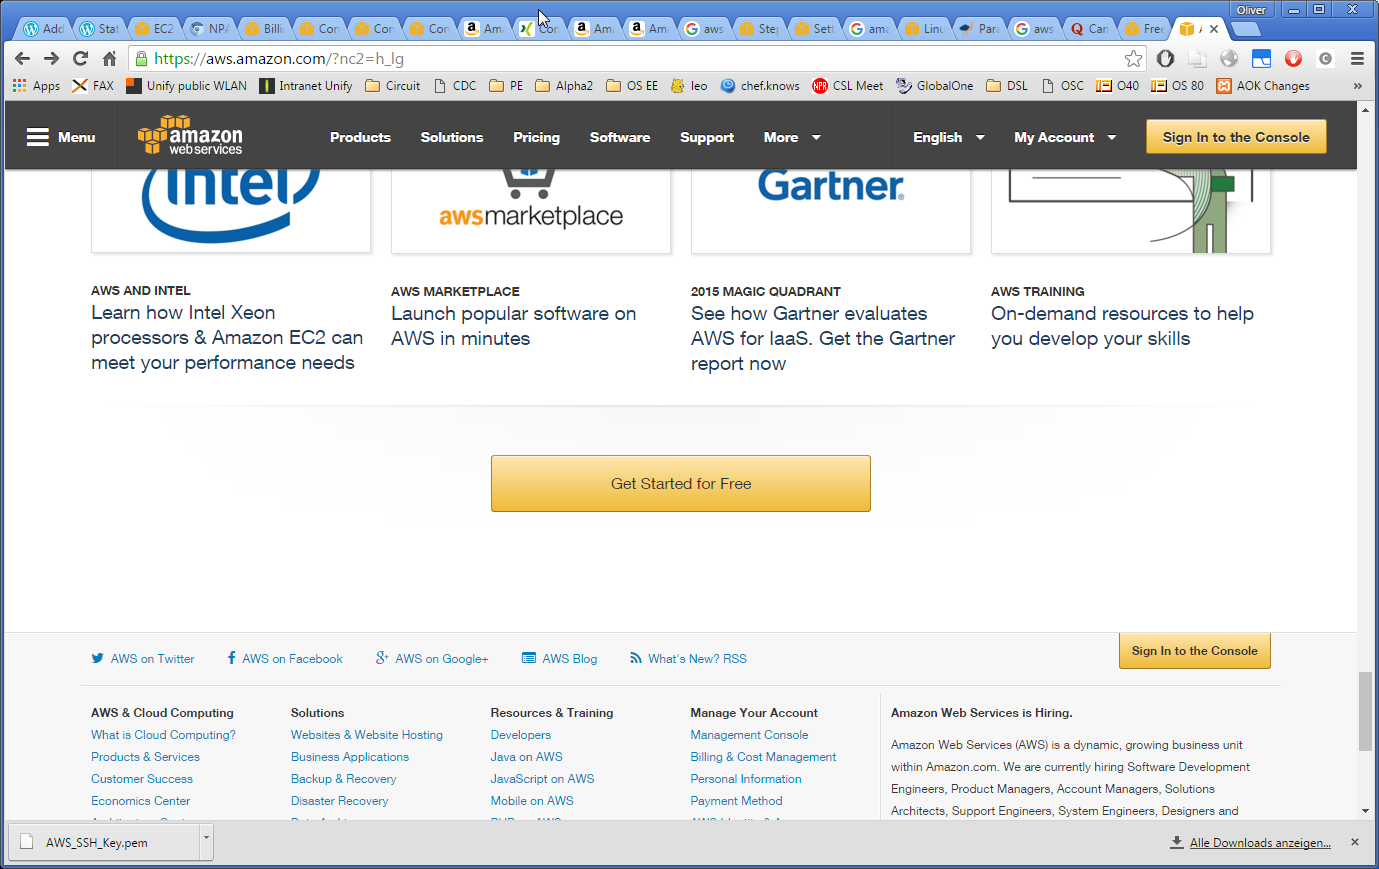
In order to get started, you need to sign into the Amazon Web Services, if not already done so. For that, visit https://aws.amazon.com/, scroll down and push the Get Started for Free button. This is starting a free tier trial account for up to 12 months and up to two time 750 hrs of computing time; Linux and Windows 2012 server on a small virtual machine.
Note that you will be offered options that are free along with other services that are not for free, so you need to be a little bit careful. Terraform with its easy automation will help us to minimize the resources needed.
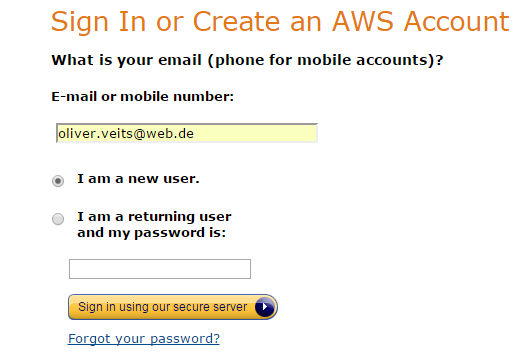
I had signed into AWS long ago, but as far as I remember, you need to choose „I am a new User“, add your email address and desired password and a set of personal data (I am not sure whether I had to add my credit card, since I am an Amazon customer anyway).
If you are interested to creating, launching, stopping and terminating virtual machine instances using the Amazon EC2 console (a web portal), you might want to have a look to part 1 of this series:
In this part of the series, we will concentrate on automating the tasks.
AWS Automation using Terraform
Now we sill use Terraform in order to automate launching a virtual machine instance on AWS from an existing image (AMI). Let us start:
Step 0: Set HTTP proxy, if needed
The tests within this Hello World blog post have been performed without a HTTP proxy. If you are located behind a proxy, this should be supported as pointed out here. Try following commands:
On Mac/*nix systems:
export http_proxy='http://myproxy.dns.name:8080'
export https_proxy='http://myproxy.dns.name:8080'
On Windows:
set http_proxy='http://myproxy.dns.name:8080'
set https_proxy='http://myproxy.dns.name:8080'
Replace myproxy.dns.name and 8080 by the IP address or DNS name and port owned by the HTTP proxy in your environment.
Step 1a Native Installation
It is best, if you have direct Internet access (behind a firewall, but without any HTTP proxy). Install Terraform on your local machine. The installation procedure depends on your operating system and is described here. I have taken the Docker alternative in Step 1b instead, though.
Step 1b Docker Alternative
If you have access to a Docker host, you also just can run any terraform command by creating a function like follows:
terraform() {
  docker run -it --rm -v `pwd`:/currentdir --workdir=/currentdir hashicorp/terraform:light $@;
}
For permanent definition, write those three lines it in the ~/.bashrc file of your Docker host.
After that terraform commands can be issued on the docker host as if terraform was installed on the Docker host. The first time the command is performed, a 20 MB terraform light image will be downloaded automatically from Docker Hub:
$ terraform --version
Unable to find image 'hashicorp/terraform:light' locally
light: Pulling from hashicorp/terraform

ece78a7c791f: Downloading [=====> ] 2.162 MB/18.03 MB
...
Terraform v0.7.4
Once the image is downloaded, the next time you issue the command, the output will look the same, as if the software was installed locally:
$ terraform --version
Terraform v0.7.4
Step 2: Create a Terraform Plan
We create a file named aws_example.tf like follows:
provider "aws" {
  access_key = "ACCESS_KEY_HERE"
  secret_key = "SECRET_KEY_HERE"
  region     = "us-east-1"
}

resource "aws_instance" "example" {
  ami           = "ami-0d729a60"
  instance_type = "t2.micro"
}
You can get the access key from AWS IAM Users page (click the user), if it exists already. However, the secret key is secret and has been provided at the time the access key has been created. If the secret key is unavailable, try creating a new one on the AWS IAM Users page (click the user).
The ami of the main images can be retrieved from the AWS console after being logged in. Simulate installing an instance by clicking „Lauch Instance“ and browse through the main images. The image number starting with „ami“ is displayed there:

We have copied the ami number of the Ubuntu Server this time. Then you can cancel the instance creation.
Your region is displayed after the question mark as part of the AWS console URL, once you are logged in:

If you are a „free tier“ user of AWS, only use „t1-micro“ or „t2-micro“ as instance-type. None of the other types are free tier eligible, even not the smaller „t2-nano“, see this comment.
Step 3: Simulate the Terraform Plan
To see, what will happen, if you execute a terraform template, just issue the following command in bold:
$ terraform plan
Refreshing Terraform state in-memory prior to plan...
The refreshed state will be used to calculate this plan, but
will not be persisted to local or remote state storage.


The Terraform execution plan has been generated and is shown below.
Resources are shown in alphabetical order for quick scanning. Green resources
will be created (or destroyed and then created if an existing resource
exists), yellow resources are being changed in-place, and red resources
will be destroyed. Cyan entries are data sources to be read.

Note: You didn't specify an "-out" parameter to save this plan, so when
"apply" is called, Terraform can't guarantee this is what will execute.

+ aws_instance.example
    ami:                      "ami-26c43149"
    availability_zone:        "<computed>"
    ebs_block_device.#:       "<computed>"
    ephemeral_block_device.#: "<computed>"
    instance_state:           "<computed>"
    instance_type:            "t2.micro"
    key_name:                 "<computed>"
    network_interface_id:     "<computed>"
    placement_group:          "<computed>"
    private_dns:              "<computed>"
    private_ip:               "<computed>"
    public_dns:               "<computed>"
    public_ip:                "<computed>"
    root_block_device.#:      "<computed>"
    security_groups.#:        "<computed>"
    source_dest_check:        "true"
    subnet_id:                "<computed>"
    tenancy:                  "<computed>"
    vpc_security_group_ids.#: "<computed>"


Plan: 1 to add, 0 to change, 0 to destroy.
Step 4: Set permissions of the AWS User
This step is not described in the Quick Start guides I have come across. You can try to skip this step and proceed with the next step. However, if the user owning the AWS credentials you have specified above, you may encounter following Error:
Error launching source instance: UnauthorizedOperation: You are not authorized to perform this operation.In this case, following steps will fix the issue:
Step 4.1: Create a new user on the AWS IAM Users page , if not already done.
Step 4.2: Assign the needed access rights to the user like follows:
Adapt and goto the AWS IAM Link https://console.aws.amazon.com/iam/home?region=eu-central-1#policies. The link needs to be adapted to your region; e.g. change eu-central-1 by the right one from the region list that applies to your account.
Click the „Get Started“ button, if the list of policies is not visible already. After that, you should see the list of policies and a filter field:
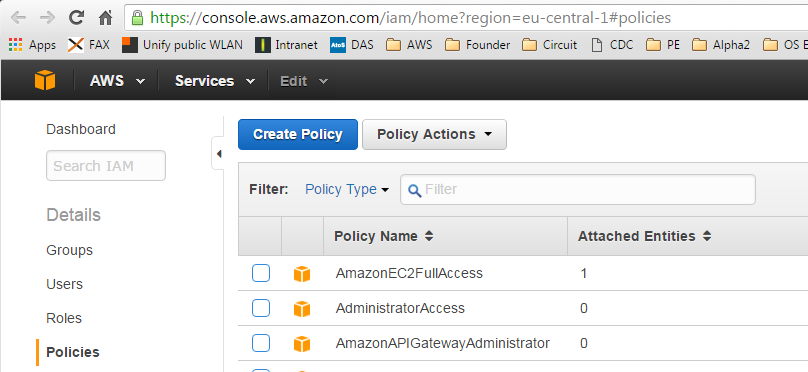
In the Filter field, search for the term AmazonEC2FullAccess.
Click on the AmazonEC2FullAccess Policy Name and then choose the tab Attached Identities.
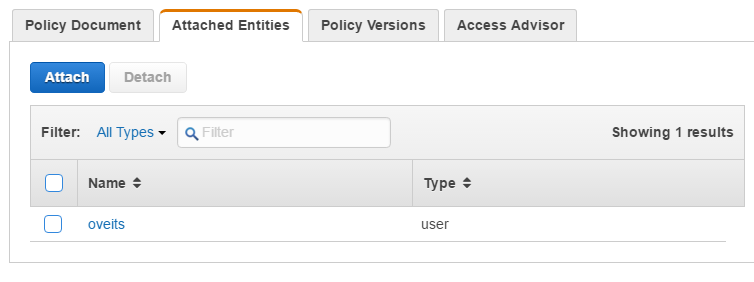
Click the Attach button and attach the main user (in the screenshot above, my main user „oveits“ is already attached; in your case, the list will be empty before you click the Attach button, most likely).
Step 5: Apply the Terraform Plan
Note: this step will launch AWS EC2 virtual machine instances. Depending on your pay plan, this might cause some cost.
To apply the Terraform plan, issue the following command:
$ terraform apply
aws_instance.example: Creating...
  ami:                      "" => "ami-26c43149"
  availability_zone:        "" => "<computed>"
  ebs_block_device.#:       "" => "<computed>"
  ephemeral_block_device.#: "" => "<computed>"
  instance_state:           "" => "<computed>"
  instance_type:            "" => "t2.micro"
  key_name:                 "" => "<computed>"
  network_interface_id:     "" => "<computed>"
  placement_group:          "" => "<computed>"
  private_dns:              "" => "<computed>"
  private_ip:               "" => "<computed>"
  public_dns:               "" => "<computed>"
  public_ip:                "" => "<computed>"
  root_block_device.#:      "" => "<computed>"
  security_groups.#:        "" => "<computed>"
  source_dest_check:        "" => "true"
  subnet_id:                "" => "<computed>"
  tenancy:                  "" => "<computed>"
  vpc_security_group_ids.#: "" => "<computed>"
aws_instance.example: Still creating... (10s elapsed)
aws_instance.example: Still creating... (20s elapsed)
aws_instance.example: Creation complete

Apply complete! Resources: 1 added, 0 changed, 0 destroyed.

The state of your infrastructure has been saved to the path
below. This state is required to modify and destroy your
infrastructure, so keep it safe. To inspect the complete state
use the `terraform show` command.

State path: terraform.tfstate
Note also the information on the
terraform.tfstatefile, which should not get lost. This shows us that Terraform is not stateless: it will not synchronize with the current state of the Provider AWS, leading to potential problems if the tfstate file and the real world get out of sync.
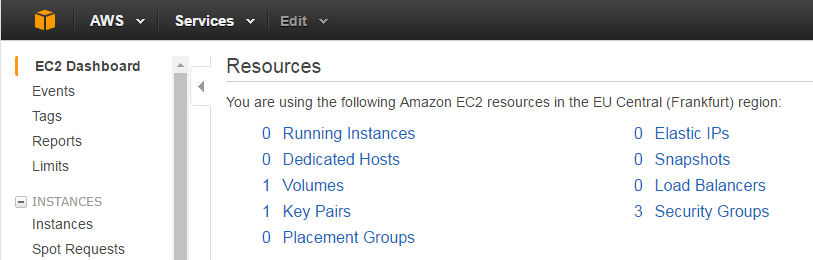
In the AWS console, we indeed can see that a Ubuntu instance has been launched:

I have not expected it to be that easy, because:
- Unlike the Vagrant example, I was not forced to specify the SSH key
- Unlike the Vagrant example, I was not forced to adapt the security rule to allow SSH traffic to the instance.
Unlike Vagrant, Terraform does not need SSH access to the virtual machine instance in order to spin it up.
Step 6: Destroy the Instance
Now let us destroy the instance again:
Step 6.1: Check the Plan for Destruction
$ terraform plan -destroy
Refreshing Terraform state in-memory prior to plan...
The refreshed state will be used to calculate this plan, but
will not be persisted to local or remote state storage.

aws_instance.example: Refreshing state... (ID: i-8e3f1832)

The Terraform execution plan has been generated and is shown below.
Resources are shown in alphabetical order for quick scanning. Green resources
will be created (or destroyed and then created if an existing resource
exists), yellow resources are being changed in-place, and red resources
will be destroyed. Cyan entries are data sources to be read.

Note: You didn't specify an "-out" parameter to save this plan, so when
"apply" is called, Terraform can't guarantee this is what will execute.

- aws_instance.example
Step 6.2 Apply the Plan with „Destroy“ Option
And now let us apply the destruction:
$ terraform destroy
Do you really want to destroy?
  Terraform will delete all your managed infrastructure.
  There is no undo. Only 'yes' will be accepted to confirm.

  Enter a value: yes

aws_instance.example: Refreshing state... (ID: i-8e3f1832)
aws_instance.example: Destroying...
aws_instance.example: Still destroying... (10s elapsed)
aws_instance.example: Still destroying... (20s elapsed)
aws_instance.example: Still destroying... (30s elapsed)
aws_instance.example: Still destroying... (40s elapsed)
aws_instance.example: Still destroying... (50s elapsed)
aws_instance.example: Still destroying... (1m0s elapsed)
aws_instance.example: Destruction complete
Checking with AWS console:

And yes, indeed, the instance was terminated. Note that AWS will keep the instance in terminated status for some time before automatically removing it.
Note also that a created instance will be charged as if it was up 15 minutes minimum. Therefore, it is not a good idea to run such examples in a loop, or with a large number of instances.
DONE!

Appendix A: Access the virtual machine via SSH
Step A.1: Check, whether you already have SSH access
Try to connect to the virtual machine instance via SSH (for information on SSH clients, check out Appendix C). If you are prompted to accept the SSH fingerprint, the security rule does not need to be updated and you can go to the next step. If there is a timeout instead, perform the steps in Appendix B: Adapt Security Rule manually.
Step A.2: Provision the SSH Key
Step A.2.1 Create or find your SSH key pair
You can follow this guide and let AWS create it for you on this page, or you can use a local OpenSSH installation to create the key pair. I have gone the AWS way this time.
Step A.2.2 Retrieve public Key Data
The key pair you have created contains a public data that looks similar to follows:
ssh-rsa AAAAB3NzaC1yc2EAAAADAQABAAABAQC22rLY2IreKhTqhdiYMIo+8p+LkuRroHZdm4OPagVuxmT1iz9o4NsPP3MIgwXjGFNtC0Sb6puuFilat+sswXEFLca2G2dWVtITpGfb4EJt72i2AmSi8TL/0UudhO9bkfZUPtlxJNrMKsxLQ62ukIC3b927CMgBMBFrLcAIh/WWQsB/KInOAID8GN+MssR7RwpAxEDXb1ZFtaaAzR2p3B3QdTzazUCZgzEMY6c3K4I4eaIzzONRV7rUUH3UC61GwXAORQLXsOBzHW0uOgIhlOTIMG0zkQtwJfLBoQKz/zQFFYX9gEoA/ElVNTrwWwX9gsJzpz6hdL/koD3tionbE6vJ
with or without email-address appended. We need the whole string (including the email-address, if present) in the next step:
Step A.2.3 Specify SSH Key as Terraform Resource
The public key data is now written into a .tf file (I have used the name aws_keyfile.tf) as described here.
resource "aws_key_pair" "deployer" {
  key_name = "deployer-key"
  public_key = "ssh-rsa AAAAB3NzaC1yc2EAAAADAQABAAABAQD3F6tyPEFEzV0LX3X8BsXdMsQz1x2cEikKDEY0aIj41qgxMCP/iteneqXSIFZBp5vizPvaoIR3Um9xK7PGoW8giupGn+EPuxIA4cDM4vzOqOkiMPhz5XK0whEjkVzTo4+S0puvDZuwIsdiW9mxhJc7tgBNL0cYlWSYVkz4G/fslNfRPW5mYAM49f4fhtxPb5ok4Q2Lg9dPKVHO/Bgeu5woMc7RY0p1ej6D4CKFE6lymSDJpW0YHX/wqE9+cfEauh7xZcG0q9t2ta6F6fmX0agvpFyZo8aFbXeUBr7osSCJNgvavWbM/06niWrOvYX2xwWdhXmXSrbX8ZbabVohBK41 email@example.com"
}
As you will see below, this resource will be added to the list of available SSH keys in the AWS console -> EC2 Dashboard -> Key Pairs.
Step A.2.4 Assign Key to the AWS Instance
We now use the key named „deployer_key“ in the instance definition. For that, we edit aws_example.tf and add the key_name:
provider "aws" {
  access_key = "MYKEY"
  secret_key = "MYSECRETKEY"
  region     = "eu-central-1"
}

resource "aws_instance" "example" {
  ami           = "ami-26c43149"
  instance_type = "t2.micro"
  key_name = "deployer_key"
}
As you will see below, the key_name will be applied to the new instance, allowing us to SSH into the virtual machine instance.
Step A.2.5 Review Terraform Plan
After that the plan looks like follows (in the shown output, the instance is running already, but this is irrelevant, since a new instance will be created anyway):
vagrant@localhost /mnt/nfs/terraform $ terraform plan
Refreshing Terraform state in-memory prior to plan...
The refreshed state will be used to calculate this plan, but
will not be persisted to local or remote state storage.


The Terraform execution plan has been generated and is shown below.
Resources are shown in alphabetical order for quick scanning. Green resources
will be created (or destroyed and then created if an existing resource
exists), yellow resources are being changed in-place, and red resources
will be destroyed. Cyan entries are data sources to be read.

Note: You didn't specify an "-out" parameter to save this plan, so when
"apply" is called, Terraform can't guarantee this is what will execute.

+ aws_instance.example
    ami:                      "ami-26c43149"
    availability_zone:        "<computed>"
    ebs_block_device.#:       "<computed>"
    ephemeral_block_device.#: "<computed>"
    instance_state:           "<computed>"
    instance_type:            "t2.micro"
    key_name:                 "deployer-key"
    network_interface_id:     "<computed>"
    placement_group:          "<computed>"
    private_dns:              "<computed>"
    private_ip:               "<computed>"
    public_dns:               "<computed>"
    public_ip:                "<computed>"
    root_block_device.#:      "<computed>"
    security_groups.#:        "<computed>"
    source_dest_check:        "true"
    subnet_id:                "<computed>"
    tenancy:                  "<computed>"
    vpc_security_group_ids.#: "<computed>"

+ aws_key_pair.deployer
    fingerprint: "<computed>"
    key_name:    "deployer-key"
    public_key:  "ssh-rsa AAAAB3NzaC1yc2EAAAADAQABAAABAQC22rLY2IreKhTqhdiYMIo+8p+LkuRroHZdm4OPagVuxmT1iz9o4NsPP3MIgwXjGFNtC0Sb6puuFilat+sswXEFLca2G2dWVtITpGfb4EJt72i2AmSi8TL/0UudhO9bkfZUPtlxJNrMKsxLQ62ukIC3b927CMgBMBFrLcAIh/WWQsB/KInOAID8GN+MssR7RwpAxEDXb1ZFtaaAzR2p3B3QdTzazUCZgzEMY6c3K4I4eaIzzONRV7rUUH3UC61GwXAORQLXsOBzHW0uOgIhlOTIMG0zkQtwJfLBoQKz/zQFFYX9gEoA/ElVNTrwWwX9gsJzpz6hdL/koD3tionbE6vJ"


Plan: 2 to add, 0 to change, 0 to destroy.
The public key will be provisioned to AWS and an instance will be created with the appropriate SSH key. Let us try:
Step A.2.6 Apply the Terraform Plan
vagrant@localhost /mnt/nfs/terraform $ terraform apply
aws_key_pair.deployer: Creating...
  fingerprint: "" => "<computed>"
  key_name:    "" => "deployer-key"
  public_key:  "" => "ssh-rsa AAAAB3NzaC1yc2EAAAADAQABAAABAQC22rLY2IreKhTqhdiYMIo+8p+LkuRroHZdm4OPagVuxmT1iz9o4NsPP3MIgwXjGFNtC0Sb6puuFilat+sswXEFLca2G2dWVtITpGfb4EJt72i2AmSi8TL/0UudhO9bkfZUPtlxJNrMKsxLQ62ukIC3b927CMgBMBFrLcAIh/WWQsB/KInOAID8GN+MssR7RwpAxEDXb1ZFtaaAzR2p3B3QdTzazUCZgzEMY6c3K4I4eaIzzONRV7rUUH3UC61GwXAORQLXsOBzHW0uOgIhlOTIMG0zkQtwJfLBoQKz/zQFFYX9gEoA/ElVNTrwWwX9gsJzpz6hdL/koD3tionbE6vJ"
aws_instance.example: Creating...
  ami:                      "" => "ami-26c43149"
  availability_zone:        "" => "<computed>"
  ebs_block_device.#:       "" => "<computed>"
  ephemeral_block_device.#: "" => "<computed>"
  instance_state:           "" => "<computed>"
  instance_type:            "" => "t2.micro"
  key_name:                 "" => "deployer-key"
  network_interface_id:     "" => "<computed>"
  placement_group:          "" => "<computed>"
  private_dns:              "" => "<computed>"
  private_ip:               "" => "<computed>"
  public_dns:               "" => "<computed>"
  public_ip:                "" => "<computed>"
  root_block_device.#:      "" => "<computed>"
  security_groups.#:        "" => "<computed>"
  source_dest_check:        "" => "true"
  subnet_id:                "" => "<computed>"
  tenancy:                  "" => "<computed>"
  vpc_security_group_ids.#: "" => "<computed>"
aws_key_pair.deployer: Creation complete
aws_instance.example: Still creating... (10s elapsed)
aws_instance.example: Still creating... (20s elapsed)
aws_instance.example: Creation complete

Apply complete! Resources: 2 added, 0 changed, 0 destroyed.

The state of your infrastructure has been saved to the path
below. This state is required to modify and destroy your
infrastructure, so keep it safe. To inspect the complete state
use the `terraform show` command.

State path: terraform.tfstate
Now the new key is visible in the AWS console -> EC2 (Dashboard) -> click „Key Pairs“:
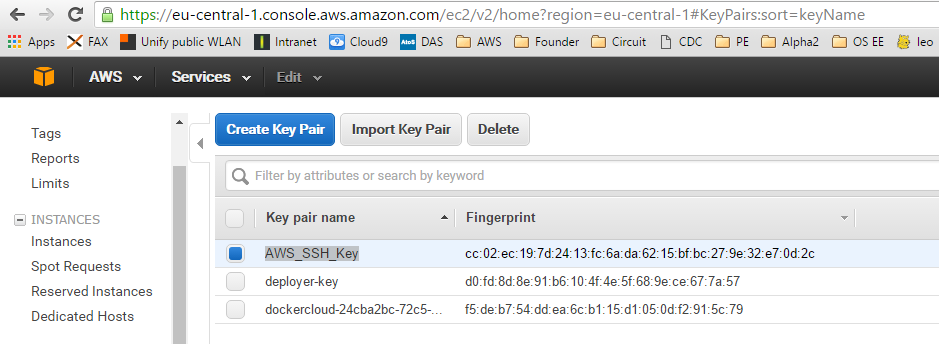
The second key named „deployer-key“ is the one we just have created.
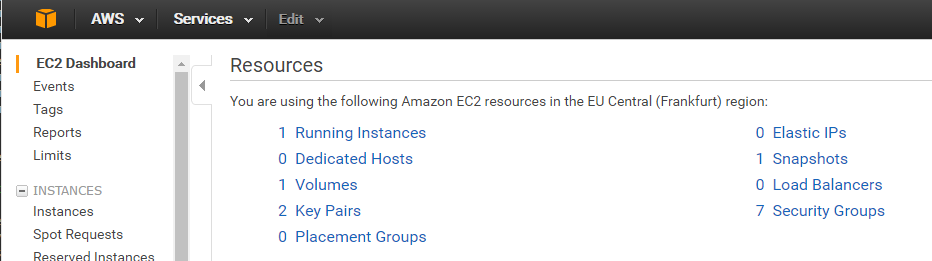
A new instance has been launched and the correct key is assigned (AWS console -> EC2 (Dashboard) -> click „Running Instances“):

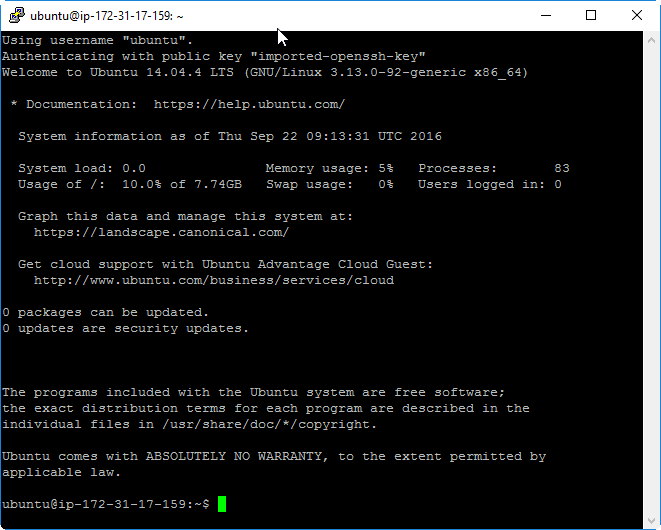
Now I should be able to connect to the system using the key. But which user? I have first tried „root“, but during login, I was informed that I should use „ubuntu“ instead of „root“.
It has worked with following data:
The public DNS name or public IP address to be used can be retrieved either from the AWS console

or better from a terraform show command:
$ terraform show
aws_instance.example:
  id = i-fc755340
  ami = ami-26c43149
  availability_zone = eu-central-1b
  disable_api_termination = false
  ebs_block_device.# = 0
  ebs_optimized = false
  ephemeral_block_device.# = 0
  iam_instance_profile =
  instance_state = running
  instance_type = t2.micro
  key_name = deployer-key
  monitoring = false
  network_interface_id = eni-b84a0cc4
  private_dns = ip-172-31-17-159.eu-central-1.compute.internal
  private_ip = 172.31.17.159
  public_dns = ec2-52-29-3-233.eu-central-1.compute.amazonaws.com
  public_ip = 52.29.3.233
  root_block_device.# = 1
  root_block_device.0.delete_on_termination = true
  root_block_device.0.iops = 100
  root_block_device.0.volume_size = 8
  root_block_device.0.volume_type = gp2
  security_groups.# = 0
  source_dest_check = true
  subnet_id = subnet-f373b088
  tags.% = 0
  tenancy = default
  vpc_security_group_ids.# = 1
  vpc_security_group_ids.611464124 = sg-0433846d
aws_key_pair.deployer:
  id = deployer-key
  key_name = deployer-key
  public_key = ssh-rsa AAAAB3NzaC1yc2EAAAADAQABAAABAQC22rLY2IreKhTqhdiYMIo+8p+LkuRroHZdm4OPagVuxmT1iz9o4NsPP3MIgwXjGFNtC0Sb6puuFilat+sswXEFLca2G2dWVtITpGfb4EJt72i2AmSi8TL/0UudhO9bkfZUPtlxJNrMKsxLQ62ukIC3b927CMgBMBFrLcAIh/WWQsB/KInOAID8GN+MssR7RwpAxEDXb1ZFtaaAzR2p3B3QdTzazUCZgzEMY6c3K4I4eaIzzONRV7rUUH3UC61GwXAORQLXsOBzHW0uOgIhlOTIMG0zkQtwJfLBoQKz/zQFFYX9gEoA/ElVNTrwWwX9gsJzpz6hdL/koD3tionbE6vJ
We need to specify the private key, which is named AWS_SSH_Key.ppk in my case (even though we have chosen to call it deployer_key in the resource). In case of putty, the key needs to be in .ppk format. See Appendix C, how a .pem file (as you get it from AWS) can be converted to .ppk format.
With this information, we can log in via SSH (assuming that you have performed step A.1 and Appendix B, if needed; otherwise, you may get a timeout).
Appendix B: Adapt Security Rule manually
Step B.1: Check, whether you have SSH access
Try to connect to the virtual machine instance. If you are prompted to accept the SSH fingerprint, the security rule does not need to be updated and you can stop here. If there is a timeout, go to the next step.
Step B.1: Updating the security group
In this step, we will adapt the security group manually in order to allow SSH access to the instance. Note that in Appendix B, we show how this step can be automated with a shell script. But now, let us perform the step manually.
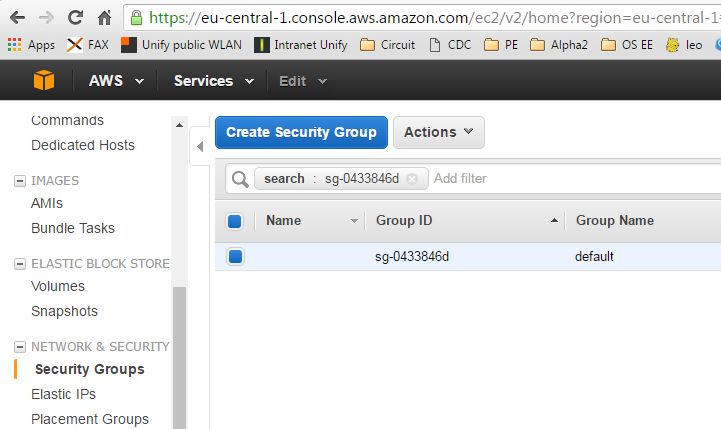
In the EC2 console, under Network&Security -> Security Groups (in my case in EU Central 1: https://eu-central-1.console.aws.amazon.com/ec2/v2/home?region=eu-central-1#SecurityGroups:sort=groupId), we can find the default security group. We need to edit the inbound rule to allow the current source IP address. For that, select the policy group, click on the „Inbound“ tab on the bottom, specify „My IP“ as source and save the policy:

Now, if you try to connect to the virtual machine instance, you should be asked by your SSH client, whether or not you permanently add the SSH key fingerprint locally.
DONE
Note: if your IP address changes frequently, you might want to automate the update of the security rule. Check out Appendix B of part 2 of this blog series for this.
Appendix C: SSH Connection Client Alternatives
C.1. SSH Connection via a *nix operating Client (or bash on Windows)
On a *nix machine or on a bash shell on Windows, you can connect via the *nix built-in SSH client. The following command line connection worked for me on a bash shell on my Windows machine. Replace the path to the private PEM file and the public DNS name, so that it works for you as well:
$ssh ubuntu@ec2-52-29-14-175.eu-central-1.compute.amazonaws.com -i /g/veits/PC/PKI/AWS/AWS_SSH_Key.pem
The authenticity of host 'ec2-52-29-14-175.eu-central-1.compute.amazonaws.com (52.29.14.175)' can't be established.
ECDSA key fingerprint is e2:34:6c:92:e6:5d:73:b0:95:cc:1f:b7:43:bb:54:39.
Are you sure you want to continue connecting (yes/no)? yes
Warning: Permanently added 'ec2-52-29-14-175.eu-central-1.compute.amazonaws.com,52.29.14.175' (ECDSA) to the list of known hosts.
Welcome to Ubuntu 14.04.3 LTS (GNU/Linux 3.13.0-74-generic x86_64)

 * Documentation:  https://help.ubuntu.com/

  System information as of Fri Apr  1 20:38:25 UTC 2016

  System load:  0.08              Processes:           98
  Usage of /:   10.0% of 7.74GB   Users logged in:     0
  Memory usage: 6%                IP address for eth0: 172.31.21.237
  Swap usage:   0%

  Graph this data and manage this system at:
    https://landscape.canonical.com/

  Get cloud support with Ubuntu Advantage Cloud Guest:
    http://www.ubuntu.com/business/services/cloud

0 packages can be updated.
0 updates are security updates.
ubuntu@ip-172-31-21-237:~$
DONE
C.2 SSH Connection via putty on Windows
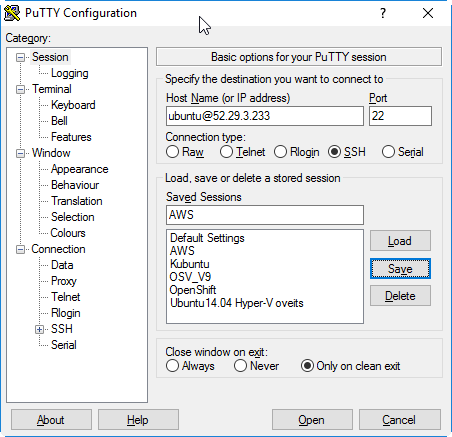
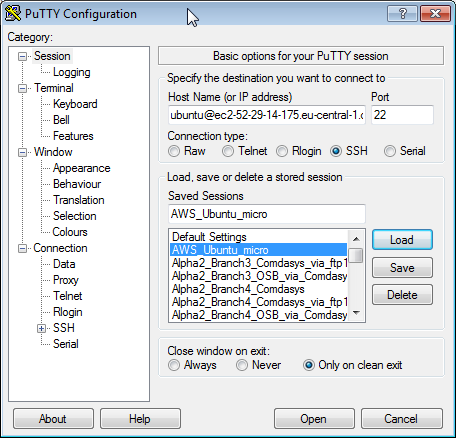
Since I am using a Windows machine and the formatting of a ssh session in a CMD console does not work well (especially, if you try to use vim), I prefer to use putty on Windows.
In putty, add the host ubuntu@<public DNS>:
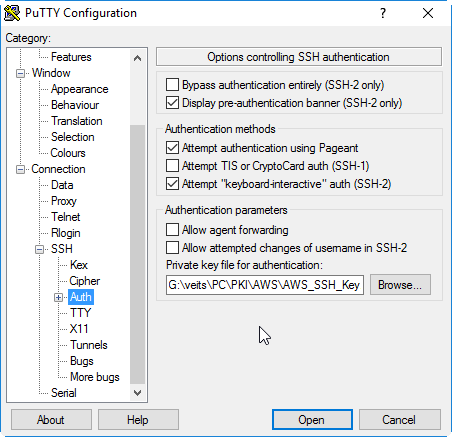
and add the path to the private key file on Connection->SSH->Auth->Private key file for authentication:
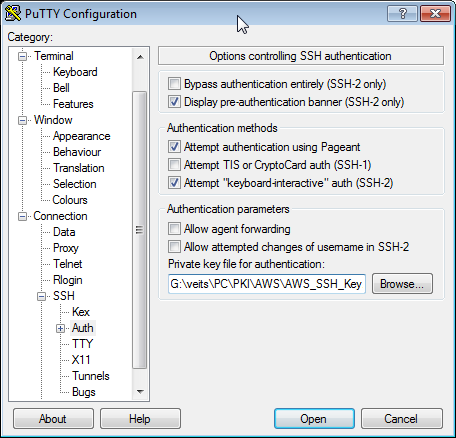
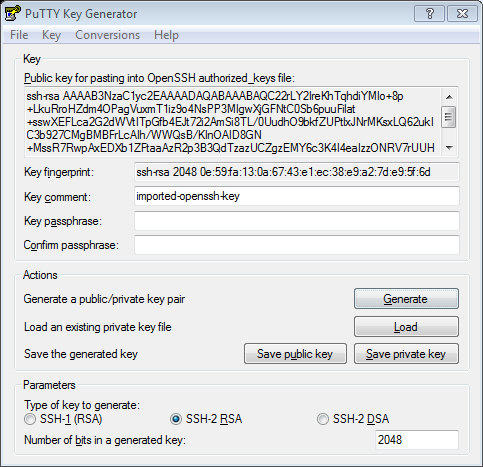
Note that the pem file needs to be converted to a ppk format putty understands. For that, import the pem file using Putty Key Generator (puttygen) via Conversions->Import Key->choose pem file -> Save private key with ppk extension.

Now add the path to the ppk file to Connection->SSH->Auth->Private key file for authentication: in the putty client, press the „yes“ button, and we are logged in:

DONE
Appendix D: Sharing Files between Windows Host and Docker Host using NFS (temporary Solution)
Locally, I am running Windows 10 and I am using a Docker Host created by Vagrant as a virtual Machine on VirtualBox. I have not (yet) configured/installed Vagrant synced folders as described on this web page. Instead, I have set up an NFS server on Windows and map it within the Docker Host like follows:
Step D.1: Install winnfsd
Step D.2: On the Windows machine, create shared folder and start NFS daemon
On a DOS window (run „CMD“), run following commands (adapt the path to a path that is appropriate for you):
mkdir D:\NFS
winnfsd.exe D:\NFS
On Linux host, mount the folder:
$ sudo mkdir /mnt/nfs; sudo mount -t nfs -o 'vers=3,nolock,udp' LAPTOP-P5GHOHB7:/D/NFS /mnt/nfs
where LAPTOP-P5GHOHB7 is my Windows machine’s name and I have found the required options here (without the -o options, I had received a message mount.nfs: mount system call failed.).
Note that this solution is not permanent, since
- winnfsd.exe is running in foreground within the DOS Window
- after reboot of the Docker host, the mount command needs to be issued again
TODO: describe the permanent solution, which survives the reboot of the Windows host (need to evaluate different NFS servers, or run winnfsd.exe as a daemon) and the Docker host (via fstab file)
Summary
It is much simpler to spin up and down AWS virtual machine instances by using Terraform than by using Vagrant’s AWS plugin. The reason is that Terraform’s AWS API (unlike Vagrant) does not require SSH access to the instance. Therefore, we were not forced to adapt any SSH related security settings. It just works with Terraform.
To be fair: if the AWS instances are part of a development or staging environment, you will need SSH access to the virtual machine instances in most of the cases anyway. In those cases, a few additional steps are necessary, as shown in Appendix A and B. However, at the end, you only need to add a few lines to the Terraform template.
Adapting the default security rule in order to allow SSH access is the same as with Vagrant. Here, we have shown, how this is done manually and in part 2 we offer an automated way of performing this based on the AWS CLI.
The actual SSH access is more convenient with Vagrant with its nice vagrant ssh command.
All in all, the effort of automating AWS using Terraform requires equal or less effort than Vagrant. And we gain a more clearly laid out description of the infrastructure resources and more flexibility to apply the same set of resources on a mixed hybrid environment on OpenStack and the IaaS clouds like AWS, Azure and Google Cloud, among others.
Possible Next Steps
- Provisioning and assignment of your own security rules based on Terraform described here
- Test remote file upload and remote command execution (are SSH keys needed for this to be successful?)
- Upload/Synchronization of local images with AWS images

Liked the comparision between terraform and vagrant, particularly the point about vbox
Super article
Thanks 😉
Would you like to rate this article as the first user? The rating from 1 to 5 stars can be seen on the top of the page. Thanks a lot!