
NEW (2017-01-02): you now can immediately start with part 2 (this post) without going through the steps of part 1. A corresponding pre-installed Docker image is provided.
NEW (2017-01-05): I have added the Maven build path with a fat executable JAR file.
In this blog post, we will perform our first automated job within Jenkins, the most popular open source tool for Continuous Integration and Continuous Deployment. Like in part 1 of this blog series, we will start Jenkins in a Docker container and define and run a first task:
- download source code from GitHub
- Create a lean executable JAR file via Gradle
- Create a fat executable JAR file via Maven
At the end of this session, we will have learned how to download GitHub code and build a Java program (executable JAR file) on a push of a button.
This blog post series is divided into following parts:
What is Jenkins?
Jenkins is the leading open source automation server mostly used in continuous integration and continuous deployment pipelines. Jenkins provides hundreds of plugins to support building, deploying and automating any project.
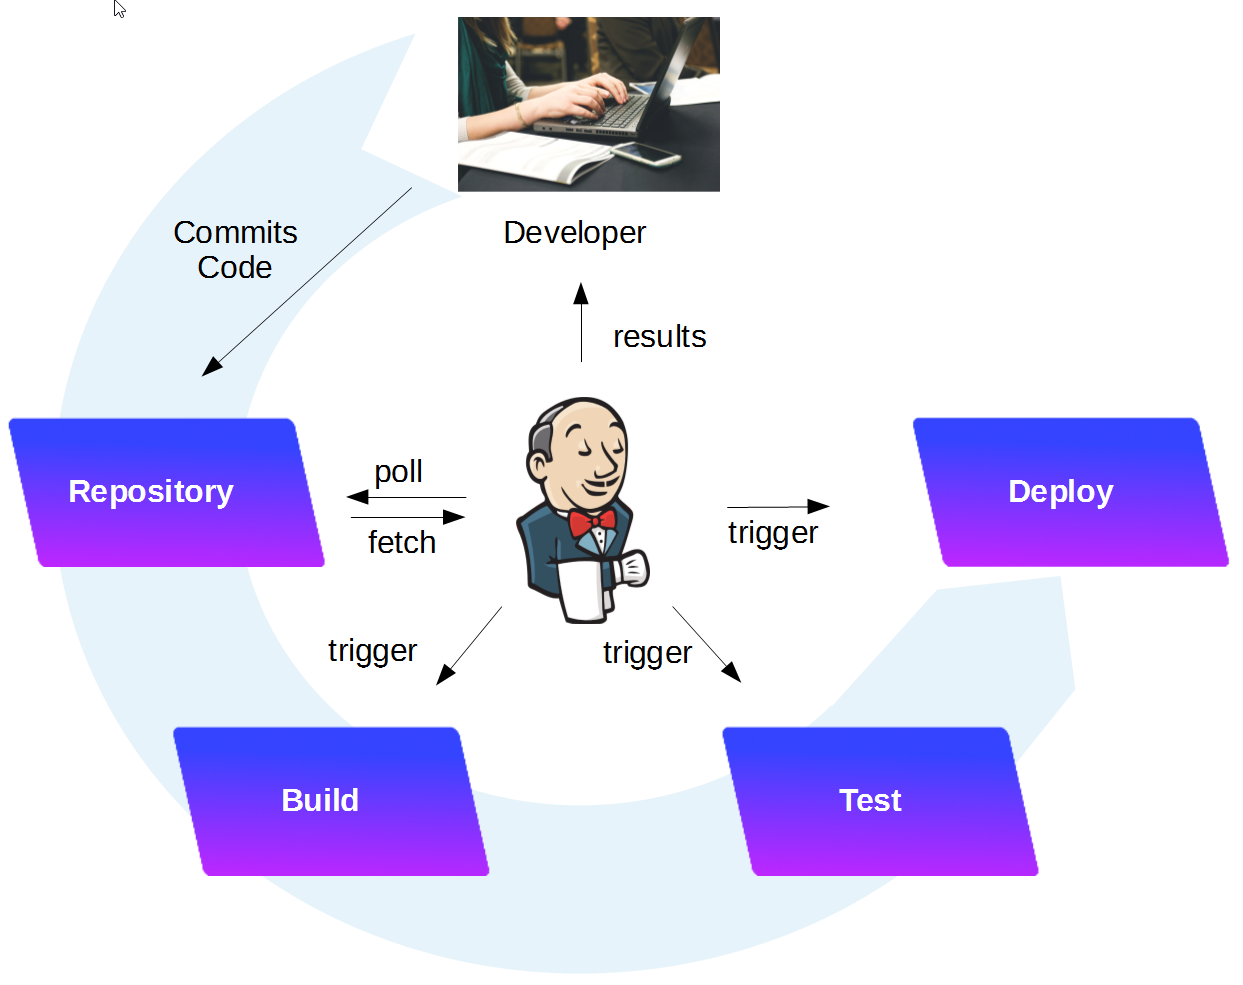
A typical workflow is visualized above: a developer checks in the code changes into the repository. Jenkins will detect the change, build (compile) the software, test it and prepare to deploy it on a system. Depending on the configuration, the deployment is triggered by a human person, or automatically performed by Jenkins.
For more information, see the introduction found in part 1 of this blog series.
Our first Jenkins Job
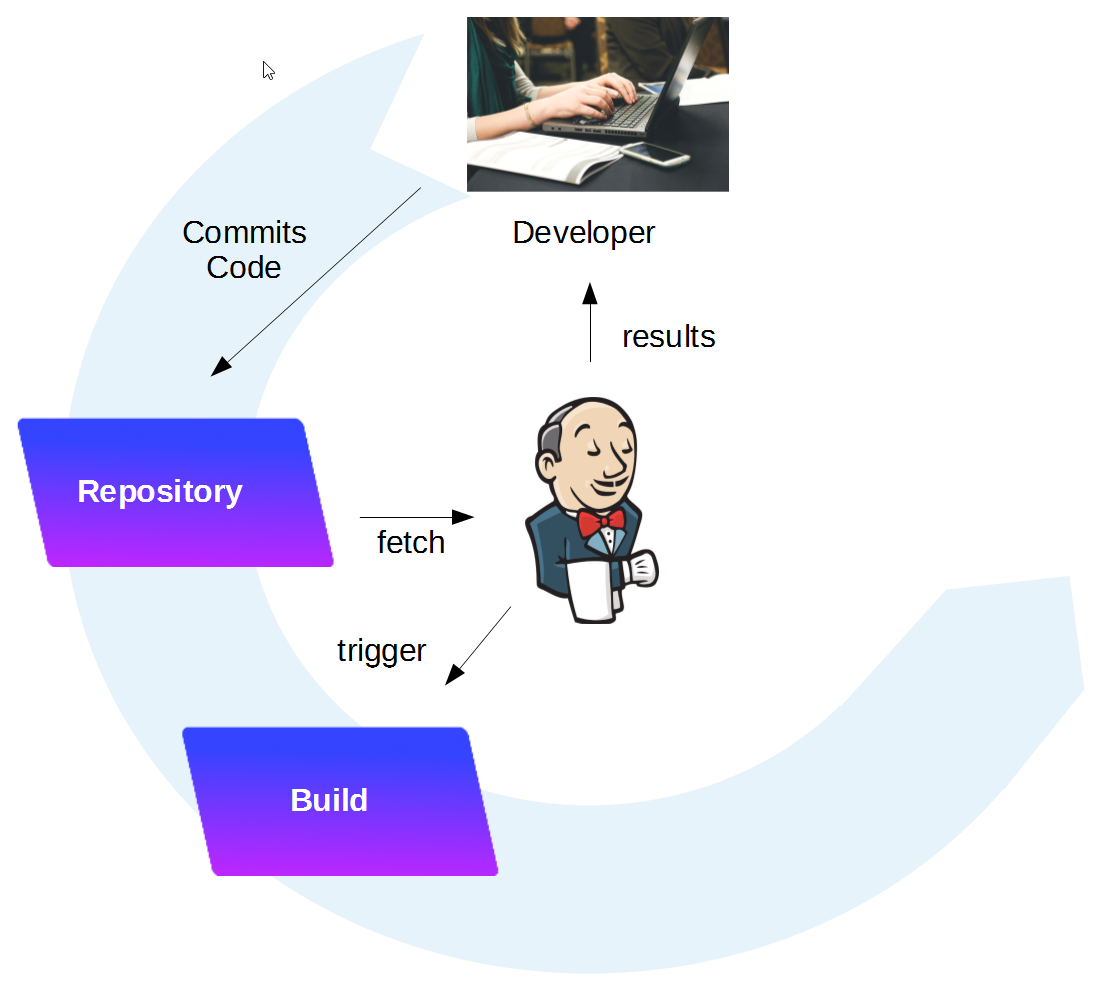
In this hello world, we will perform the first part of the typical build pipeline shown in the previous chapter, applied to a java hello world program:
- Upon a push of a button, download code from the GIT repository
- Build an executable jar from the java code
Tools used
- Vagrant 1.8.6
- Virtualbox 5.0.20
- Docker 1.12.1
- Jenkins 2.32.1
Prerequisites:
- Free DRAM overall >~ 4 GB
- A Docker Host is available. Perform Step 1 in Part 1 of this blog series, if you are in need of a Docker host.
Step 1: Start Jenkins in interactive Terminal Mode
Step 1.1: Make sure the TCP Port is unused
Make sure that port 8080 is unused on the Docker host. If you were following all steps in part 1 of the series, you might need to stop cadvisor:
(dockerhost)$ sudo docker stop cadvisor
Alternatively, you can alter the ports option below from -p8080:8080 to -p9090:8080, as an example.
Step 1.2: Alternative (A): If you have followed all steps in part 1 of this blog series, start Jenkins from the official Jenkins image
I assume that you have followed all steps in part 1 of the blog series. In this case, you have created a jenkins_home directory on you Docker host. All popular plugins are installed and an Admin user has been created. If the Jenkins container is not started already, we start it with the jenkins_home Docker host volume mapped to /var/jenkins_home (as we have done in part 1 of this blog series):
(dockerhost)$ cd <path_to_jenkins_home>
(dockerhost:jenkins_home)$ sudo docker run -it --rm --name jenkins -p8080:8080 -p50000:50000 -v`pwd`:/var/jenkins_home jenkins
Running from: /usr/share/jenkins/jenkins.war
...
--> setting agent port for jnlp
--> setting agent port for jnlp... done
Step 1.2: Alternative (B): You prefer to start from a pre-installed Jenkins Image
If you have not followed the steps in part 1, or if you prefer to start from a cleanly installed image, you also can start Jenkins from a cleanly installed Docker image like follows:
(dockerhost)$ sudo docker run -it --name jenkins -p8080:8080 -p50000:50000 oveits/jenkins_tutorial:part2_step1
Running from: /usr/share/jenkins/jenkins.war
...
--> setting agent port for jnlp
--> setting agent port for jnlp... done
Note that in alternative (B), all data is kept within /var/jenkins_home_local directory within the created container. For the case you want to save your work thereafter, I have not used the docker run remove option
--rm. This will give you the chance to stop and start the same container later. In addition, you can create your own image from the stopped container in order to retain the work.
Step 2: Open Jenkins in a Browser
Now we want to connect to the Jenkins portal. For that, open a browser and open the URL
<your_jenkins_host>:8080
In our case, Jenkins is running in a container and we have mapped the container-port 8080 to the local port 8080 of the Docker host. On the Docker host, we can open the URL.
localhost:8080
Note: In case of Vagrant with VirtualBox, per default, there is only a NAT-based interface and you need to create port-forwarding for any port you want to reach from outside (also the local machine you are working on is to be considered as outside). In this case, we need to add an entry in the port forwarding list of VirtualBox:
We have created this entry in part 1 already, but I have seen that the entries were gone again, which seems to be a VirtualBox bug. I have added it again now.

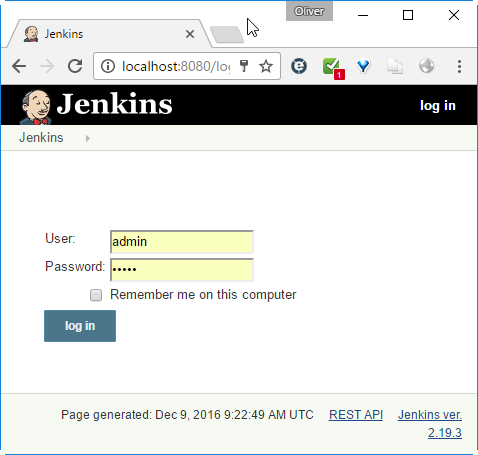
Log in with the admin account we have created in the last session:
Step 3: Alternative (a): Prepare Gradle Usage
If you later prefer to use Gradle instead of (or in addition to) Maven, you need to prepare its first usage. For Maven preparation, see Step 3, Alternative (b) below.
On this wiki page about the Gradle plugin we find that we need to configure Gradle first:
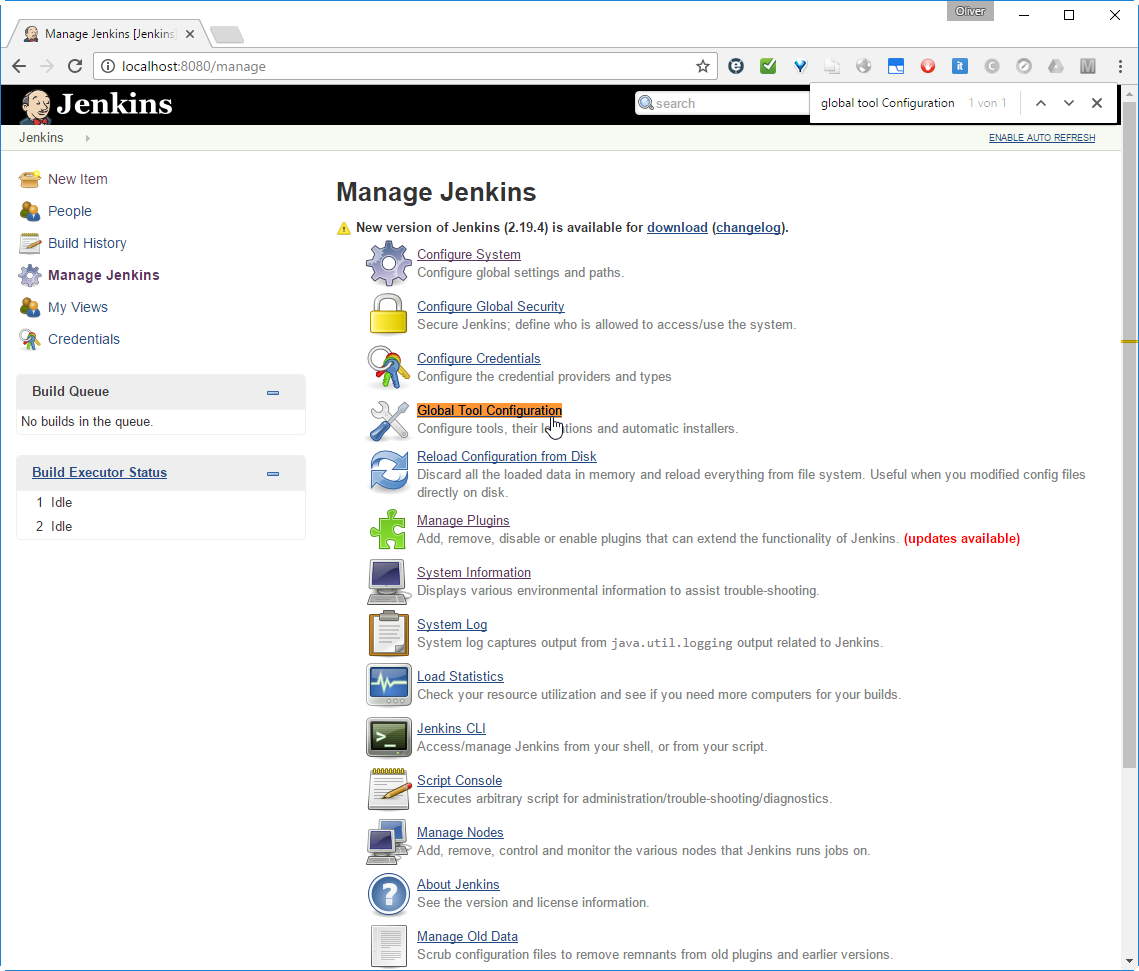
Goto Jenkins -> Manage Jenkins -> Global Tool Configuration (available for Jenkins >2.0)
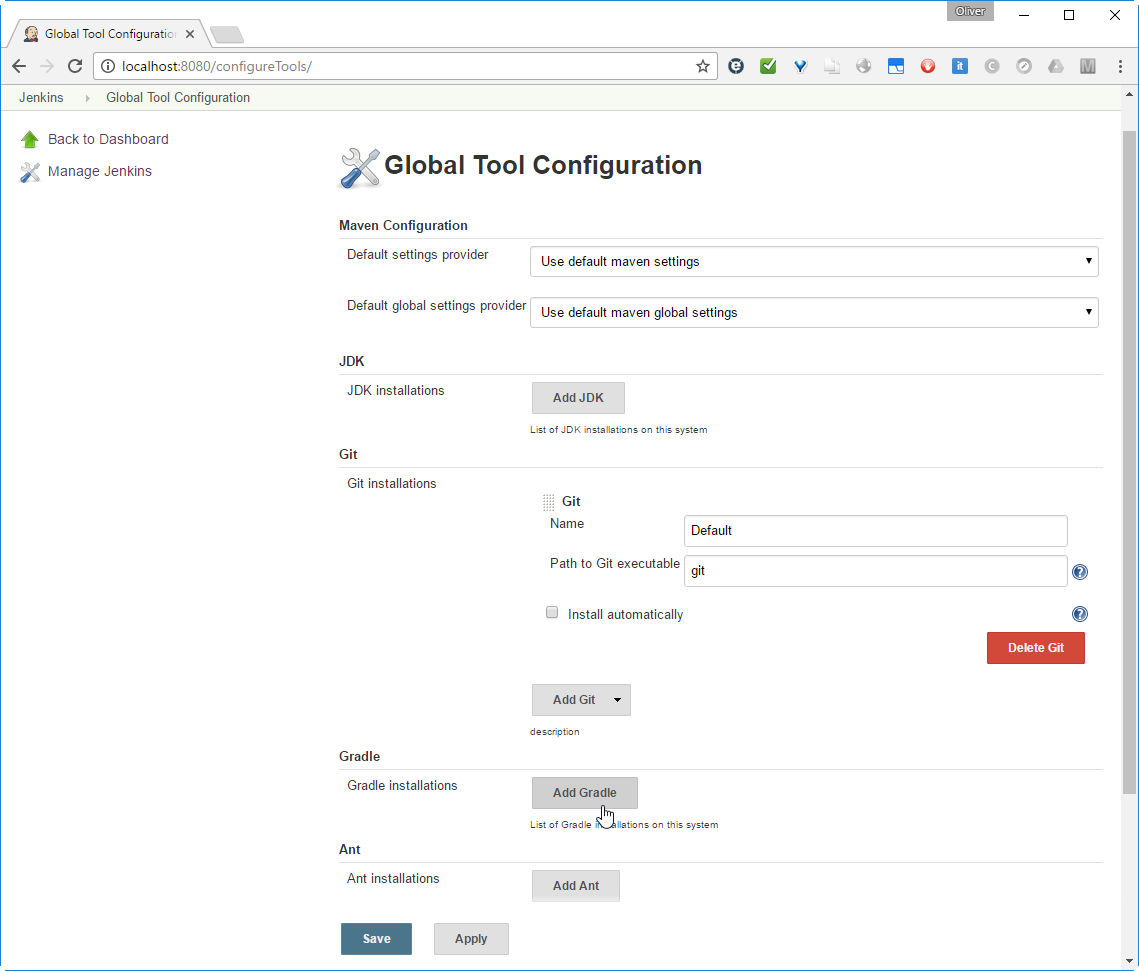
Scroll down to Gradle -> ![]()

-> choose Version (Gradle 3.2.1 in my case)
-> Add a name („Gradle 3.2.1“ in my case)
-> ![]()
Since we have checked „Install automatically“ above, I expect that it will be installed automatically on first usage.
Step 3: Alternative (b): Prepare Maven Usage
If you later prefer to use Maven instead of (or in addition to) Gradle, you need to prepare its first usage. For Gradle preparation, see Step 3, Alternative (a) above.
Goto Jenkins -> Manage Jenkins -> Global Tool Configuration (available for Jenkins >2.0)
Scroll down to Maven -> ![]()
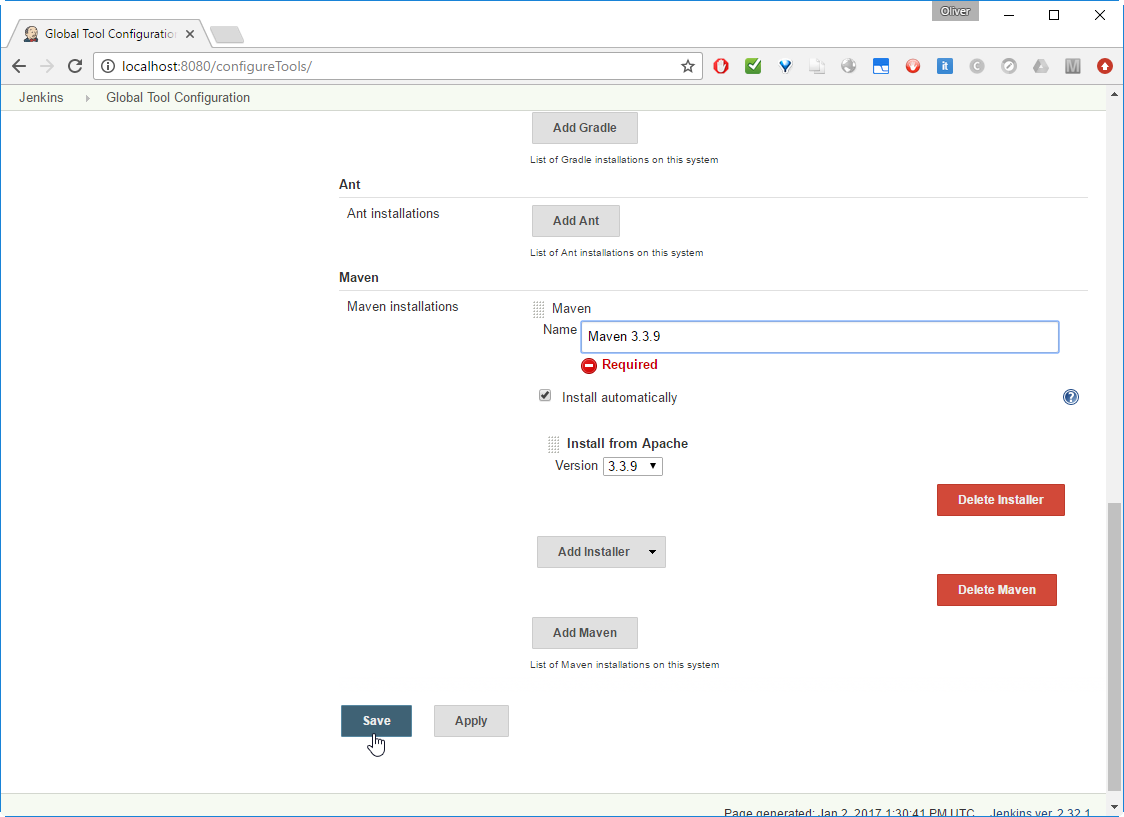
-> choose Version (3.3.9 in my case)
-> Add a name („Maven 3.3.9“ in my case)
-> ![]()
Since we have checked „Install automatically“ above, I expect that it will be installed automatically on first usage.
Step 4: Create a Job (Freestyle Project)
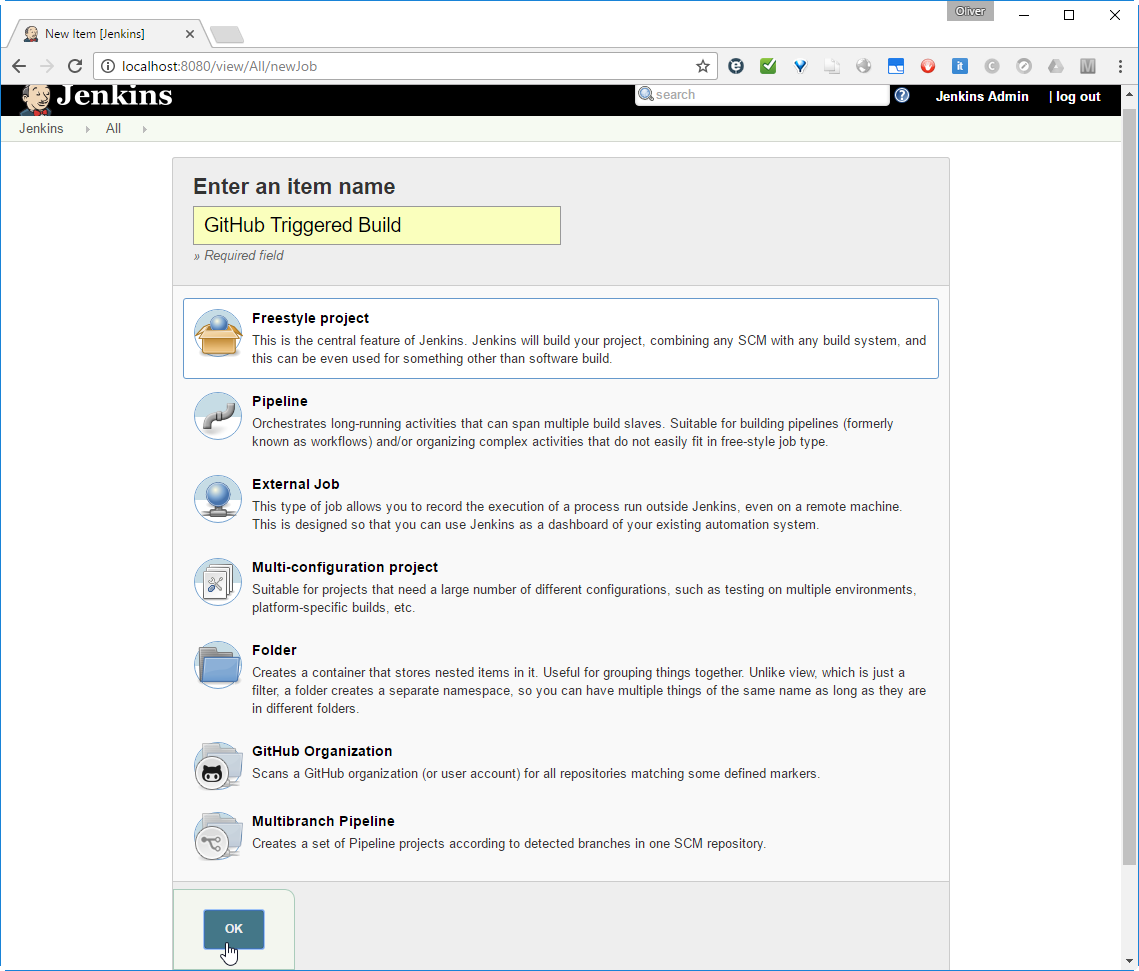
Step 4.1 Enter Name and Project Type
Either click on „create new jobs“ or on ![]() .
.
Now enter an Item name and click on Freestyle Project and OK:
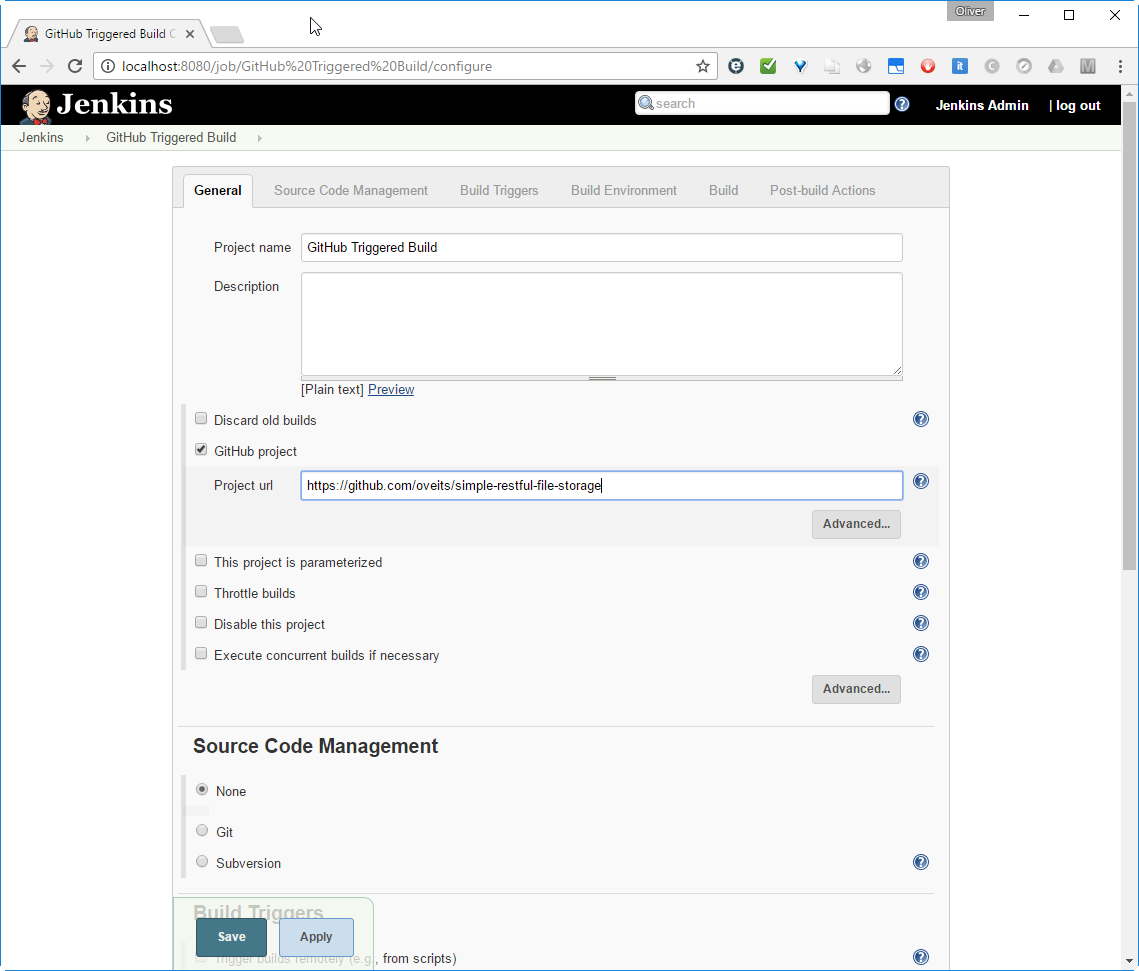
Step 4.2: Specify GitHub Project
Check „GitHub project“ and add the HTTPS GitHub URL. I have used a small Apache Camel project of mine that provides a simple restful file storage:
https://github.com/oveits/simple-restful-file-storage
Step 4.3 Configure Source Code Management
Under Source Code Management, we choose „Git“ and specify the GitHub repository a second time. If it is public, we do not enter the credentials for now:
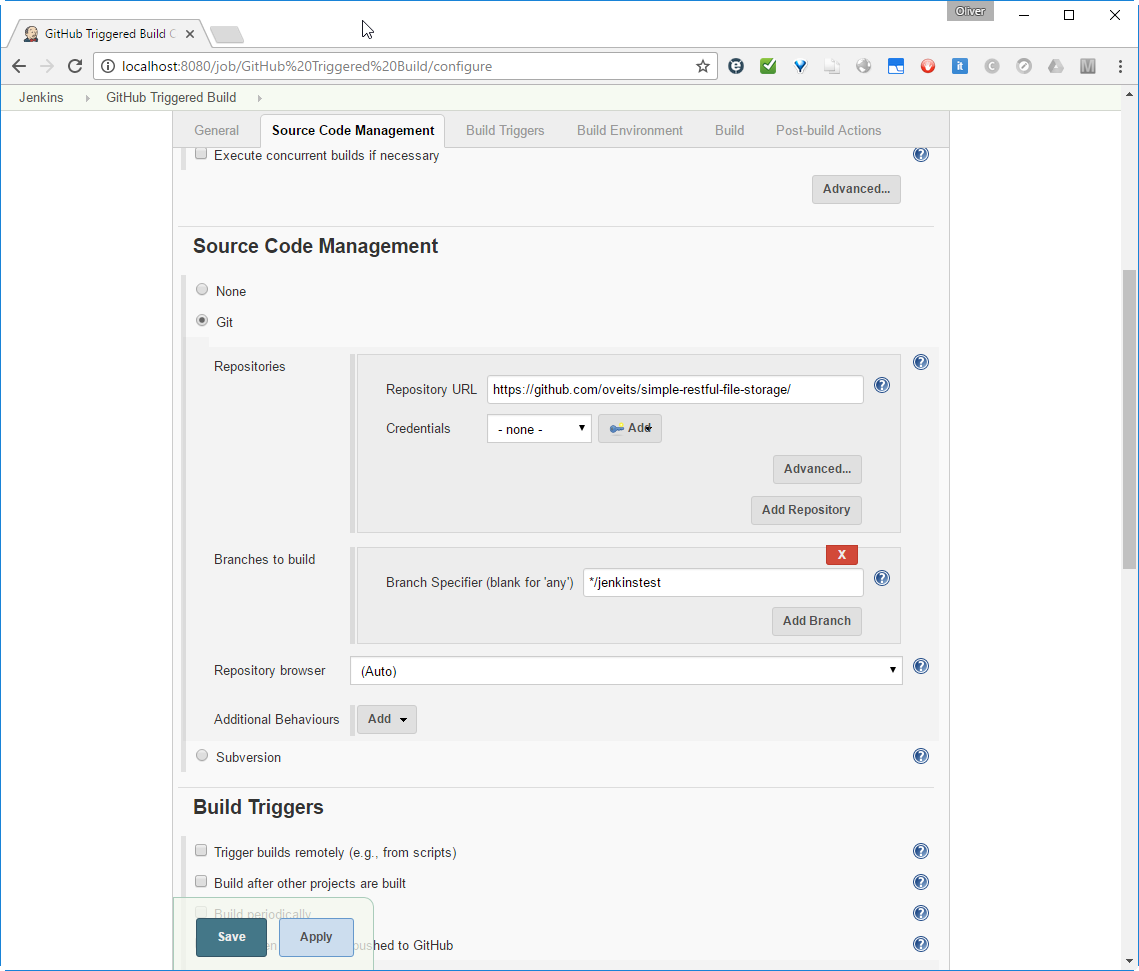
-> Click ![]()
Note also that I have chosen a branch different from the master branch („jenkinstest“). I have created this new branch in order to keep the master branch clean from any changes that might be needed to test Jenkins.
Step 4.4 Configure Build Triggers (postponed to part 3 of this blog post series)
For now, we will test only manual „build now“ triggers, so we do not need to specify any build triggers. Build triggers will be tested in the next blog post.
Step 4.5: Alternative (a): Configure Gradle Build
Prerequisite: For creation of an executable JAR, the file build.gradle in the project root directory must be prepared. See e.g.
- this blog post of mine how to create lean JAR files using Gradle.
- this blog post of Mkyong how to create a fat JAR file using Gradle (is easier to accomplish).
Here, we show how to build the project via Gradle. If you prefer to build via Maven, seee Step 4.5: Alternative (b): Configure Maven Build below.
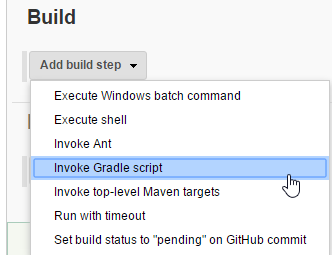
Here, we scroll down to „Build“ -> click ![]() -> „Invoke Gradle script“
-> „Invoke Gradle script“
Choose the Gradle version we have prepared in Step 3 and add the task „jar“:
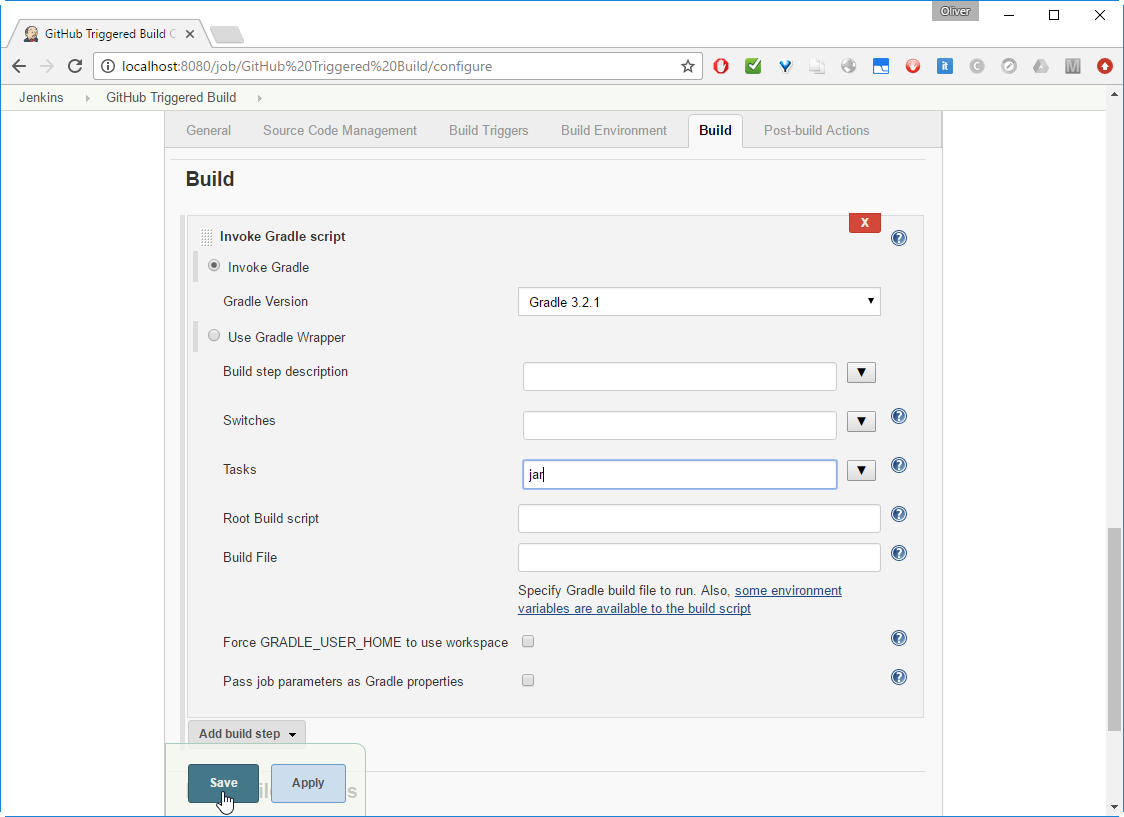
Note that keeping the (Default) Gradle version will not work, as long as this Default has not been defined. See Appendix A for details.
The Gradle task „jar“ will create our executable JAR file.
-> Click ![]() at the bottom left.
at the bottom left.
Step 4.5: Alternative (b): Configure Maven Build
Here, we show how to build the project via Maven. If you prefer to build via Gradle, seee Step 4.5: Alternative (a): Configure Graven Build above.
Here, we scroll down to „Build“ -> click ![]() -> „Invoke Maven script“
-> „Invoke Maven script“

Choose the Maven version we have prepared in Step 3 and specify the goal „package“:
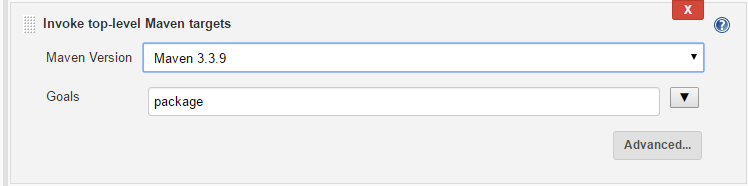
Note that keeping the (Default) Maven version will not work, as long as this Default has not been defined.
The Maven goal „package“will build our JAR file.
-> Click ![]() at the bottom left.
at the bottom left.
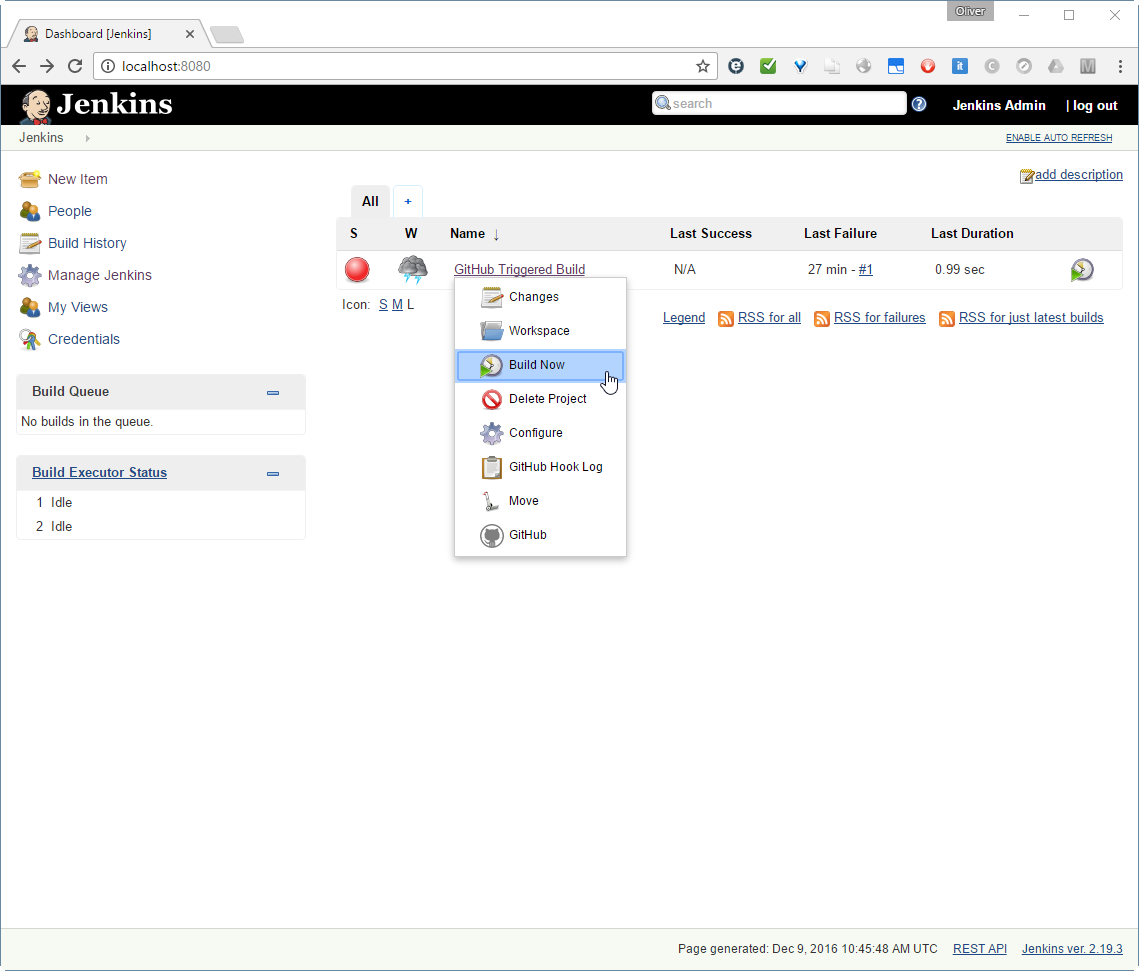
Step 5: Test manually triggered Build
We can trigger a build manually via Jenkins -> drop-down right of „GitHub Triggered Build“ -> Build Now.
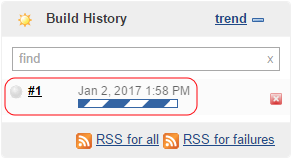
Click on #1 of the build history:
then on Console Output:
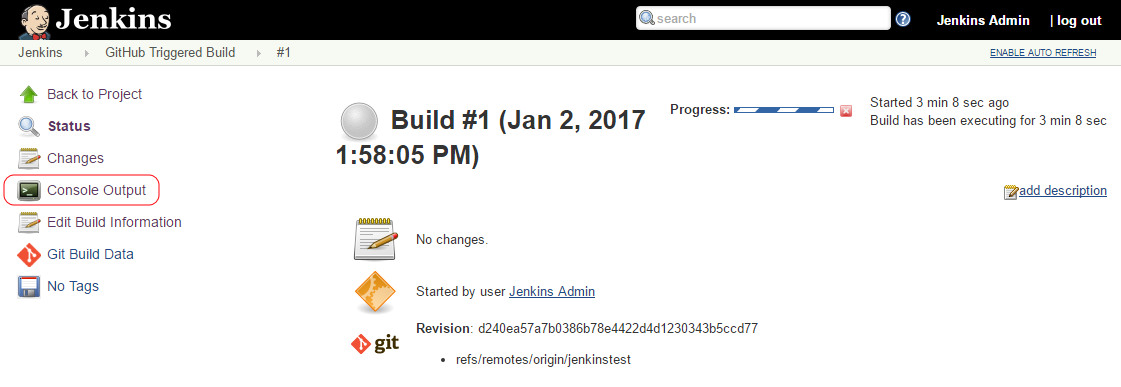
We can observe the console output e.g. by clicking on the build link in the build history, then clicking Console:
Output for step 5 in case of Gradle:
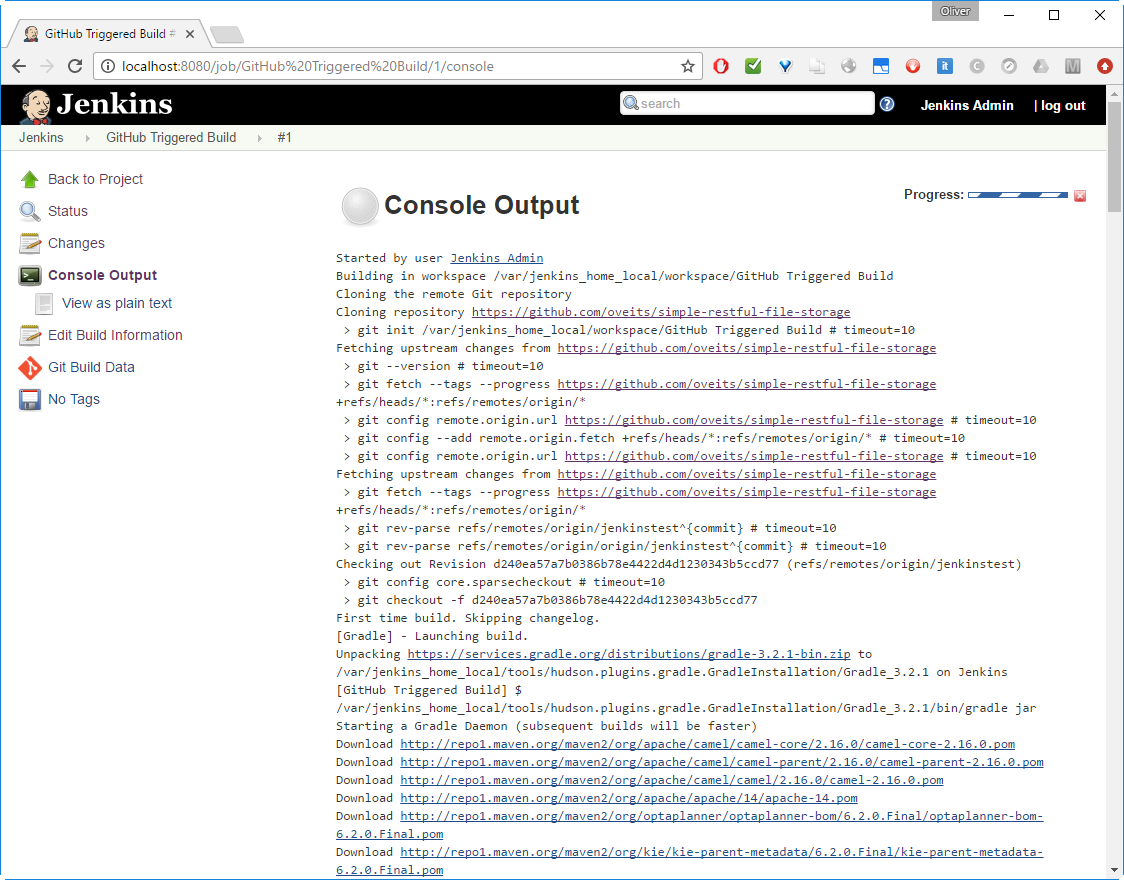
This may take a while (~11 min in my case with a 100Mbps Internet connection):
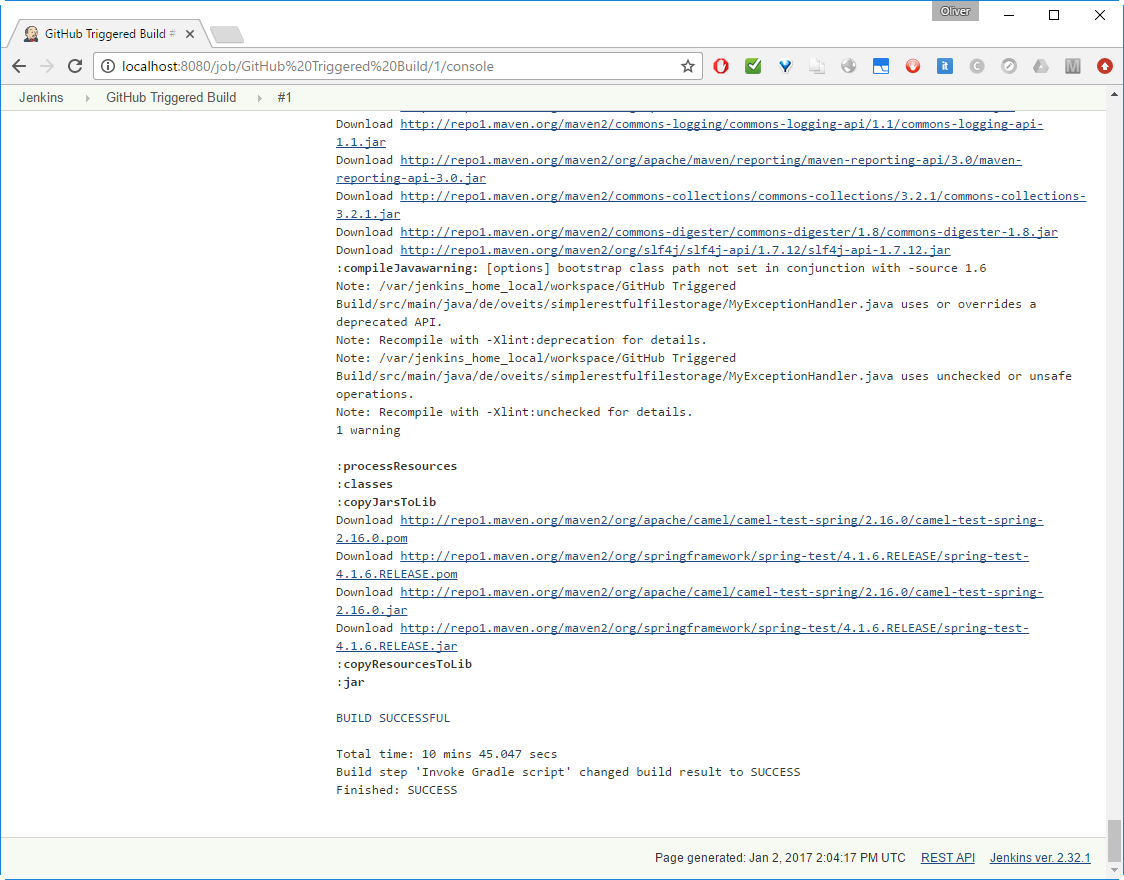
This was the first successful Jenkins triggered Git download and Gradle build.
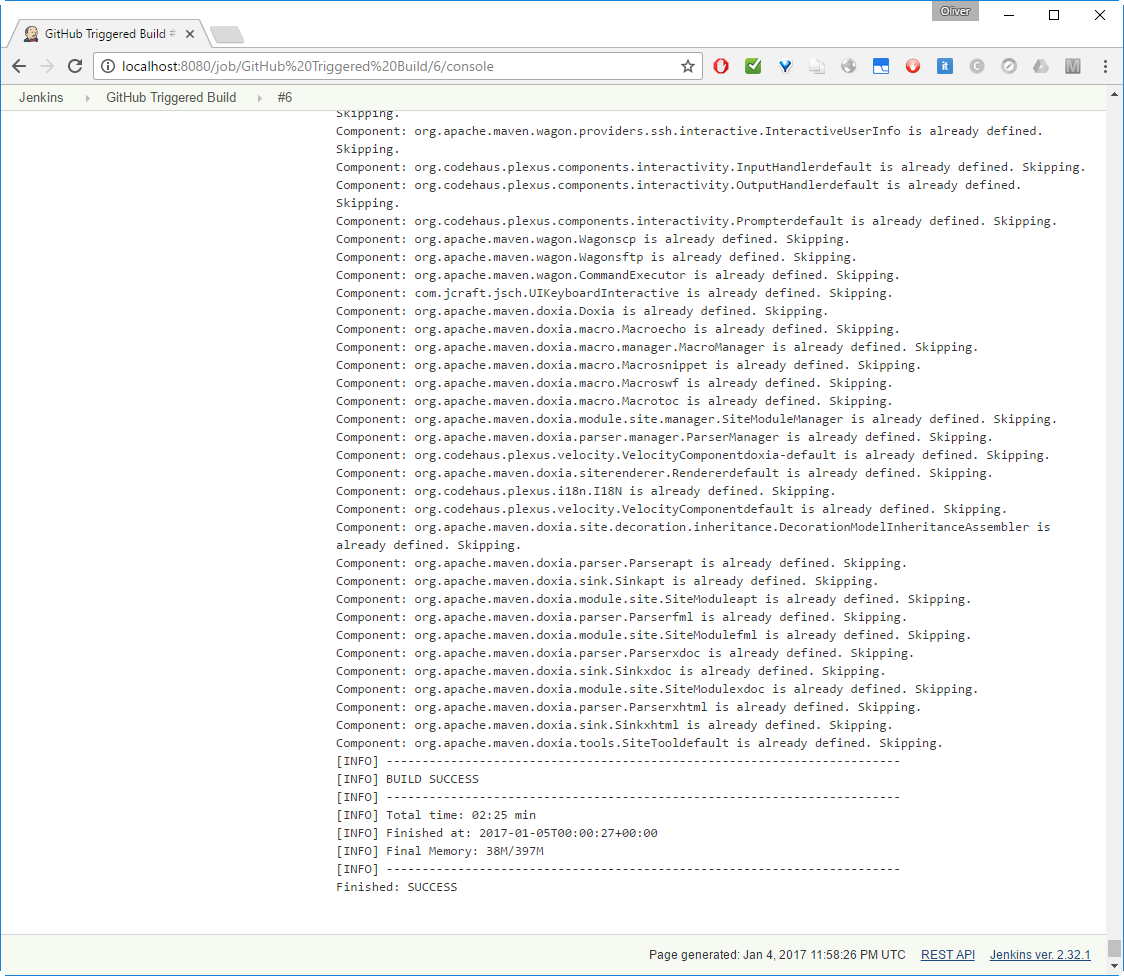
Output for step 5 in case of Maven:
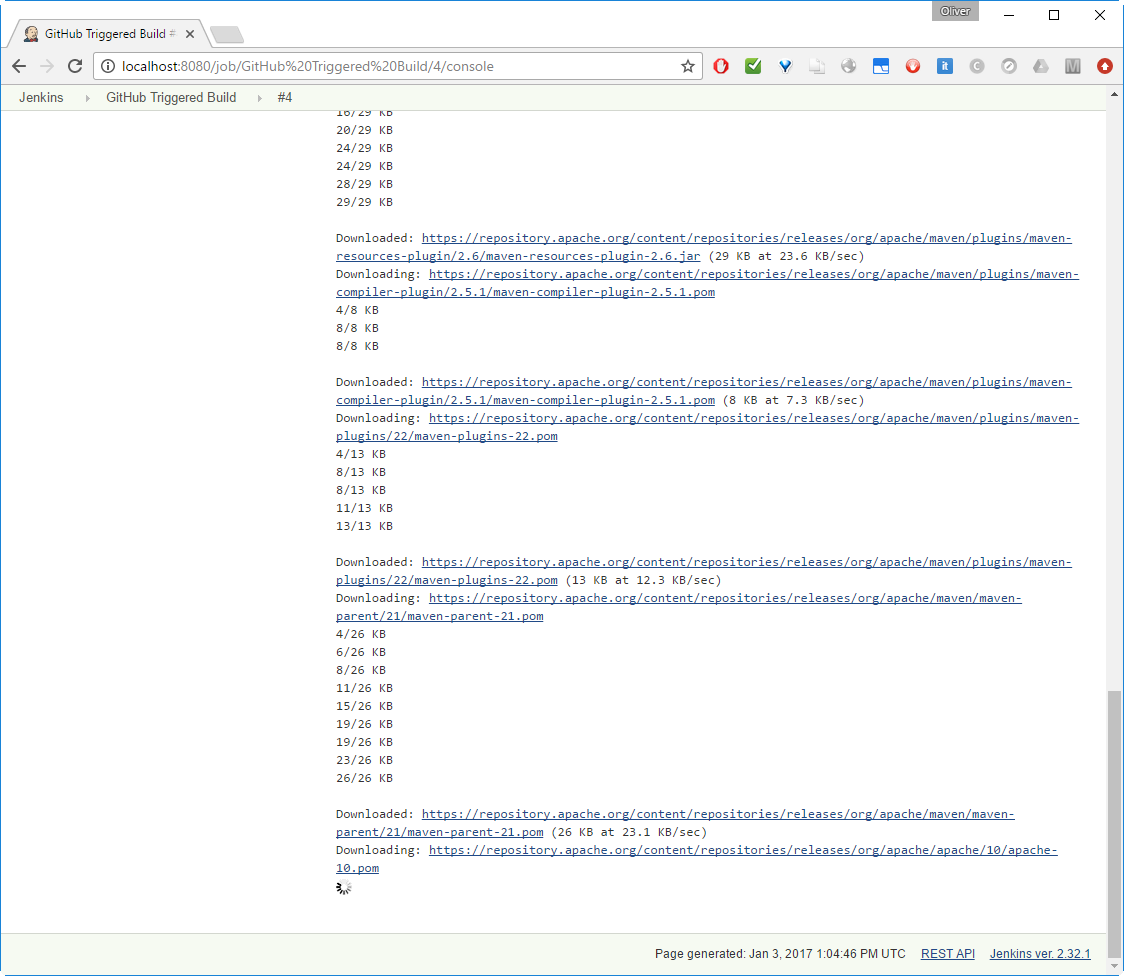
This may take a while (~8 min in my case with a 100Mbps Internet connection):
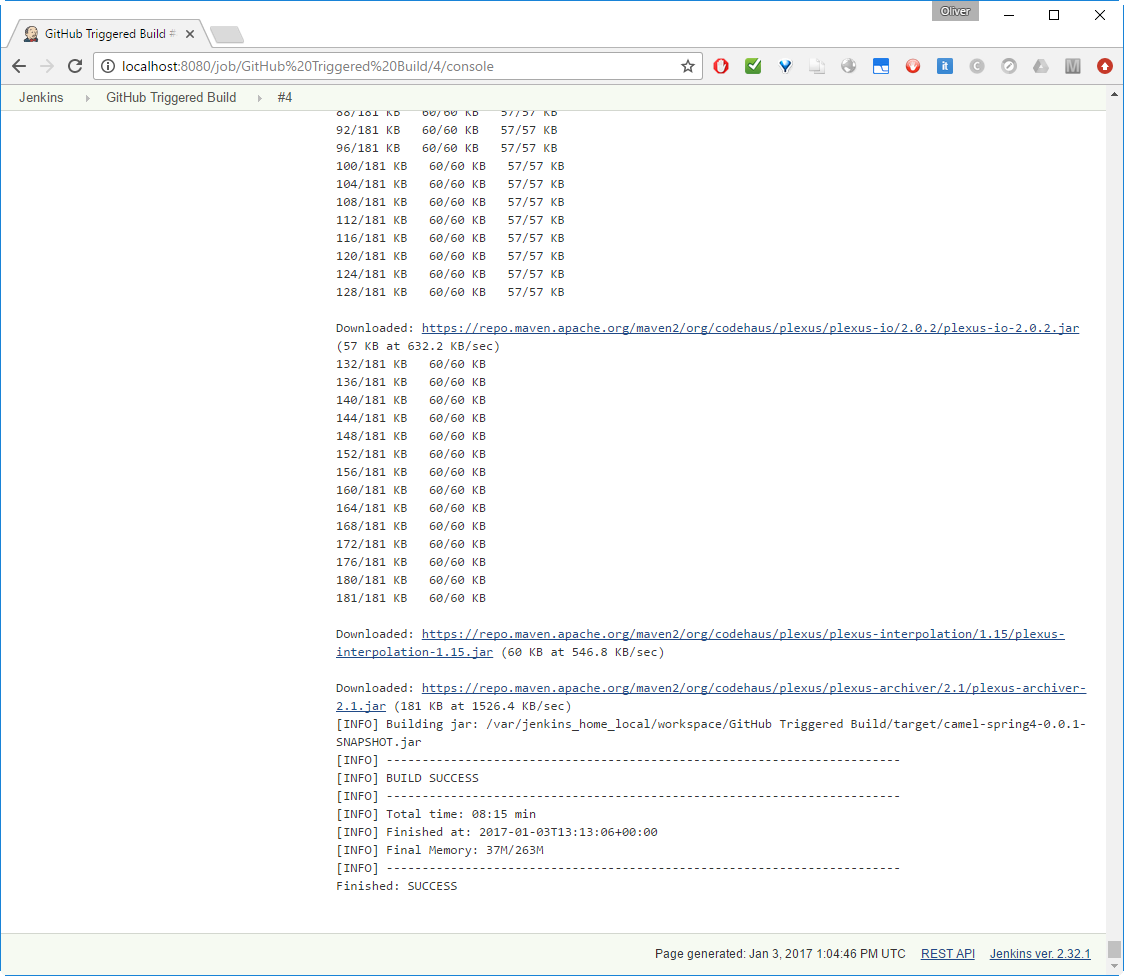
We can see in the output, that the JAR file was placed to
/var/jenkins_home_local/workspace/GitHub Triggered Build/target/camel-spring4-0.0.1-SNAPSHOT.jar
This was the first successful Jenkins triggered Git download and Maven build.
Step 5.2 (Optional): Measure Time Consumption for Gradle clean Build
Let us test again, whether the build is quicker the second time:
-> ![]()
-> ![]()
-> Add „clean“ Gradle task before „jar“ Gradle task:

-> ![]()
-> ![]()
-> ![]()
-> ![]()

This is showing that a clean build takes only ~6.4 sec, if all SW is downloaded already.
Step 6 (Gradle): Retrieve and start executable JAR File
For Maven, scroll down to Step 6 (Maven).
Let us see, where the executable jar file can be found:
For that, let us enter a bash session on the same Docker container:
(dockerhost)$ docker exec -it jenkins bash
jenkins@(container):/$ cd /var/jenkins_home_local/workspace/GitHub\ Triggered\ Build/build/libs/
In case you have started Jenkins with the jenkins image (Step 1.2, alternative (A)), the project will be found on
(container):$ cd /var/jenkins_home
In case you have started Jenkins with the oveits/jenkins_tutorial image (Step 1.2, alternative (B)), the project will be found on
(container):$ cd /var/jenkins_home_local
Then enter the Project. In my case „GitHub Triggered Build“
(container)$ cd 'GitHub Triggered Build'
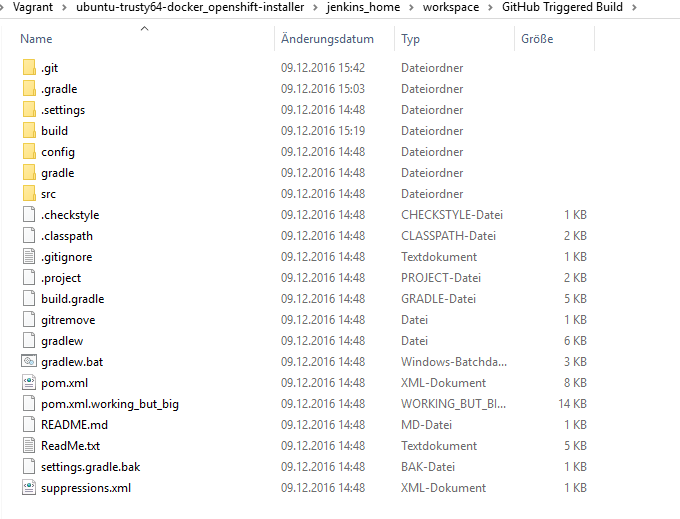
The jar is found on the path defined in build.gradle file (default: build/libs).
(container)$ cd build/libs
(container)$ ls
GitHub Triggered Build-0.0.1-SNAPSHOT.jar   META-INF   lib   log4j.properties   properties   templates
Now let us start the executable file:
$ java -jar 'GitHub Triggered Build-0.0.1-SNAPSHOT.jar'
[                          main] MainSupport                    INFO  Apache Camel 2.16.0 starting
0 [main] INFO org.apache.camel.main.MainSupport  - Apache Camel 2.16.0 starting
[                          main] DefaultTypeConverter           INFO  Loaded 196 type converters
1706 [main] INFO org.apache.camel.impl.converter.DefaultTypeConverter  - Loaded 196 type converters
...
2762 [main] INFO org.apache.camel.spring.SpringCamelContext  - Total 15 routes, of which 15 is started.
[                          main] SpringCamelContext             INFO  Apache Camel 2.16.0 (CamelContext: camel-1) started in 1.046 seconds
2765 [main] INFO org.apache.camel.spring.SpringCamelContext  - Apache Camel 2.16.0 (CamelContext: camel-1) started in 1.046 seconds
Yes. perfect, it seems to work.
You can stop the Apache Camel process by pressing <CTRL>-C in the console.
Step 6 (Maven): Retrieve and start executable JAR File
For Gradle, scroll up to Step 6 (Gradle).
In case of Maven, the location of the created JAR file can be seen at the end of the build console output:
[INFO] Building jar: /var/jenkins_home_local/workspace/GitHub Triggered Build/target/camel-spring4-0.0.1-SNAPSHOT.jar
[INFO] ------------------------------------------------------------------------
[INFO] BUILD SUCCESS
[INFO] ------------------------------------------------------------------------
[INFO] Total time: 08:15 min
[INFO] Finished at: 2017-01-03T13:13:06+00:00
[INFO] Final Memory: 37M/263M
[INFO] ------------------------------------------------------------------------
Finished: SUCCESS
Let us test the executable JAR:
(dockerhost)$ docker exec -it jenkins bash
jenkins@(container):/$ java -jar '/var/jenkins_home_local/workspace/GitHub Triggered Build/target/camel-spring4-0.0.1-SNAPSHOT.jar'
no main manifest attribute, in /var/jenkins_home_local/workspace/GitHub Triggered Build/target/camel-spring4-0.0.1-SNAPSHOT.jar
Okay, the jar is not executable yet. Let us change the POM file to create an executable fat JAR as described on Mkyong’s page:
$ git clone <repository-URL>
$ cd <repository-Dir>
$ vi pom.xml
Add the following text to the plugins-part of pom.xml:
cloning the git repository, adding the text below to the plugins part, adding pom.xml to git, commit the git change and push the change:
      <!-- Maven Assembly Plugin -->
      <plugin>
        <groupId>org.apache.maven.plugins</groupId>
        <artifactId>maven-assembly-plugin</artifactId>
        <version>2.4.1</version>
        <configuration>
          <!-- get all project dependencies -->
          <descriptorRefs>
            <descriptorRef>jar-with-dependencies</descriptorRef>
          </descriptorRefs>
          <!-- MainClass in mainfest make a executable jar -->
          <archive>
            <manifest>
            <mainClass>de.oveits.simplerestfulfilestorage.MainApp</mainClass>
            </manifest>
          </archive>

        </configuration>
        <executions>
          <execution>
          <id>make-assembly</id>
          <!-- bind to the packaging phase -->
          <phase>package</phase>
          <goals>
            <goal>single</goal>
          </goals>
          </execution>
        </executions>
      </plugin>
For other projects, you will need to adapt the blue part above.
Then:
$ git add pom.xml
$ git commit -m "Maven creates fat executable JAR file now"
$ git push
Now again, let us build the project:
-> ![]()
-> ![]()
-> ![]()
Now there are many downloads, and it takes a while:
After ~2.5 minutes, it is ready:
And we can find and run the new fat JAR file on the Docker container:
(dockerhost)$ docker exec -it jenkins bash
(container) $ ls -ltr '/var/jenkins_home_local/workspace/GitHub Triggered Build/target'
total 57680
drwxr-xr-x 3 jenkins jenkins     4096 Jan  3 13:12 generated-sources
drwxr-xr-x 6 jenkins jenkins     4096 Jan  3 13:12 classes
drwxr-xr-x 3 jenkins jenkins     4096 Jan  3 13:12 generated-test-sources
drwxr-xr-x 3 jenkins jenkins     4096 Jan  3 13:12 test-classes
drwxr-xr-x 2 jenkins jenkins     4096 Jan  3 13:13 maven-archiver
-rw-r--r-- 1 jenkins jenkins    44657 Jan  4 23:58 camel-spring4-0.0.1-SNAPSHOT.jar
drwxr-xr-x 2 jenkins jenkins     4096 Jan  5 00:00 archive-tmp
-rw-r--r-- 1 jenkins jenkins 58988354 Jan  5 00:00 camel-spring4-0.0.1-SNAPSHOT-jar-with-dependencies.jar
Here, we can see, that a large JAR file with all dependencies has been created. Now let us try to execute it:
(container) $ java -jar '/var/jenkins_home_local/workspace/GitHub Triggered Build/target/camel-spring4-0.0.1-SNAPSHOT-jar-with-dependencies.jar'
17/01/05 00:07:50 INFO main.MainSupport: Apache Camel 2.16.0 starting
0 [main] INFO org.apache.camel.main.MainSupport  - Apache Camel 2.16.0 starting
...
17/01/05 00:07:52 INFO spring.SpringCamelContext: Total 15 routes, of which 15 is started.
2420 [main] INFO org.apache.camel.spring.SpringCamelContext  - Total 15 routes, of which 15 is started.
17/01/05 00:07:52 INFO spring.SpringCamelContext: Apache Camel 2.16.0 (CamelContext: camel-1) started in 0.876 seconds
2422 [main] INFO org.apache.camel.spring.SpringCamelContext  - Apache Camel 2.16.0 (CamelContext: camel-1) started in 0.876 seconds
Yes. perfect, it seems to work.
You can stop the Apache Camel process by pressing <CTRL>-C in the console.
Step 7: How to get the JAR file from the Jenkins Container to the Docker Host in case you have mapped the jenkins_home
In case, you have taken the alternative (A) way or starting Jenkins with your own jenkins_home directory on the Docker host on step 1.2, you can retrieve the JAR file from the project file without copying the file from the container to the Docker host. In my case, the project folder is located on
<jenkins_home>/workspace/GitHub Triggered Build
And from there, the default location for Gradle to place the created JAR file is on ‚build/libs‘ as discussed here:
Step 7: Alternative (B) Retrieve JAR File in case jenkins_home is located on the Container only
In case, you have taken the alternative (B) way or starting Jenkins with the jenkins_home directory on the Docker container on step 1.2, you need to copy the JAR file from the container to another location. The easiest way to do so is to copy it via
(dockerhost) $ docker cp <containerId>:/file/path/within/container /host/path/target
The container ID can be seen via docker ps:
(dockerhost) $ docker ps | grep jenkins
9159bedefbee        oveits/jenkins_tutorial:part2_step1   "/start.sh"              9 hours ago         Up 9 hours          0.0.0.0:8080->8080/tcp, 0.0.0.0:50000->50000/tcp   jenkins
Now we can copy the jar file to the Docker host via:
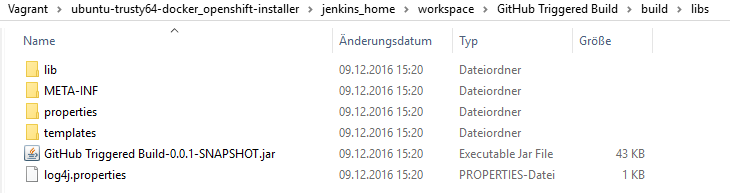
(dockerhost) $ docker cp '9159bedefbee:/var/jenkins_home_local/workspace/GitHub Triggered Build/build/libs/GitHub Triggered Build-0.0.1-SNAPSHOT.jar' '/vagrant/GitHub Triggered Build-0.0.1-SNAPSHOT.jar'Since our Docker host is a Vagrant virtual machine, we have chosen a destination on the /vagrant folder, since this folder is synchronized with the Vagrant host machine per default. This way, we can get access to the JAR file on the host machine without further ado:
Appendix A: Error Message „Cannot run gradle“
Problem:
If the Gradle plugin is installed, but not configured according to step 3 above, you will get following build error:
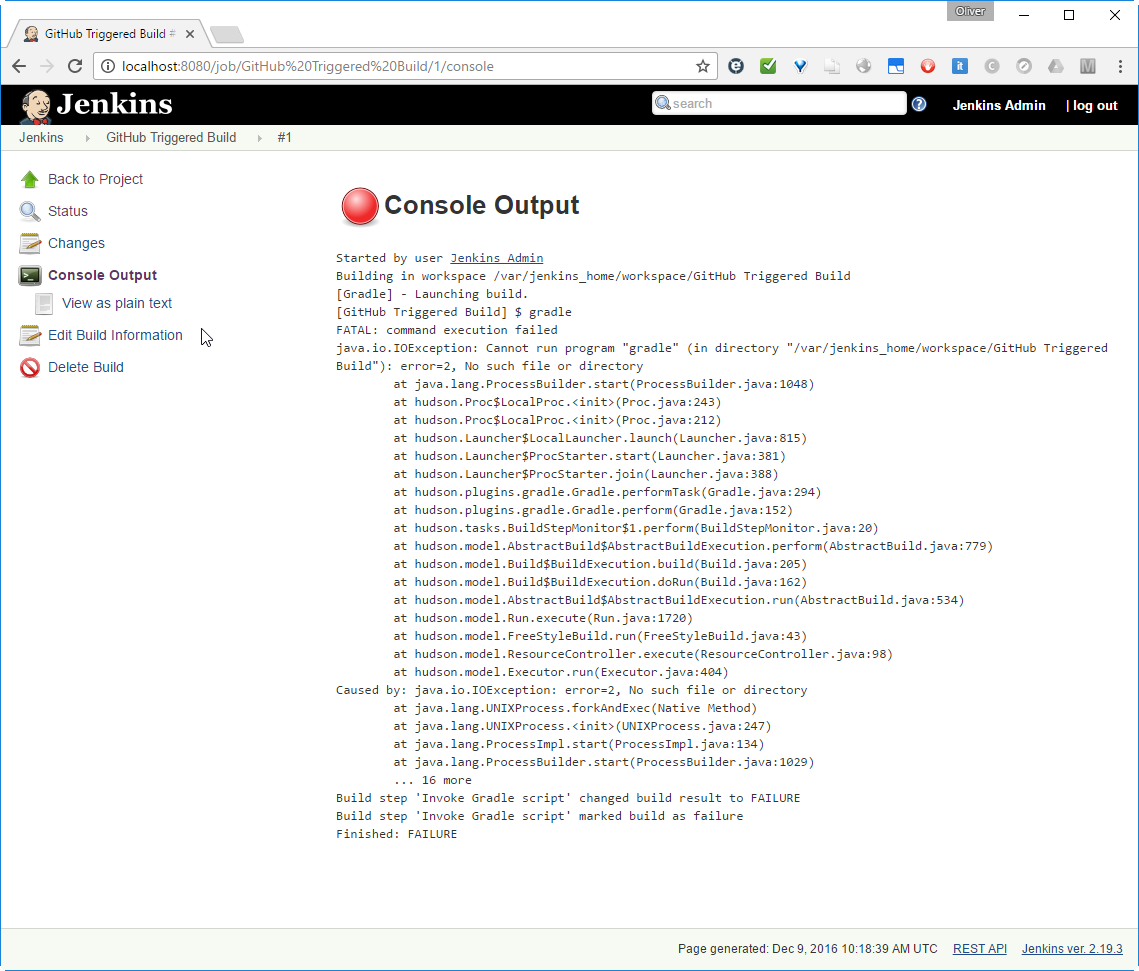
Resolution:
Perform step 3: Prepare Gradle Usage (alternative (a), see above)
Appendix B: How I have created the Image for Part 2 (oveits/jenkins_tutorial:part2_step1)
Note: This appendix is for reference only and describes, how I have created the Docker images for usage in Part 2 (Part 3, …). You do not need to follow those steps.
The images like
jenkins_tutorial:part2are designed for users, who want to skip steps performed in part 1 and directly start with step 1 in part 2. Similarly with images likejenkins_tutorial:part3_step1,jenkins_tutorial:part4_step1, …
My target is to create an Image that has the jenkins_home directory stored in the container. The directory /var/jenkins_home cannot be saved in the container, since it is defined as external volume (if I run a docker commit, all changes in /var/jenkins_home are ignored, even if it is not mapped to a Docker host volume).
Since I do not know how to remove the VOLUME label from /var/jenkins_home in the official jenkins image, the only solution I see is to use a different Jenkins home directory within the container/image.
Step B.1 Start Container from official Jenkins Image
sudo docker run -it --name jenkins_tutorial -p8080:8080 -p50000:50000 -eJENKINS_HOME="/var/jenkins_home_local" --entrypoint=bash jenkins
Step B.2: Create new home Directory
On another terminal determine the container ID (with docker ps).
Assuming that running container has ID 84ec9c83c1ce, I log into the container as root (see this Stackoverflow page), even though we do not know the root password:
(dockerhost)$ sudo docker exec -u 0 -it 84ec9c83c1ce bash
Inside the container, we now can create the new home directory and assign it to the user „jenkins“
(container)# mkdir /var/jenkins_home_local
(container)# chown jenkins:jenkins /var/jenkins_home_local
Step B.3: Create new Entrypoint Startup Script
Now we can create a new entrypoint startup script as follows:
(container)# echo '#!/bin/bash' > /start.sh
(container)# echo 'export JENKINS_HOME=/var/jenkins_home_local' >> /start.sh
(container)# echo '/bin/tini -- /usr/local/bin/jenkins.sh' >> /start.sh
(container)# chmod +x /start.sh
(container)# exit
Step B.4: Save Container into an Image
With the following command, we can save the container as a Docker image:
(dockerhost)$ sudo docker commit e82d5277431d jenkins_local
Step B.5: Change Entrypoint
We now change the entrypoint to run the start.sh script we have created above. For that, we run a new container with the entrypoint and save it as image again.
(dockerhost)$ sudo docker run -it --name jenkins_tutorial -p8080:8080 -p50000:50000 -eJENKINS_HOME="/var/jenkins_home_local" --entrypoint="/start.sh" jenkins_local
Step B.6: Save Container as Docker Image
We now can save the container as a Docker image with the new entrypoint. For that, we can issue a docker ps command to find the container ID.
Assuming that the new container ID is 5e82d8360b3e, we can save the container as an image with the following command. With the docker push commands, we save the image to Docker Hub (here as version 0.4 and as an implicit latest tag):
(dockerhost)$ docker commit 5e82d8360b3e oveits/jenkins_tutorial:part1_step1_v0.4
(dockerhost)$ docker tag jenkins_local oveits/jenkins_tutorial:part1_step1
(dockerhost)$ docker push oveits/jenkins_tutorial:part1_step1_v0.4
(dockerhost)$ docker push oveits/jenkins_tutorial:part1_step1
Step B.7: Create Image for Part 2 (Part 3, …, Part X)
For creating the image oveits/jenkins_tutorial:part1_step1 for usage on part2, we
- start image
oveits/jenkins_tutorial:part1_step1 - perform all steps described on part 1
- save (commit) the changes to image
oveits/jenkins_tutorial:part2_step1
TODO: the steps of Appendix B should be automated by using a Dockerfile and saving start.sh and the Dockerfile to Github.
Appendix C: docker exec produces error „unable to find user jenkins: no matching entries in passwd file“
Symptoms:
The images I have created in Appendix B can be started and will run inside as the user „jenkins“. However, if the container is running and you want to create a new parallel bash session like so:
(dockerhost)$ docker exec -it 9159bedefbee bash
unable to find user jenkins: no matching entries in passwd file
Here, I was assuming that the Docker container ID is 9159bedefbee.
The error message is misleading, since I can show that the passwd file contains a jenkins user by entering as root:
(dockerhost)$ docker exec -u 0 -it 9159bedefbee bash
root@9159bedefbee:/# grep jenkins /etc/passwd
jenkins:x:1000:1000::/var/jenkins_home:/bin/bash
Workaround:
You can run an exec session as user „jenkins“ by specifying the user ID 1000:
(dockerhost)$ docker exec -u 1000 -it 9159bedefbee bash
jenkins@9159bedefbee:/$
Summary
In this blog post we have performed following tasks:
- Started Jenkins in a Docker container
- Created a project
- Configured the project with Git and Gradle information
- Manually triggered a build
- Jenkins has downloaded the Git repository,
- started Gradle build and performed the tasks we have configured in the project configuration
- Searched for the executable JAR file on the Jenkins server and started the JAR file successfully from command line
In order to avoid any compatibility issues with the java version on the host, we have run Jenkins in a Docker container. In order to better see what happens under the hood, we have chosen to run the Docker container in interactive terminal mode. While it was a little bit confusing that the GitHub repository had to be specified twice, everything was working fine, once the Source code management was configured correctly
Further Reading:
- Part 1 of this Series: Installation and Configuration of Jenkins, loading plugins
- Part 3 of this Series: Periodic and automatically triggered Builds
- Jenkins Homepage
- Jenkins GitHub Tutorial on YouTube
- Jenkins for Beginners series on YouTube
- Tutorialspoint’s Jenkins Tutorial for absolute Beginners

5 comments