
Today, we will make sure that Jenkins will detect a code change in the software repository without manual intervention. We will show two methods to do so:
- Periodic Builds via Schedulers: Jenkins periodically asks the software repository for any code changes
- Triggered Builds via Webhooks: Jenkins is triggered by the software repository to perform the build task
We will see that the triggering build processes is more challenging to set up, but has quite some advantages in terms of economics and handling, once it is set up properly. See also the Summary at the end of this post.
This blog post series is divided into following parts:
What is Jenkins?
Jenkins is the leading open source automation server mostly used in continuous integration and continuous deployment pipelines. Jenkins provides hundreds of plugins to support building, deploying and automating any project.
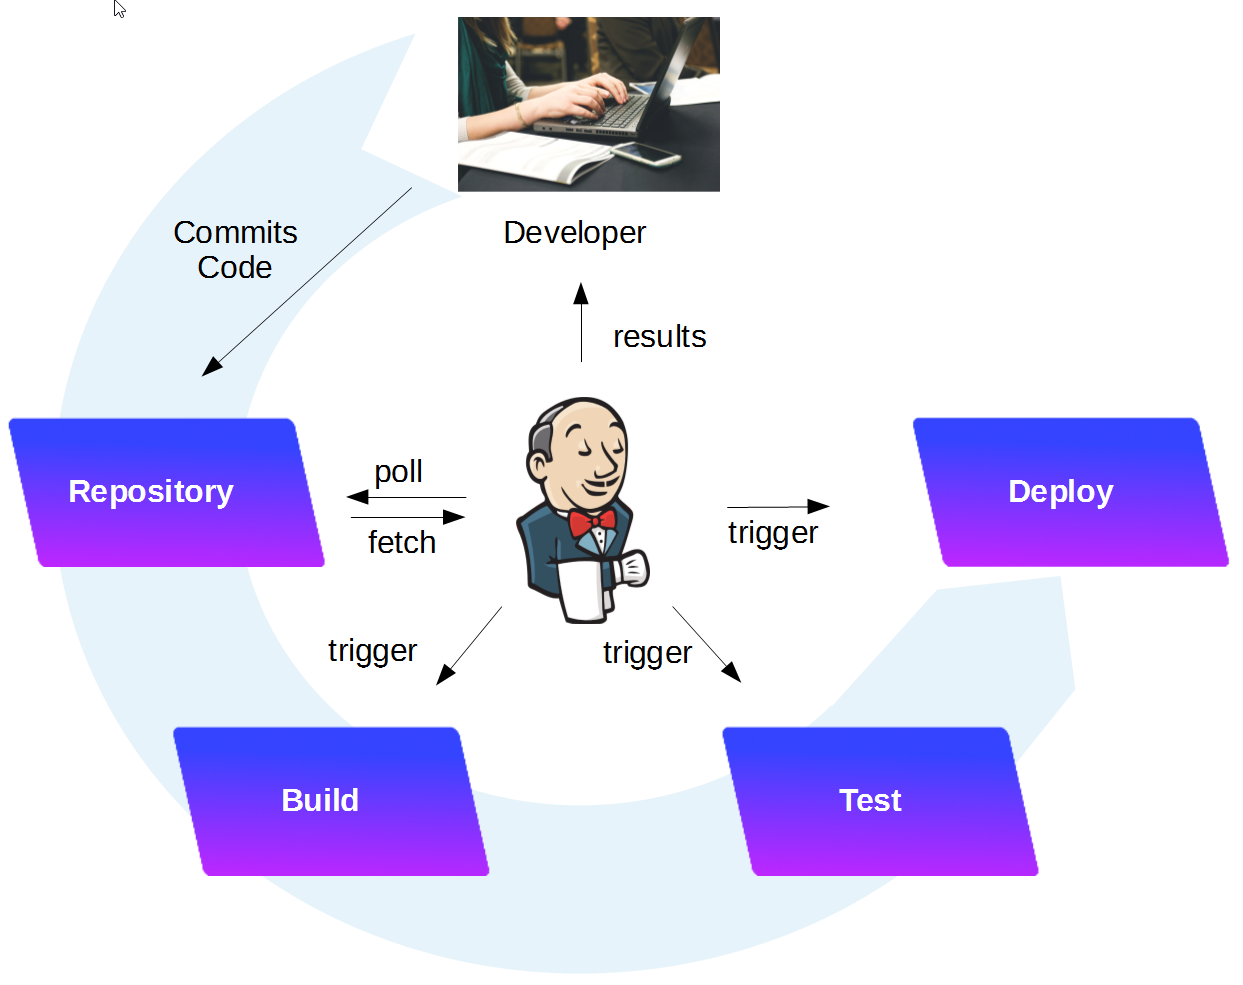
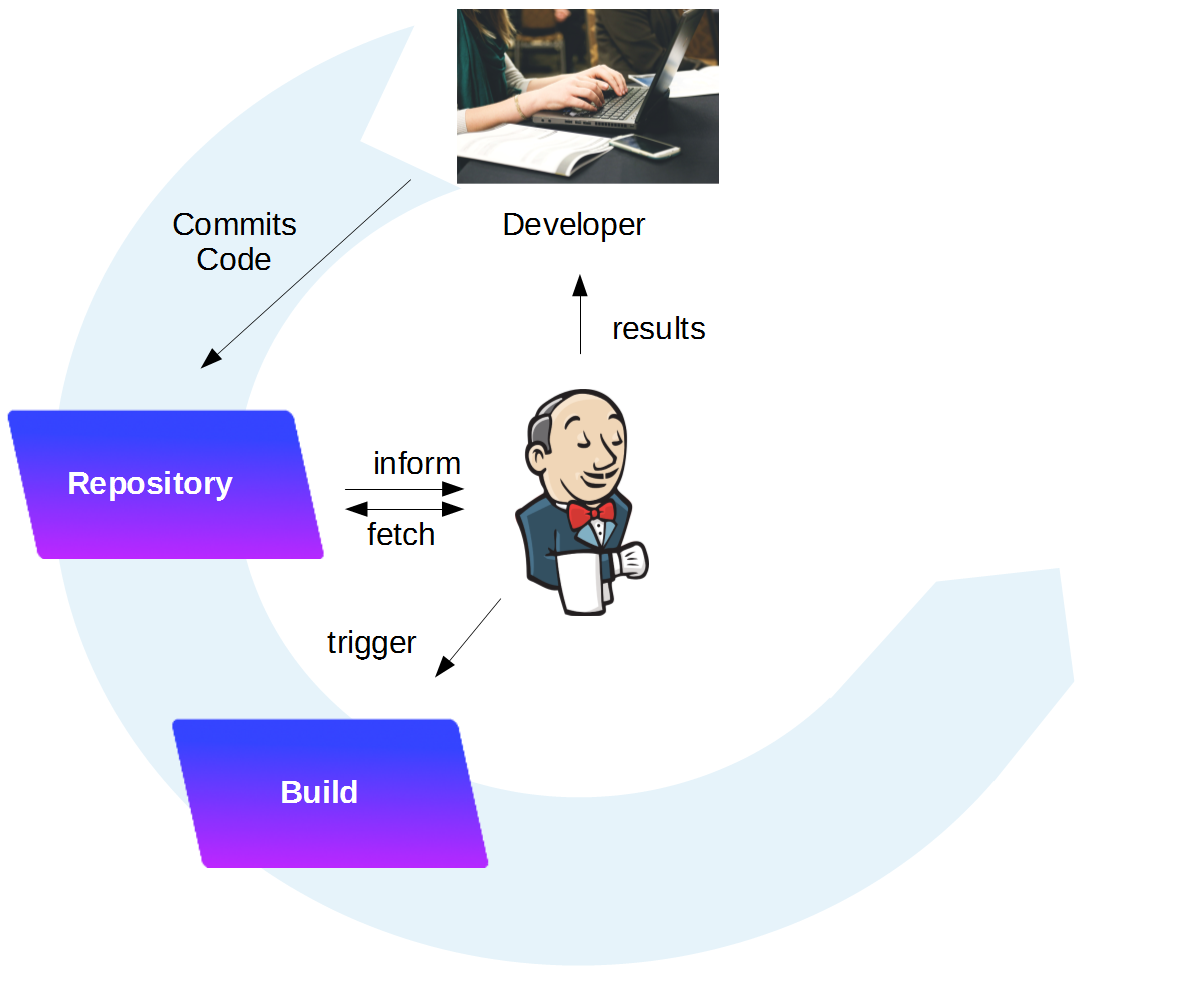
A typical workflow is visualized above: a developer checks in the code changes into the repository. Jenkins will detect the change, build (compile) the software, test it and prepare to deploy it on a system. Depending on the configuration, the deployment is triggered by a human person, or automatically performed by Jenkins.
For more information, see the introduction found in part 1 of this blog series.
Automatic Jenkins Workflow: Periodic Polling
In this chapter, we will show how we need to configure Jenkins for automatic polling of the Software repository and start the build process, if code changes are detected.

Tools used
- Vagrant 1.8.6
- Virtualbox 5.0.20
- Docker 1.12.1
- Jenkins 2.19.3
Prerequisites:
Step 1: Start Jenkins in interactive Terminal Mode
Make sure that port 8080 is unused on the Docker host. If you were following all steps in part 1 of the series, you might need to stop cadvisor:
(dockerhost)$ sudo docker stop cadvisor
I assume that jenkins_home is already created, all popular plugins are installed and an Admin user has been created as shown in part 1 of the blog series. We start the Jenkins container with the jenkins_home Docker host volume mapped to /var/jenkins_home:
(dockerhost)$ cd <path_to_jenkins_home> # in my case: cd /vagrant/jenkins_home/
(dockerhost:jenkins_home)$ sudo docker run -it --rm --name jenkins -p8080:8080 -p50000:50000 -v`pwd`:/var/jenkins_home jenkins
Running from: /usr/share/jenkins/jenkins.war
...
--> setting agent port for jnlp
--> setting agent port for jnlp... done
Step 2: Open Jenkins in a Browser
Now we want to connect to the Jenkins portal. For that, open a browser and open the URL
<your_jenkins_host>:8080
In our case, Jenkins is running in a container and we have mapped the container-port 8080 to the local port 8080 of the Docker host. On the Docker host, we can open the URL.
localhost:8080
Note: In case of Vagrant with VirtualBox, per default, there is only a NAT-based interface and you need to create port-forwarding for any port you want to reach from outside (also the local machine you are working on is to be considered as outside). In this case, we need to add an entry in the port forwarding list of VirtualBox:
We have created this entry in part 1 already, but I have seen that the entries were gone again, which seems to be a VirtualBox bug. I have added it again now.

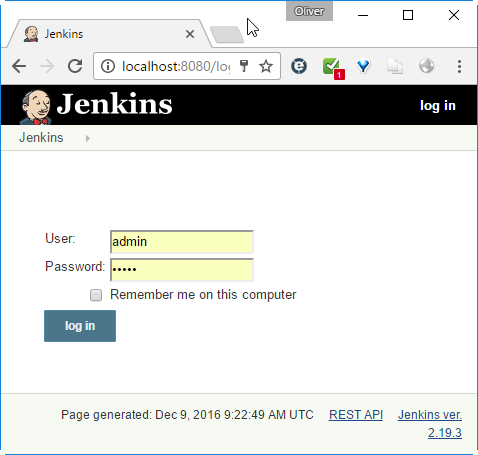
Log in with the admin account we have created in the last session:
Step 3: Configure Project for periodic Polling of SW Repository
Step 3.1: Goto Build Trigger Configuration
On the Jenkins Dashboard, find the hidden triangle right of the project name,

In the drop-down list, choose „Configure“
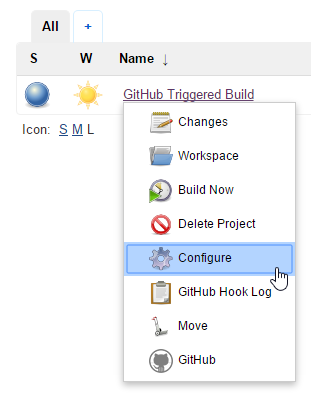
(also possible: on the Dashboard, click on the project name and then „Configure“).
Step 3.2: Configure a Schedule
We scroll down to „Build Triggers“ and check „Build periodically“ and specify that it will be done every 10 minutes (H/10 * * * *). I do not recommend to use lower values than that since I have seen that even my monster notebook with i7-6700HQ and 64GB RAM is quite a bit stressed by the build those many build processes.

Note that this is a very short polling period for our test purposes only; we do not want to wait very long after a code change is detected.
Note also: you can click the
right of the Schedule text box to get help with the scheduler syntax.
Step 3.2: Save
Click Save
Step 4: Change the content of the Software Repository
Now we expect that a change of the SW repository is detected latest 2 minutes after new code is checked in. Let us do so now: In this case, I have changed the content of README.md and commited the change:
(local repository)$ git add README.md
(local repository)$ git commit -m "changed README"
(local repository)$ git push
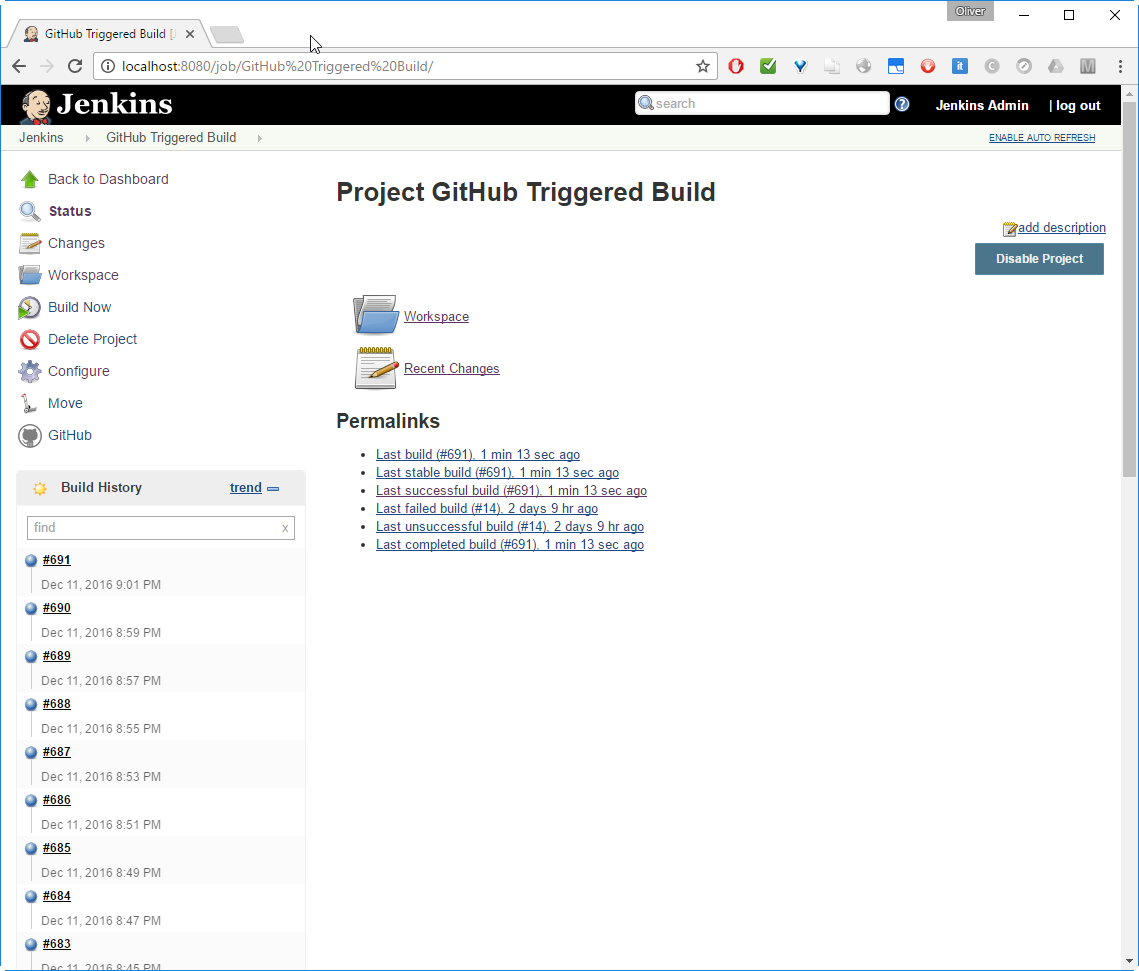
Within 2 minutes, I see a new job #24 running on the lower left:
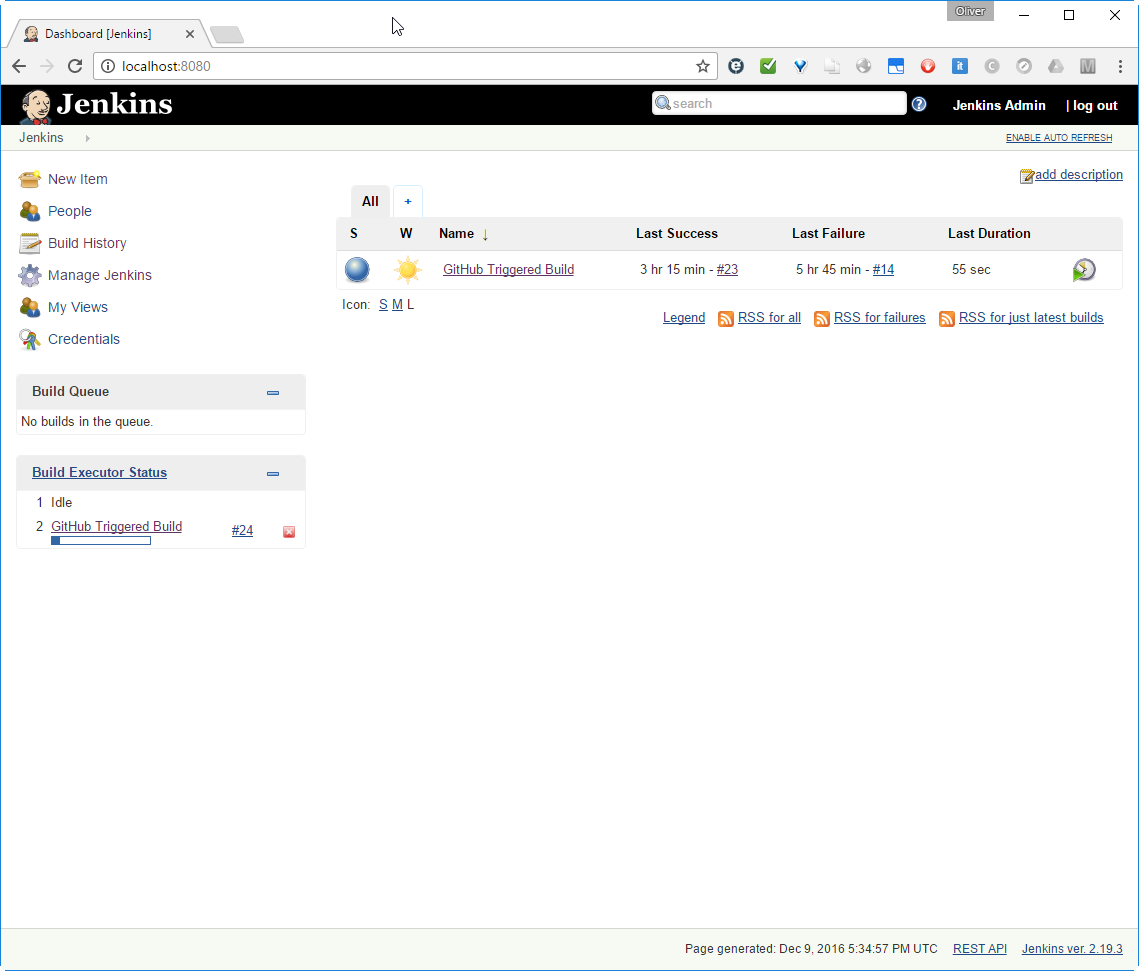
It seems that the page needs to be reloaded by refreshing the browser, so the dashboard displays the #24 build process as „Last Success“:
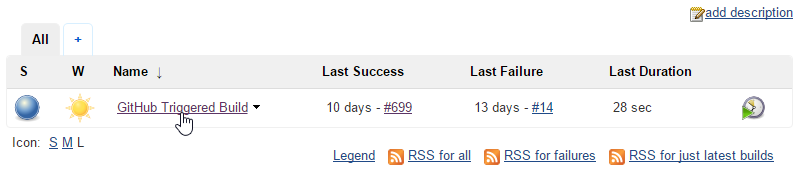
The build process was very quick, since we have not changed any relevant source code. The console log can be reached via the Jenkins -> Project Link -> Build History -> click on build number -> Console:

As you can see, after some hours, the git repository is downloaded even if there was no code change at all. However, Gradle will detect that the JAR file is up-to-date and it will not re-build the JAR file, unless there is a code change.
The disadvantage of a scheduled build process with high frequency is that the number of builds in the build history is increasing quickly:
Note: The build history is spammed by many successful builds with no code change, and it is not easy to find the interesting build among all those many unnecessary builds. Let us try to improve the situation by replacing periodic, scheduled builds by triggered builds:
Step 5: Triggered Builds
In Step 4, we have seen that periodic builds should not be performed in a very short timeframe, because:
- the Jenkins server is stressed quite a bit by configuring a too low build frequency
- the build history is polluted by information of many irrelevant build processes with no changed code.
Therefore, it is much better to create a triggered build. The target is to trigger a build process every time the developer is checking in new code to the software repository:
In this way, a periodic build is not necessary, or can be done much less frequently.
What do we need to do?
- Make sure that the Jenkins server is reachable from the SW repository
- Configure the SW repository with a web hook for informing Jenkins upon each code change
- Configure Jenkins for triggered build
Let us start:
Step 5.1 Configure Jenkins for triggered Build
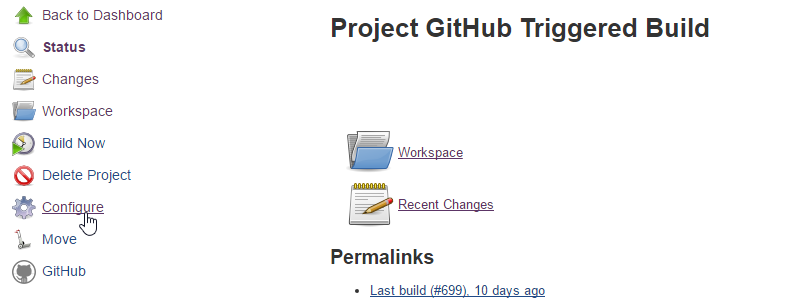
On the Jenkins Dashboard, click on the project:
and then „Configure“ on the left pane:
Scroll down to Build Triggers and check the „Trigger build remotels (e..g. , from scripts)“ checkbox and choose an individual secret token (do not use the one you see here):
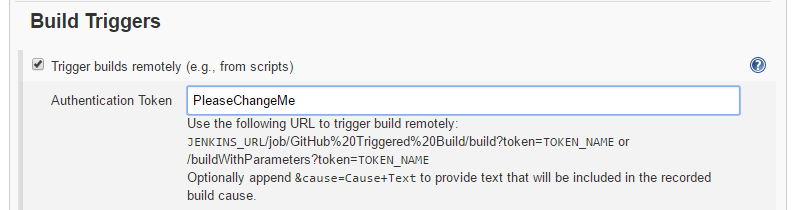
You will be provided with the build trigger URL, which is in my case:
JENKINS_URL/job/GitHub%20Triggered%20Build/build?token=TOKEN_NAME
And the JENKINS_URL is the URL needed to be contacted by the Git Repository. Save the URL above for later use.
Now click ![]() .
.
Step 5.2 Test Trigger URL locally
Now we can test the trigger URL locally on the Docker Host as follows (as found on this StackOverflow Q&A):
We need to retrieve a so-called Jenkins-Crumb:
(dockerhost)$ CRUMB=$(curl -s 'http://admin:your_admin_password@localhost:8080/crumbIssuer/api/xml?xpath=concat(//crumbRequestField,":",//crumb)')
(dockerhost)$ echo $CRUMB
Jenkins-Crumb:CCCCCCCCCCCCCCCCCCCCCCCCCC
Please make a note of the returned Jenkins-Crumb, since we will need this value in the next step.
Then we can use the Jenkins-Crumb as header in the build trigger request:
(dockerhost)$ curl -H $CRUMB 'http://admin:your_admin_password@localhost:8080/job/GitHub%20Triggered%20Build/build?token=hdsghewriohwziowrhwsn'
This should trigger a new build on Jenkins:
By clicking on the build and then the „Console Output“, we see a successful build with no changed data:

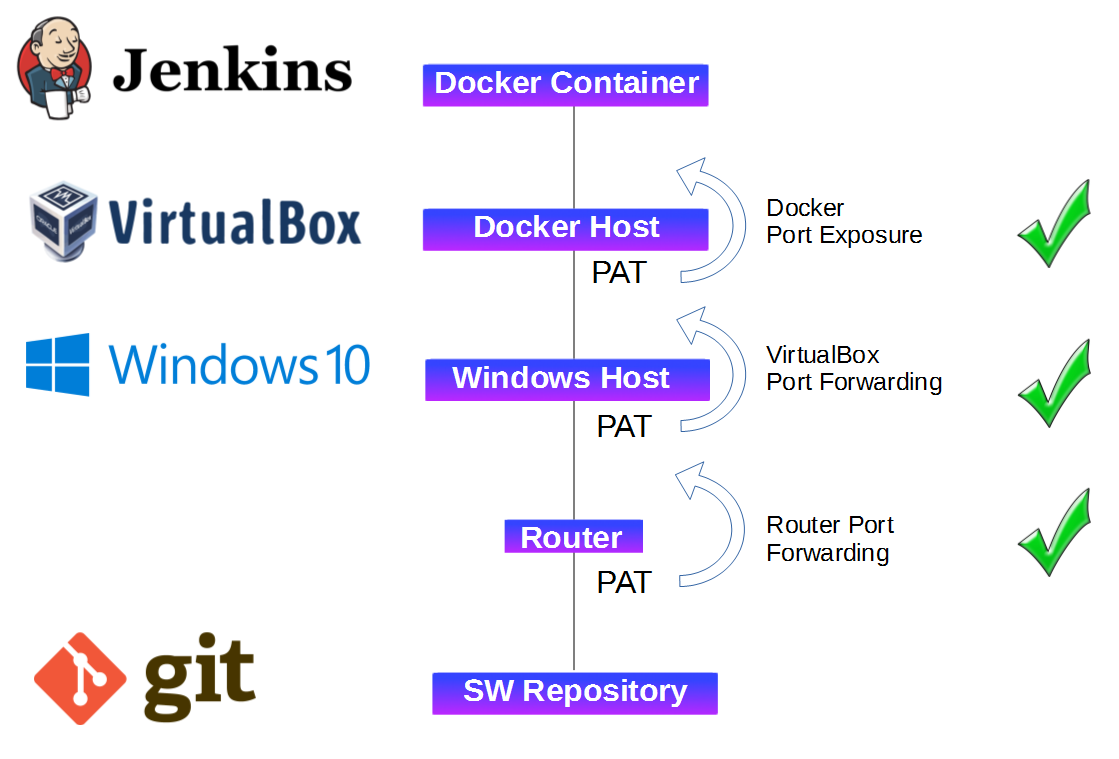
Step 5.3 Make sure that the Jenkins Server is reachable from the SW repository
We are running the Jenkins server as a Docker container within a Vagrant VM as host. In step 2 we have made sure that the Docker container is reachable from the local network by exposing the Docker ports and by configuring port forwarding in VirtualBox. However, the Docker container is not yet reachable from the Git Repository, since the Router will block all requests, as long as no pot forwarding is configured on the router:
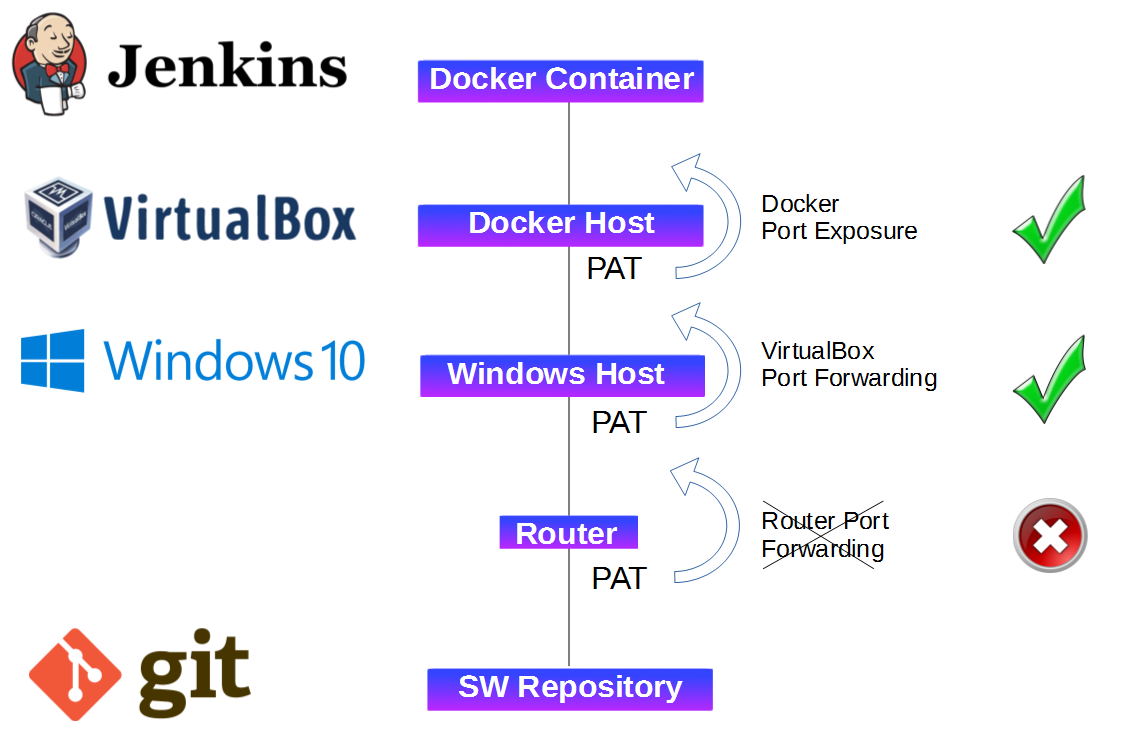
Let us fix that now:
In my case, the (sorry, German) input mask of the router looks like follows:
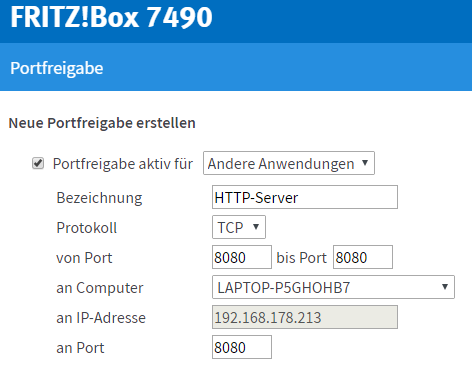
I am mapping outside port 8080 to the internal machine running the Docker Host VM.
Now, the routing should work. We will test this in the next step.
Step 5.4: Add Webhook to Git SW Repository
Now we need to add a Webhook to the Git repository. In my case, the repository is located at https://github.com/oveits/simple-restful-file-storage. On that page, goto
![]() ->
-> ![]() ->
-> ![]() ->
-> ![]()
Then copy&paste the URL of Step 5.1 into the Payload URL with following changes:
- Change JENKINS_URL by the IP address or DNS name your router is reachable from the Internet.
- Choose a port that you intend to open for this service (e.g. 8080) in the next step.
- Add admin:your_admin_password@ before the JENKINS_URL; use your own username and password here
- append &Jenkins-Crumb=CCCCCCCCCCCCCCCC to the URL with the value of the Jenkins-Crumb we have retrieved in the previous step
Example with the items to change in red:
http://admin:your_admin_password@your_public_ip_or_name:8080/job/GitHub%20Triggered%20Build/build?token=TTTTTTTTTTTTTTTTT&Jenkins-Crumb=CCCCCCCCCCCCCCCCCCCC
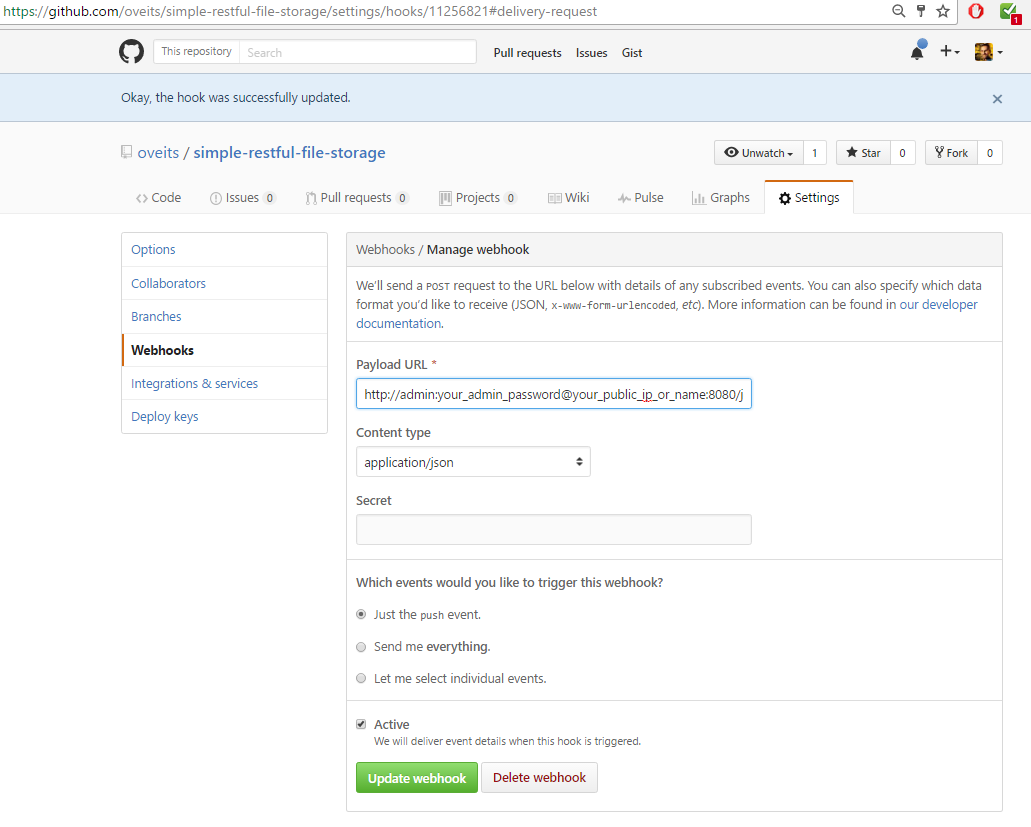
For the other fields, keep the defaults and klick ![]() .
.
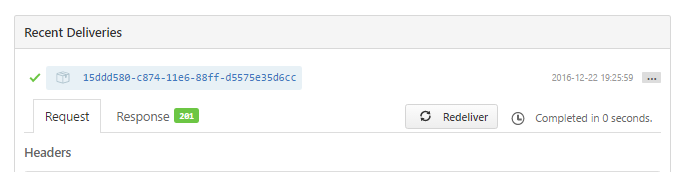
If everything works fine, we already should see a successful delivery of the trigger on the lower end of the Github page:
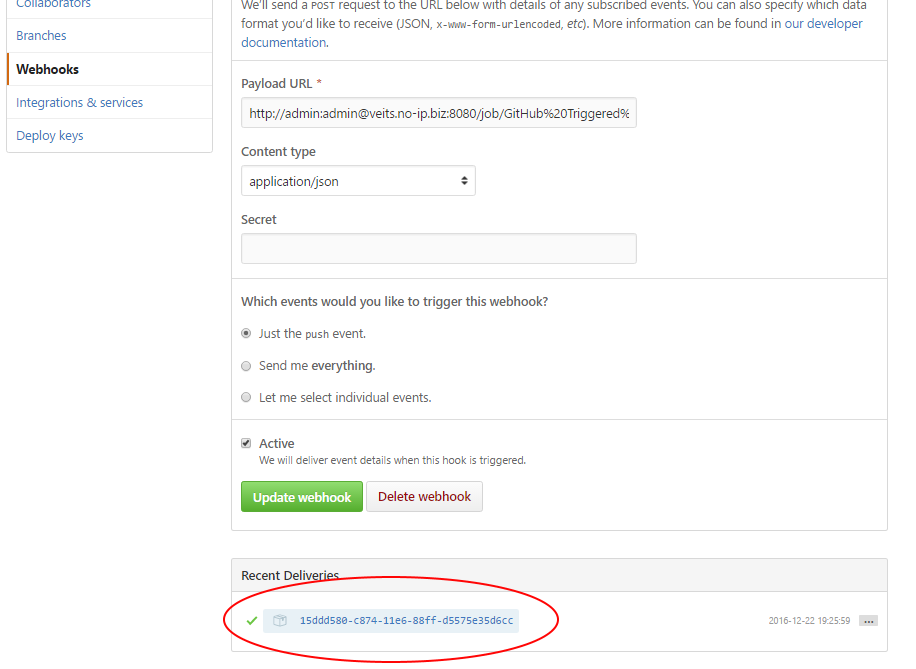
If it was not successful, you can see more details by clicking on the request:
Step 6: Test triggered Build upon Code Push
This is the final step of this tutorial: we now will test that a build is triggered each time a user pushes new code to the repository.
Step 6.1: Install Git locally
If Git is not installed locally, so do it now.
Step 6.2: Download the Project Repository
We now clone the project by issuing the command
$ git clone https://github.com/oveits/simple-restful-file-storage
Step 6.3: Change Code
You can perform a minor change the content of the README.md in order to test the triggered build.
Step 6.4: Push Code to the Repository
With the commands
$ git commit -am "Minor change of README.md to trigger a Jenkins build"
$ git push
We push the changed code to the SW repository.
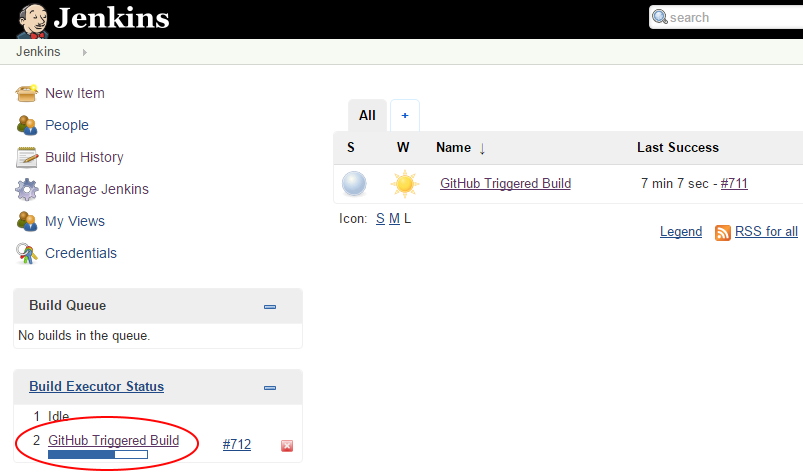
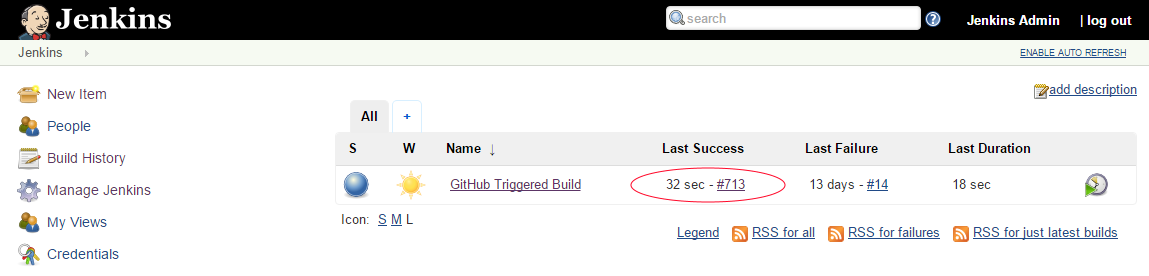
If everything works correctly, we will immediately see, that Git has triggered Jenkins to perform a build by reloading the Jenkins Dashboard (32 sec ago, in this screenshot):
We can check the build by clicking on the Last Success build and then „Console Output“:
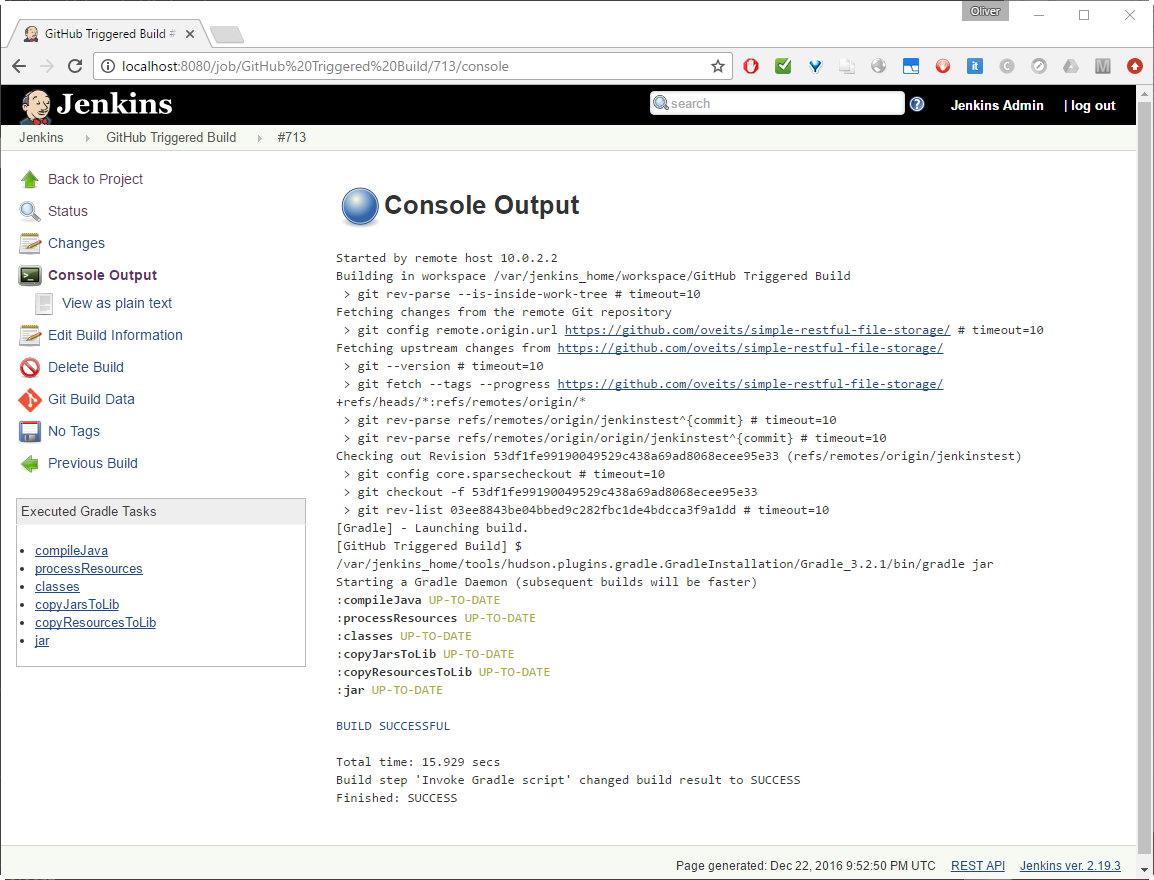
Gradle was clever enough to detect that no relevant code had been changed, so everything is still up to date.
With this procedure we have made sure that the Software repository will trigger a new build process on each and every code change. Moreover, the Jenkins server is not polluted with unnecessary builds anymore, since we have switched off periodic builds.
Summary
In this blog post we have performed following tasks:
- Started Jenkins in a Docker container
- Configured and tested periodic builds
- Configured and tested triggered builds
- Made sure that the Git Software repository is triggering such a build at every code change
As in the other parts of this series, we have run Jenkins interactively in a Docker container. See below a discussion of the advantages of periodic and triggered builds:
Periodic Builds vs Triggered Builds
When we compare periodic builds with triggered builds, we see following advantages/disadvantages:
Complexity of Setup: periodic builds are much easier to set up. They only need to be configured on Jenkins. Triggered builds requires setup steps on the Jenkins Server, the Software Repository and intermediate Firewalls, if the Jenkins Server is located in a private network.
Economics: Triggered builds are more economic in terms of Jenkins Server load. The build processes run only, when needed.
Handling: Triggered builds have important handling advantages compared to triggered builds: firstly, each and every code change can be tested helping the programmer to get near immediate feedback for every code change. Secondly, the build log is not polluted by hundreds of irrelevant builds.
In my opinion, a clear winner is: triggered builds. Those may be combined with periodic clean builds at certain milestones.

References
- Jenkins Homepage
- Part 1 of this Series: Installation and Configuration of Jenkins, loading plugins
- Part 2 of this Series: creating our first Jenkins job: GitHub download and Software build
- Jenkins for Beginners series on YouTube
- Tutorialspoint’s Jenkins Tutorial for absolute Beginners

You can run any jar inside a jdk Docker image, if this is, what you are looking for? In the Dockerfile, just ADD the jar to the image and run the java -jar command vi ENTRYPOINT and/or CMD.
hello , is there way i can run docker container from the jar created openjdk or the maven docker image