In this hello-world style blog post, we will learn how to create load balanced Docker services in an open source DC/OS & Mesos environment. For that, we will perform Mesos and Marathon REST API calls using simple cURL commands.
First, we will install the DCOS CLI, before we retrieve the API Token. After playing around with several GET commands for Mesos, IAM, and Marathon, we will create a load-balanced Docker service via the Marathon REST API. In the end, we will show how to check the healthiness of the Marathon service via API calls.
References
- Marathon REST API Documentation
- Official Mesosphere Documentation
- Mesos Resource Reservation & Marathon Watchdog – A “Hello World” Example
- DC/OS on Vagrant
- DC/OS on AWS
Step 1: Install DCOS CLI
On the bootstrap node or a master node of the DCOS cluster, start a centos container as follows:
docker run -it centos bash
On a GUI based machine, open a browser and head to <DCOS_MASTER_URL>. Log in to the DCOS UI:
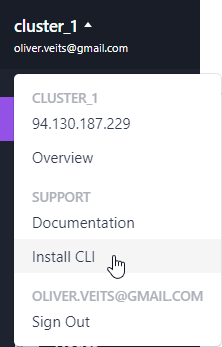
Choose „Install CLI“ and cut&paste the content into the centos container:
sudo echo hallo 2>/dev/null || alias sudo=$@
[ -d /usr/local/bin ] || sudo mkdir -p /usr/local/bin &&
curl https://downloads.dcos.io/binaries/cli/linux/x86-64/dcos-1.10/dcos -o dcos &&
sudo mv dcos /usr/local/bin &&
sudo chmod +x /usr/local/bin/dcos &&
dcos cluster setup http://94.130.187.229 &&
dcos
The first line will make sure that the sudo prefix is ignored. You should see something as follows:
  % Total    % Received % Xferd  Average Speed   Time    Time     Time  Current
                                 Dload  Upload   Total   Spent    Left  Speed
100 14.0M  100 14.0M    0     0  11.8M      0  0:00:01  0:00:01 --:--:-- 11.8M
If your browser didn't open, please go to the following link:

    http://94.130.187.229/login?redirect_uri=urn:ietf:wg:oauth:2.0:oob

Enter OpenID Connect ID Token:
Step 2: Retrieve the OpenID Token
Head to the URL given in the output and log in again. DC/OS will present your Connect ID Token:
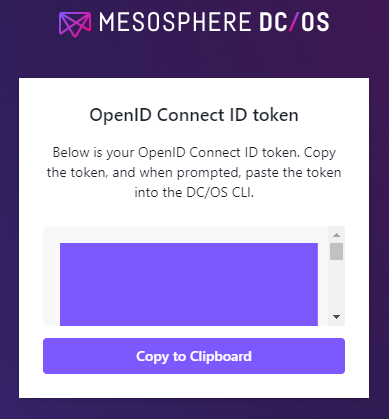
Click „Copy to Clipboard“ and paste it to the open terminal after „Enter OpenID Connect ID Token:“. The output should look like follows:
Command line utility for the Mesosphere Datacenter Operating
System (DC/OS). The Mesosphere DC/OS is a distributed operating
system built around Apache Mesos. This utility provides tools
for easy management of a DC/OS installation.

Available DC/OS commands:

        auth            Authenticate to DC/OS cluster
        cluster         Manage your DC/OS clusters
        config          Manage the DC/OS configuration file
        experimental    Manage commands that are under development
        help            Display help information about DC/OS
        job             Deploy and manage jobs in DC/OS
        marathon        Deploy and manage applications to DC/OS
        node            View DC/OS node information
        package         Install and manage DC/OS software packages
        service         Manage DC/OS services
        task            Manage DC/OS tasks

Get detailed command description with 'dcos  --help'.
We can test the DCOS CLI by entering dcos node command, which should produce an output similar to the one that follows:
# dcos node
   HOSTNAME           IP                           ID                    TYPE
 195.201.17.1    195.201.17.1   f2966d51-12b2-43f4-8d7a-1e8fb39fe80d-S0  agent
195.201.27.175  195.201.27.175  311a96d6-b5fc-4939-b9ef-92a6d1e0ae1f-S0  agent
master.mesos.   94.130.187.229    311a96d6-b5fc-4939-b9ef-92a6d1e0ae1f   master (leader)
Step 3: Retrieve the API Token
The manual procedure above will set the API token automatically.
Note: the API token is valid for 5 days only and the API requires you to re-fresh it by re-performing the manual steps 1 and 2. An automatic way of API retrieval via IAM API requires the installation of the DC/OS Enterprise edition and is described here.
Verify that the token is set:
# dcos config show core.dcos_acs_token
eyJhb...
Note: the first time, I tried, I got an error message like follows:
Property 'core.dcos_acs_token' doesn't existI have resolved the issue by re-authenticating with a ‚dcos auth login‘ a second time.
Step 4: Mesos and Marathon API Calls
Preparation: Install jq and less
We will use the jq program (JSON Queries) for prettifying JSON output and less for easier handling the output of the curl commands. Let us install those programs now:
yum install -y epel-release
yum install -y jq less
Step 4.1: A first Mesos REST API Call
Test the API with our first API call:
(container)# curl --header "Authorization: token=$(dcos config show core.dcos_acs_token)" \
    http://94.130.187.229/mesos/master/state.json | jq '.' | less
{
 "version": "1.4.2",
 "git_sha": "732c49e6e98ac720df3418d9d868a6dfe1b2c6b5",
 "build_date": "2017-12-22 12:23:23",
 "build_time": 1513945403,
 "build_user": "",
...
Here, we have piped the prettified output from jq into a less. To avoid a jq error („Usage: jq …“), we have run jq with the standard „do nothing“ filter ‚.‘ as found on StackOverflow: How to use `jq` in a shell pipeline.
You will need to add your master’s IP address.
Step 4.2: A first Marathon REST API Call
The following command will show all Marathon services:
(container)# curl -X GET -H 'Content-Type: application/json' \
    -H "Authorization: token=$(dcos config show core.dcos_acs_token)" \
    http://94.130.187.229/service/marathon/v2/apps/ | jq '.' | less
{
  "apps": [
    {
      "id": "/marathon-lb",
      "acceptedResourceRoles": [
        "slave_public"
      ],
...
You can see that I already have installed a Marathon Load Balancer. In a fresh DC/OS installation, you might get an empty apps list.
Step 4.3: A first IAM REST API Call
Show all users of the system (the output will show up in an uglified version as a one-liner, though):
(container)# curl -X GET -H 'Content-Type: application/json' \
    -H "Authorization: token=$(dcos config show core.dcos_acs_token)" \
    http://94.130.187.229/acs/api/v1/users | jq
  % Total    % Received % Xferd  Average Speed   Time    Time     Time  Current
                                 Dload  Upload   Total   Spent    Left  Speed
100   144  100   144    0     0  15425      0 --:--:-- --:--:-- --:--:-- 16000
{
  "array": [
    {
      "uid": "yourfirstuser@email.com",
      "description": "yourfirstuser@email.com"
    }
  ]
}
As a minimum, you will see a single list entry: the user you have logged into DC/OS first time.
Step 5: Create a new Docker Service via Marathon REST API
Now let us now create a new Marathon Service. For that, we will
- define a service template named app.json
- send an HTTP PUT with the app.json in the body to create/update the service
- review the results in the graphical user interface and
- access the created service.
Step 5.0: Install the Marathon Load Balancer
As a prerequisite of the load-balanced service, we intend to deploy, we need to install the Marathon load balancer as follows:
dcos package install marathon-lb
Step 5.1: Define a Service Template (app.json)
Now let us now create a new Marathon Service. For that, we define a service template named app.json as follows:
{
  "id": "/mynamespace/nginx-hello-world-service",
  "backoffFactor": 1.15,
  "backoffSeconds": 1,
  "container": {
    "portMappings": [
      {
        "containerPort": 80,
        "hostPort": 0,
        "labels": {
          "VIP_0": "/mynamespace/nginx-hello-world-service:80"
        },
        "protocol": "tcp",
        "servicePort": 80,
        "name": "mynamespace-nginx"
      }
    ],
    "type": "DOCKER",
    "volumes": [],
    "docker": {
      "image": "nginxdemos/hello",
      "forcePullImage": false,
      "privileged": false,
      "parameters": []
    }
  },
  "cpus": 0.1,
  "disk": 0,
  "healthChecks": [
    {
      "gracePeriodSeconds": 15,
      "ignoreHttp1xx": false,
      "intervalSeconds": 3,
      "maxConsecutiveFailures": 2,
      "portIndex": 0,
      "timeoutSeconds": 2,
      "delaySeconds": 15,
      "protocol": "HTTP",
      "path": "/"
    }
  ],
  "instances": 3,
  "labels": {
    "HAPROXY_DEPLOYMENT_GROUP": "nginx-hostname",
    "HAPROXY_0_REDIRECT_TO_HTTPS": "false",
    "HAPROXY_GROUP": "external",
    "HAPROXY_DEPLOYMENT_ALT_PORT": "80",
    "HAPROXY_0_PATH": "/mynamespace/nginx",
    "HAPROXY_0_VHOST": "195.201.17.1"
  },
  "maxLaunchDelaySeconds": 3600,
  "mem": 100,
  "gpus": 0,
  "networks": [
    {
      "mode": "container/bridge"
    }
  ],
  "requirePorts": false,
  "upgradeStrategy": {
    "maximumOverCapacity": 1,
    "minimumHealthCapacity": 1
  },
  "killSelection": "YOUNGEST_FIRST",
  "unreachableStrategy": {
    "inactiveAfterSeconds": 0,
    "expungeAfterSeconds": 0
  },
  "fetch": [],
  "constraints": []
}
Note that you need to replace the HAPROXY_0_VHOST (in red) by the IP address that matches your network.
Step 5.2: Create a Service
We now can create our first marathon service („app“) as follows:
# curl  -X PUT -H 'Content-Type: application/json' \
    -H "Authorization: token=$(dcos config show core.dcos_acs_token)" \
    -d '@app.json' \
    http://94.130.187.229/service/marathon/v2/apps/mynamespace/nginx-hello-world-service
{"version":"2018-03-27T17:32:20.243Z","deploymentId":"a1bab3a4-3cbf-40de-a67e-3a1c961d9ad9"}
Note that we have received an immediate response including the deployment ID. With that information, we later can periodically check, whether the deployment is finished by asking the API about the status of the deployment.
Step 5.3 (optional): Review the Service in the GUI
We can see that we have created a new namespace:
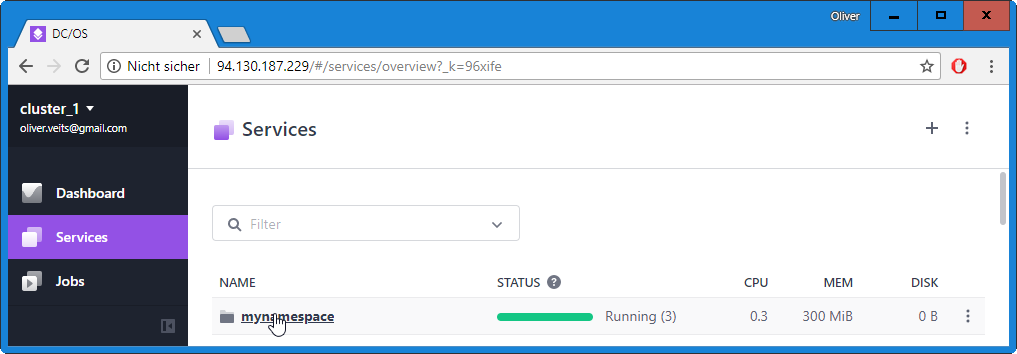
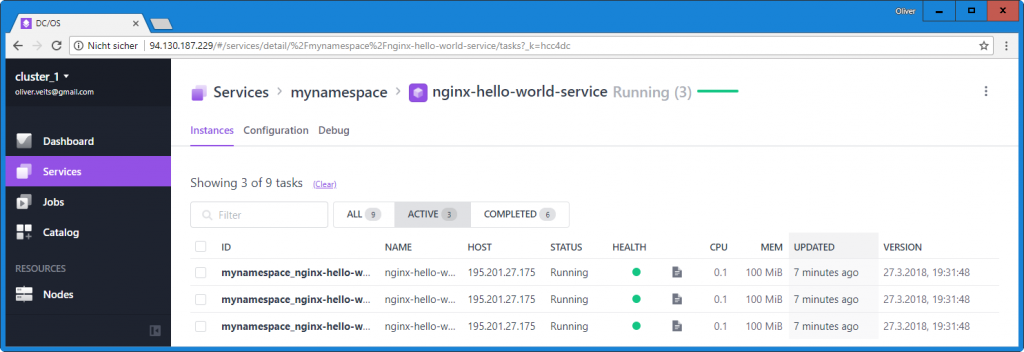
Within that namespace, we have created a new service:
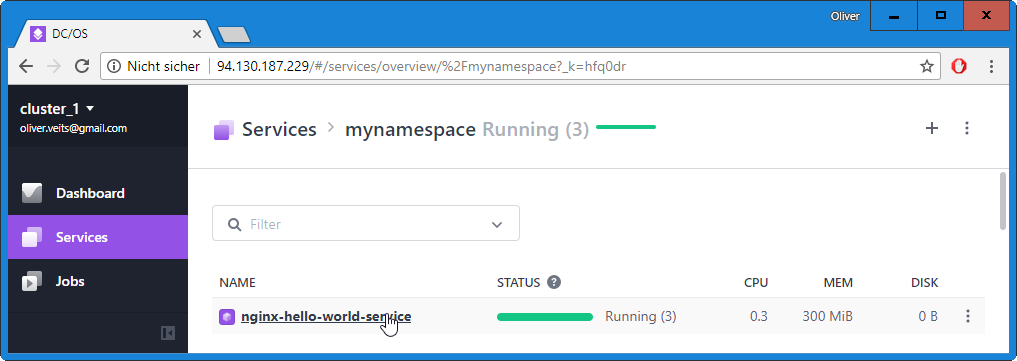
And the service is running on three container instances, as we have defined it in the app.json file:
Step 5.4 (optional): Access the Service
The created service can be accessed via the public agent’s IP address and port 80 on the path /mynamespace/nginx:
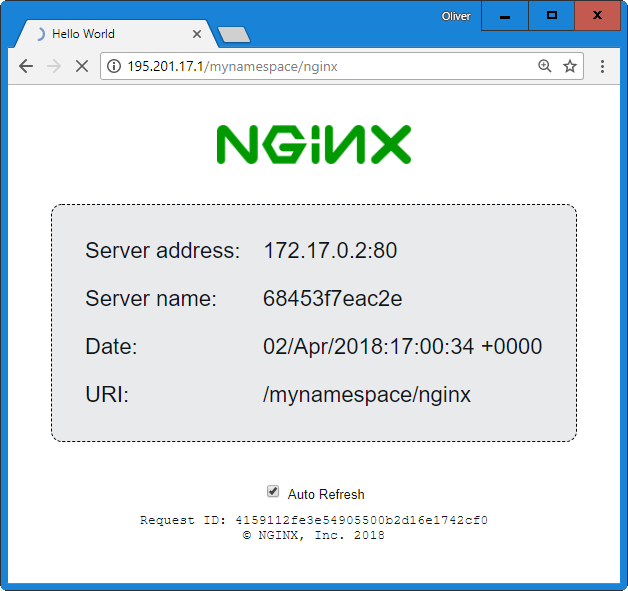
When you reload the page several times, you will see that the load balancer is using a round-robin balancing strategy to distribute the load among the three containers.
Step 6: Print App Summary
Step 6.1: App Summary
Above, we have seen a list of containers of our service in the GUI. Now let us retrieve the same information via API:
# APP_INFO=$(curl  -X GET -H 'Content-Type: application/json' \
      -H "Authorization: token=$(dcos config show core.dcos_acs_token)" \  http://94.130.187.229/service/marathon/v2/apps/mynamespace/nginx-hello-world-service)
the output is organized as follows:
# echo "$APP_INFO" | jq
{
  "app": {
    "id": "/mynamespace/nginx-hello-world-service",
    ...
    "container": {            <----- information about Docker image, volumes, port mappings etc.
      ...
    },
    "cpus": 0.1,              <----- information about resource reservation, health checks, number of instances
    ...
    "labels": {               <----- information about HAPROXY configuration
      "HAPROXY_DEPLOYMENT_GROUP": "nginx-hostname",
      ...
    },
    ...
    "tasksStaged": 0,
    "tasksRunning": 3,
    "tasksHealthy": 3,
    "tasksUnhealthy": 0,
    "deployments": [],
    "tasks": [
      {
        "ipAddresses": [
          {
            "ipAddress": "172.17.0.8",
            "protocol": "IPv4"
          }
        ],
        "stagedAt": "2018-03-27T18:14:53.139Z",
        "state": "TASK_RUNNING",
        "ports": [
          19891
        ],
        "startedAt": "2018-03-27T18:14:54.324Z",
        "version": "2018-03-27T18:14:53.082Z",
        "id": "mynamespace_nginx-hello-world-service.bf0082f9-31ea-11e8-833d-f24b754eb1a3",
        "appId": "/mynamespace/nginx-hello-world-service",
        "slaveId": "311a96d6-b5fc-4939-b9ef-92a6d1e0ae1f-S0",
        "host": "195.201.27.175",
        "healthCheckResults": [
          {
            "alive": true,
            "consecutiveFailures": 0,
            "firstSuccess": "2018-03-27T18:14:56.131Z",
            "lastFailure": null,
            "lastSuccess": "2018-04-01T15:03:29.708Z",
            "lastFailureCause": null,
            "instanceId": "mynamespace_nginx-hello-world-service.marathon-bf0082f9-31ea-11e8-833d-f24b754eb1a3"
          }
        ]
      },
      {
      ... <--------- second container ("task")
      },
      {
      ... <--------- third container ("task")
      }
    ]
  }
}
The output shows us information on the deployed service („app“) like
- app id,
- Docker container information,
- information on the resource reservations
- labels that are used to configure the HA proxy load balancer
- health information and information on the number of containers
- information on each and every container („task“).
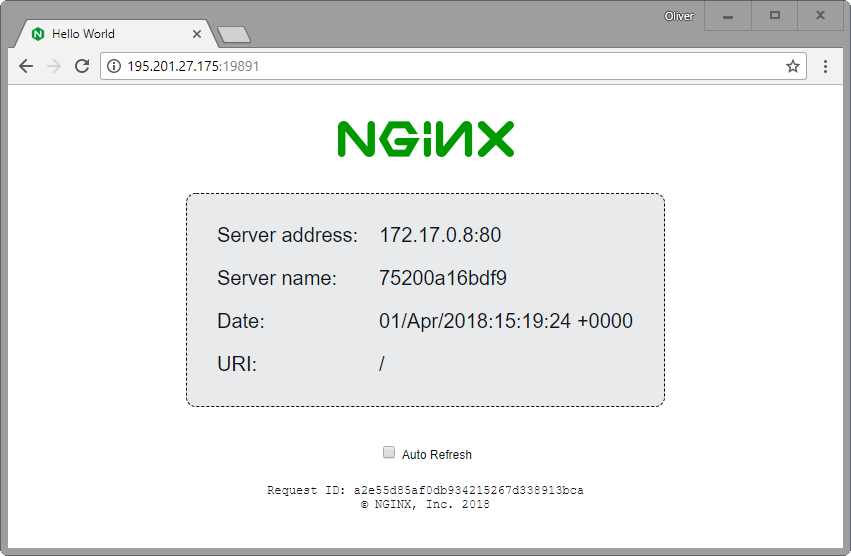
As an example, we can go to the „tasks“ section of the output and extract the information that we can reach the first container in the tasks list on http://195.201.27.175:19891 („host“ 195.201.27.175 and „port(s)“ 19891):
Step 6.2: Check Service Health
We can check the service health of a service („app“) by checking following conditions:
- There should be no active deployments:
### Example:
### "deployments": [],
###
$ [ "$(echo "$APP_INFO" | jq '.app.deployments')" == '[]' ] && echo "OK: no active deployments"
OK: no active deployments
- There should be no staged tasks:
### Example:
### "tasksStaged": 0,
###
$ [ "$(echo "$APP_INFO" | jq '.app.tasksStaged')" == '0' ] && echo "OK: no staged tasks"
OK: no staged tasks
- All running tasks should be healthy:
### Example:
### "tasksRunning": 3,
### "tasksHealthy": 3,
###
$ [ "$(echo "$APP_INFO" | jq '.app.tasksRunning')" == "$(echo "$APP_INFO" | jq '.app.tasksHealthy')" ] && echo "OK: all running tasks are healthy"
OK: all running tasks are healthy
- There should be no unhealthy tasks:
### Example:
### "tasksUnhealthy": 0,
###
$ [ "$(echo "$APP_INFO" | jq '.app.tasksUnhealthy')" == '0' ] && echo "OK: no unhealthy tasks"
OK: no unhealthy tasks
Combined, we can check for the app health as follows:
#!/bin/bash

MASTER=94.130.187.229

function checkAppHealth {
   APP_INFO=$1
   ERROR=''
   DEPLOYMENTS="$(echo "$APP_INFO" | jq '.app.deployments')"
   TASKS_STAGED="$(echo "$APP_INFO" | jq '.app.tasksStaged')"
   TASKS_RUNNING="$(echo "$APP_INFO" | jq '.app.tasksRunning')"
   TASKS_HEALTHY="$(echo "$APP_INFO" | jq '.app.tasksHealthy')"
   TASKS_UNHEALTHY="$(echo "$APP_INFO" | jq '.app.tasksUnhealthy')"
   [ "$DEPLOYMENTS" == '[]' ] || ERROR="Found active deployments for this app: $DEPLOYMENTS"
   [ "$ERROR" != "" ] && return 1
   [ "$TASKS_STAGED" == '0' ] || ERROR="Found $TASKS_STAGED staged tasks for this app"
   [ "$ERROR" != "" ] && return 1
   [ "$TASKS_RUNNING" == "$TASKS_HEALTHY" ] || ERROR="Not all running tasks ($TASKS_RUNNING) seem to be healthy ($TASKS_HEALTHY)"
   [ "$ERROR" != "" ] && return 1
   [ "$TASKS_UNHEALTHY" == '0' ] || ERROR='Found $TASKS_UNHEALTHY unhealthy tasks'
   [ "$ERROR" != "" ] && return 1
   return 0
}

APP_INFO="$(curl -X GET -H 'Content-Type: application/json' \
                 -H "Authorization: token=$(dcos config show core.dcos_acs_token)" \
                 http://${MASTER}/service/marathon/v2/apps/mynamespace/nginx-hello-world-service)"
ERROR="$(checkAppHealth $APP_INFO)"

if [ "$ERROR" == "" ]; then
   echo "Service status: healthy"
else
   echo "Service status: ERROR: $ERROR"
fiSummary
In this blog post, we have learned how to
- install the DCOS CLI
- retrieve the REST API Token in an open source DC/OS environment
- use the Marathon REST API to create a load-balanced Docker service that can be accessed from the Internet
- check the service health of a Marathon service.
Appendix: Print List of Containers of a Marathon Service
Above, we have seen a list of containers of our service in the GUI. Now let us retrieve the same information via API.
# curl  -X GET -H 'Content-Type: application/json' \
      -H "Authorization: token=$(dcos config show core.dcos_acs_token)" \
      http://94.130.187.229/service/marathon/v2/apps/mynamespace/nginx-hello-world-service 2>/dev/null \
      | jq '.app.tasks'
[
  {
    "ipAddresses": [
      {
        "ipAddress": "172.17.0.8",
        "protocol": "IPv4"
      }
    ],
    "stagedAt": "2018-03-27T18:14:53.139Z",
    "state": "TASK_RUNNING",
    "ports": [
      19891
    ],
    "startedAt": "2018-03-27T18:14:54.324Z",
    "version": "2018-03-27T18:14:53.082Z",
    "id": "mynamespace_nginx-hello-world-service.bf0082f9-31ea-11e8-833d-f24b754eb1a3",
    "appId": "/mynamespace/nginx-hello-world-service",
# curl -X GET -H 'Content-Type: application/json' \
     -H "Authorization: token=$(dcos config show core.dcos_acs_token)" \
     http://94.130.187.229/service/marathon/v2/apps/mynamespace/nginx-hello-world-service\
     | jq '.app.tasksHealthy'
  % Total    % Received % Xferd  Average Speed   Time    Time     Time  Current
                                 Dload  Upload   Total   Spent    Left  Speed
100  3531    0  3531    0     0   746k      0 --:--:-- --:--:-- --:--:--  862k
3
Here, we can see that there are 3 healthy „tasks“, i.e. Docker containers.
Appendix: Continuously print List of Marathon Deployments
With following while loop, we can print the list of deployments:
# while true; do
  curl -X GET -H 'Content-Type: application/json' \
  -H "Authorization: token=$(dcos config show core.dcos_acs_token)" \
  http://94.130.187.229/service/marathon/v2/deployments; echo ""
  sleep 1;
done
When we now go into the DC/OS GUI and restart the service, we will see something as follows:
[]
[]
[]
[]
[]
[{"id":"0252a58b-9ff5-4ed5-9169-90b3d2cd6ea0","version":"2018-03-27T18:14:53.082Z","affectedApps":["/mynamespace/nginx-hello-world-service"],"affectedPods":[],"steps":[{"actions":[{"action":"RestartApplication","app":"/mynamespace/nginx-hello-world-service"}]}],"currentActions":[{"action":"RestartApplication","app":"/mynamespace/nginx-hello-world-service","readinessCheckResults":[]}],"currentStep":1,"totalSteps":1}]
[{"id":"0252a58b-9ff5-4ed5-9169-90b3d2cd6ea0","version":"2018-03-27T18:14:53.082Z","affectedApps":["/mynamespace/nginx-hello-world-service"],"affectedPods":[],"steps":[{"actions":[{"action":"RestartApplication","app":"/mynamespace/nginx-hello-world-service"}]}],"currentActions":[{"action":"RestartApplication","app":"/mynamespace/nginx-hello-world-service","readinessCheckResults":[]}],"currentStep":1,"totalSteps":1}]
[]
[]
I.e., the list of deployments is empty most of the time, but when you restart the service, a deployment is running for longer than one second.
Appendix: Retrieve IP Address and Port of a specific Docker Container
We can use the following commands to retrieve the IP address and TCP port of a certain container (tested in a DC/OS Enterprise environment with a service account):
Step 1: Create a Configuration File DCOS_API.cfg
export DCOS_API_USER=MyDcosUserName
export DCOS_API_PASSWORD=MyDcosPassword
export DCOS_API_HOST=https://mesos-master.company.com
export PROXYOPTION="-x proxy:8080"
Step 2: Create DCOS_API
#!/bin/bash

source $0.cfg

MESOS_UID="$DCOS_API_USER"
MESOS_PWD="$DCOS_API_PASSWORD"
MESOS_MASTER=$DCOS_API_HOST
MARATHON_LOCATION=/base/url

if [ "$#" == "2" ]; then
  VERB=$1
  [ "$VERB" != "GET" ] && echo "Warning: only GET is supported currently. Using GET"
  RESOURCE=$2
else
  echo "usage: ´$0 GET resource"
  exit 1
fi

MARATHON_APP_ID=${MARATHON_LOCATION}/${APP_ID}

TOKEN=`curl $PROXYOPTION -s -k -D - -H 'Accept: application/json'  -H 'Content-Type: application/json' "$MESOS_MASTER/acs/api/v1/auth/login" --data "{\"password\":\"$MESOS_PWD\",\"uid\":\"$MESOS_UID\" }" | grep token | awk -F ":" '{print $2}' | awk -F "\"" '{print $2}'`


#                        -H 'Accept: application/json' \
curl $PROXYOPTION -s -k -H "Authorization: token=$TOKEN" \
                        -H 'Accept: text/plain' \
                        -H 'Content-Type: application/json' \
                        "$MESOS_MASTER/service/marathon/$RESOURCE"
Read the host + port of a single Container from the Marathon REST API
#!/bin/bash

MESOS_UID="$DCOS_API_USER"
MESOS_PWD="$DCOS_API_PASSWORD"
MESOS_MASTER=$DCOS_API_HOST
MARATHON_LOCATION=/base/url

if [ "$#" == "1" ]; then
  APP_ID=$1
else
  echo "APP_ID_MISSING"
  exit 1
fi

MARATHON_APP_ID=${MARATHON_LOCATION}/${APP_ID}

TOKEN=`curl $PROXYOPTION -s -k -D - -H 'Accept: application/json'  -H 'Content-Type: application/json' "$MESOS_MASTER/acs/api/v1/auth/login" --data "{\"password\":\"$MESOS_PWD\",\"uid\":\"$MESOS_UID\" }" | grep token | awk -F ":" '{print $2}' | awk -F "\"" '{print $2}'`

APPS=`curl $PROXYOPTION -s -H "Authorization: token=$TOKEN" -H 'Accept: application/json' -H 'Content-Type: application/json' -s -k "$MESOS_MASTER/service/marathon/v2/apps/$MARATHON_APP_ID"`

HOST=`echo "$APPS" | awk -F "\"tasks\"" '{print $2}' | awk -F "\"host\":\"" '{print $2}' | awk -F "\"" '{print $1}'`
PORT=`echo "$APPS" | awk -F "\"tasks\"" '{print $2}' | awk -F "\"ports\":" '{print $2}' | awk -F "\"" '{print $1}' | sed -e 's/\[\(.*\)\],/\1/g'`

[ "$HOST" == "" ] && HOST=NOT_FOUND
[ "$PORT" == "" ] && PORT=NOT_FOUND

echo "$HOST:$PORT"

if [ "$DEBUG" != "" ]; then
   echo "MESOS_MASTER=$MESOS_MASTER" >&2
   echo "DCOS_API_HOST=$DCOS_API_HOST" >&2
   echo "DCOS_API_USER=$DCOS_API_USER" >&2
   echo "TOKEN=$TOKEN" >&2
   echo "APPS=$APPS" >&2
fi

This is exactly what I was looking for. I am a Db2 DBA now supporting Cassandra running on Mesos and have a steep learning curve. I followed along and was able to run my first Mesos and Marathon API which I plan to use in a Jenkins job. Thank you so much!
Thanks a lot for your kind words.
I don’t think the title of your article matches the content lol. Just kidding, mainly because I had some doubts after reading the article.