In this tutorial, we will expose a kubernetes application via HTTPS with a valid Let’s Encrypt certificate. A certificate manager will help us to automatically receive and provision a trusted TLS certificate. It is trusted since Let’s Encrypt has signed the certificate for us:

However, before we install the needed ingredients, you may first want to review the cert-manager architecture:
Architecture
In this blog post we have installed cert-manager, which has the following architecture:

The goal is to automatically provision a trusted certificate to the ingress controller, which in turn will use the certificate to terminate encrypted HTTPS connections from the Internet. This is shown in Magenta on the right part of the figure.
However, several steps have to be performed to get such a certificate:
- the cert-manager issuer registers with the Let’s Encrypt service.
- Upon successful registration, the cert-manager certificate object will send a list of domains. Let’s encrypt will send a URL path and a key to the cert-manager certificate object
- Immediately thereafter, the certification object creates three temporary objects for the purpose of ACME validation:
- an ACME POD listening on port 8089
- an ACME Service accessing the POD
- a backend entry in the ingress controller that points to port 8090
- Once, the three temporary objects are fully functional, the Let’s Encrypt ACME service can access the POD on the domain and URL and will receive the key from the POD. With that, Let’s Encrypt has validated that the person, who has requested a certificate signature has full control of the domain listed in the certificate.
- Thus, the domain valid and the ACME service will send a signed certificate to the certificate object.
- After receipt of the signed certificate, the cert-manager certificate object will encapsulate the certificate and private key into a TLS secret.
- The ingress controller now can access the certificate and key and use it to terminate HTTPS sessions from the Internet.
For housekeeping purposes, the certificate object will delete the POD, the Service and the backend entry in the ingress controller, once it has received the signed certificate.
Now, let us start to install the components needed for such a process.
Prerequisites
- You will need a kubernetes installation, whether it be a single node cluster or a multi-node cluster:
- You can create a single node kubernetes cluster via minikube. See e.g. this blog post for details.
- For a multi-node cluster, we recommend following the instruction in the blog post with the title Kubernetes Cluster with Kubeadm.
Step 1: Installing cert-manager
Step 1.1: Installing Helm
Helm is a package manager for Kubernetes. We will use helm to install the cert-manager on the kubernetes master. For that, we are following the installation instructions on the Helm Docs:
On the kubernetes master (assuming Linux with 64 bits), the following command can be used:
curl -s -o helm.tar.gz https://storage.googleapis.com/kubernetes-helm/helm-v2.12.1-linux-amd64.tar.gz \
  && tar -zxvf helm.tar.gz \
  && cp -p -f linux-amd64/helm /usr/local/bin/ \
  && helm init
This will yield the output:
linux-amd64/
linux-amd64/tiller
linux-amd64/helm
linux-amd64/LICENSE
linux-amd64/README.md
Creating /root/.helm
Creating /root/.helm/repository
Creating /root/.helm/repository/cache
Creating /root/.helm/repository/local
Creating /root/.helm/plugins
Creating /root/.helm/starters
Creating /root/.helm/cache/archive
Creating /root/.helm/repository/repositories.yaml
Adding stable repo with URL: https://kubernetes-charts.storage.googleapis.com
Adding local repo with URL: http://127.0.0.1:8879/charts
$HELM_HOME has been configured at /root/.helm.

Tiller (the Helm server-side component) has been installed into your Kubernetes Cluster.

Please note: by default, Tiller is deployed with an insecure 'allow unauthenticated users' policy.
To prevent this, run `helm init` with the --tiller-tls-verify flag.
For more information on securing your installation see: https://docs.helm.sh/using_helm/#securing-your-helm-installation
Happy Helming!
For this hello world application, we will allow also unauthenticated users to use helm. However, if this is not only a test installation and/or the kubernetes cluster is shared with other users, we recommend securing your helm installation.
Step 1.2: Create a Cluster Admin Account for Tiller
In case RBAC is enabled on your kubernetes cluster, we need to allow tiller to create resources for us. In our case, I have chosen to allow tiller to create any resource on any namespace by creating a cluster admin service account:
cat <<EOF | kubectl apply -f -
---
apiVersion: v1
kind: ServiceAccount
metadata:
  name: tiller
  namespace: kube-system
---
apiVersion: rbac.authorization.k8s.io/v1
kind: ClusterRoleBinding
metadata:
  name: tiller
roleRef:
  apiGroup: rbac.authorization.k8s.io
  kind: ClusterRole
  name: cluster-admin
subjects:
  - kind: ServiceAccount
    name: tiller
    namespace: kube-system
EOF
The output of the command should be:
serviceaccount/tiller created
clusterrolebinding.rbac.authorization.k8s.io/tiller created
If you do not want to give cluster admin rights to tiller, check out other options here on Helm Docs.
With the service account created, we need to re-run the init command and specifying the service account:
helm init --service-account tiller --upgrade
The output should look as follows:
$HELM_HOME has been configured at /root/.helm.

Tiller (the Helm server-side component) has been upgraded to the current version.
Happy Helming!
We had to add the upgrade option, even though we have not changed the tiller version. If the upgrade option is omitted, you get the error message that tiller is already installed and the installation of the cert-manager will fail.
$HELM_HOME has been configured at /root/.helm.
Warning: Tiller is already installed in the cluster.
(Use --client-only to suppress this message, or --upgrade to upgrade Tiller to the current version.)
Happy Helming!
Step 1.3: Installing cert-manager
Installing the cert-manager is as simple as cutting&pasting the following command to your helm installation.
kubectl apply \
      -f https://raw.githubusercontent.com/jetstack/cert-manager/release-0.7/deploy/manifests/00-crds.yaml

helm repo add jetstack https://charts.jetstack.io

helm install \
  --name cert-manager \
  --namespace kube-system \
  jetstack/cert-manager
Here we have switched to the jetstack/cert-manager chart repo, since the stable/chart of the helm repo has been deprecated. The first manifest command is needed as described on https://github.com/helm/charts/issues/10949. If we omit this command, we will get an error validation failed: – no matches for kind „Certificate“ in version „certmanager.k8s.io/v1alpha1“
The output of the above command should look similar to:
NAME:   cert-manager
LAST DEPLOYED: Thu Jan  3 19:21:44 2019
NAMESPACE: kube-system
STATUS: DEPLOYED

RESOURCES:
==> v1/ServiceAccount
NAME          SECRETS  AGE
cert-manager  1        0s

==> v1beta1/ClusterRole
NAME          AGE
cert-manager  0s

==> v1beta1/ClusterRoleBinding
NAME          AGE
cert-manager  0s

==> v1beta1/Deployment
NAME          DESIRED  CURRENT  UP-TO-DATE  AVAILABLE  AGE
cert-manager  1        1        1           0          0s

==> v1/Pod(related)
NAME                          READY  STATUS             RESTARTS  AGE
cert-manager-d86d844f7-5xcll  0/1    ContainerCreating  0         0s


NOTES:
cert-manager has been deployed successfully!

In order to begin issuing certificates, you will need to set up a ClusterIssuer
or Issuer resource (for example, by creating a 'letsencrypt-staging' issuer).

More information on the different types of issuers and how to configure them
can be found in our documentation:

https://cert-manager.readthedocs.io/en/latest/reference/issuers.html

For information on how to configure cert-manager to automatically provision
Certificates for Ingress resources, take a look at the `ingress-shim`
documentation:

https://cert-manager.readthedocs.io/en/latest/reference/ingress-shim.html
Note: If RBAC ins not installed on your kubernetes cluster, you need to add the option
--set rbac.create=false, so helm does not try to create RBAC resources for you.Be sure to perform step 2 in case RBAC is enabled. If you fail to do so, you will get an error message as follows:
Error: namespaces "kube-system" is forbidden: User "system:serviceaccount:kube-system:default" cannot get resource "namespaces" in API group "" in the namespace "kube-system"
Step 2 (optional): Review Custom Resource Definitions added by cert-manager
The cert-manager has created three custom resource definitions to your kubernetes installation:
- certificates: can create a kubernetes secret from a certificate
- cluster issuer: can issue certificates for an entire cluster
- issuer: can issue certificates for a single namespace
# kubectl get crd
NAME                                CREATED AT
certificates.certmanager.k8s.io     2019-01-03T18:21:45Z
clusterissuers.certmanager.k8s.io   2019-01-03T18:21:45Z
issuers.certmanager.k8s.io          2019-01-03T18:21:45Z
Step 3: Create the Issuer
cat <<EOF > issuer-staging.yaml
---
apiVersion: certmanager.k8s.io/v1alpha1
kind: Issuer
metadata:
  name: letsencrypt-staging
spec:
  acme:
    server: https://acme-staging-v02.api.letsencrypt.org/directory
    email: oliver.veits+letsencrypt-test@vocon-it.com
    privateKeySecretRef:
      name: letsencrypt-staging
    http01: {}
EOF

kubectl apply -f issuer-staging.yaml
# output: issuer.certmanager.k8s.io/letsencrypt-staging created
Now the issuer should have the following status:
# kubectl describe issuer letsencrypt-staging
Name:         letsencrypt-staging
Namespace:    default
Labels:       <none>
Annotations:  kubectl.kubernetes.io/last-applied-configuration:
                {"apiVersion":"certmanager.k8s.io/v1alpha1","kind":"Issuer","metadata":{"annotations":{},"name":"letsencrypt-staging","namespace":"default...
API Version:  certmanager.k8s.io/v1alpha1
Kind:         Issuer
Metadata:
  Creation Timestamp:  2019-01-03T18:54:53Z
  Generation:          1
  Resource Version:    4828189
  Self Link:           /apis/certmanager.k8s.io/v1alpha1/namespaces/default/issuers/letsencrypt-staging
  UID:                 0e636493-0f89-11e9-a13e-9600001441cb
Spec:
  Acme:
    Email:  oliver.veits+letsencrypt-test@vocon-it.com
    Http 01:
    Private Key Secret Ref:
      Key:
      Name:  letsencrypt-staging
    Server:  https://acme-staging-v02.api.letsencrypt.org/directory
Status:
  Acme:
    Uri:  https://acme-staging-v02.api.letsencrypt.org/acme/acct/7753182
  Conditions:
    Last Transition Time:  2019-01-03T19:16:34Z
    Message:               The ACME account was registered with the ACME server
    Reason:                ACMEAccountRegistered
    Status:                True
    Type:                  Ready
Events:                    <none>
First, I tried with the v1 version of the ACME server
https://acme-staging.api.letsencrypt.org/directory, but I got the following status:Status: Conditions: Last Transition Time: 2019-01-03T19:08:46Z Message: Your ACME server URL is set to a v1 endpoint (https://acme-staging.api.letsencrypt.org/directory). You should update the spec.acme.server field to "https://acme-staging-v02.api.letsencrypt.org/directory" Reason: InvalidConfig Status: False Type: Ready Events: <none>However, after using the specified link, the ACME account was registered successfully
If you have registration problems, it might be helpful to view the log of the certmanager POD like follows:
CERT_MANAGER_POD=$(kubectl -n kube-system get pods | grep '^cert-manager' | awk '{print $1}'); echo CERT_MANAGER_POD=$CERT_MANAGER_POD
kubectl logs -n kube-system $CERT_MANAGER_POD
Step 4: Create Application and Ingress Entry
We now need to create the application, if not already done.
Step 4.1: Create Deployment & Expose Service
We create an application named nginx-letsencrypt-demo and expose it to port 80 of the Cluster IP:
kubectl create deployment nginx-letsencrypt-demo --image=nginxdemos/hello
# output: 'deployment.apps/nginx-letsencrypt-demo created'

kubectl expose deployment nginx-letsencrypt-demo --port=80
# output: 'service/nginx-letsencrypt-demo exposed'
Step 4.2: Create Ingress Entry
With the next command, we create an entry in the ingress controller:
cat <<EOF | kubectl apply -f -
---
apiVersion: extensions/v1beta1
kind: Ingress
metadata:
  name: nginx-letsencrypt-demo
spec:
  rules:
    - host: nginx-letsencrypt-demo.159.69.221.89.nip.io
      http:
        paths:
          - backend:
              serviceName: nginx-letsencrypt-demo
              servicePort: 80
            path: /
EOF

# output: 'ingress.extensions/nginx-letsencrypt-demo created'
Note: the path specification might mandatory in order to discriminate this backend from a backend cert-manager creates automatically for the authenticate the ACME request.
Step 5: Create a Certificate
We are connected and verified by Let’s Encrypt now, but we have not yet created a certificate. Let us do so now.
cat <<EOF > certificate-staging.yaml
---
apiVersion: certmanager.k8s.io/v1alpha1
kind: Certificate
metadata:
  name: test-letsencrypt-staging
spec:
  secretName: test-letsencrypt-staging-tls
  issuerRef:
    name: letsencrypt-staging
  commonName: nginx-letsencrypt-demo.159.69.221.89.nip.io
  acme:
    config:
      - http01:
          ingress: nginx-letsencrypt-demo
        domains:
          - nginx-letsencrypt-demo.159.69.221.89.nip.io
EOF

kubectl apply -f certificate-staging.yaml
# output: certificate.certmanager.k8s.io/test-letsencrypt-staging created
After a few seconds or minutes, the issuer changes the ingress configuration automatically:
# kubectl get ingress.extensions/nginx-letsencrypt-demo -o yaml
apiVersion: extensions/v1beta1
kind: Ingress
metadata:
  annotations:
    kubectl.kubernetes.io/last-applied-configuration: |
      {"apiVersion":"extensions/v1beta1","kind":"Ingress","metadata":{"annotations":{},"name":"nginx-letsencrypt-demo","namespace":"default"},"spec":{"rules":[{"host":"nginx-letsencrypt-demo.159.69.221.89.nip.io","http":{"paths":[{"backend":{"serviceName":"nginx-letsencrypt-demo","servicePort":80},"path":"/"}]}}]}}
  creationTimestamp: 2019-01-04T10:41:27Z
  generation: 33
  name: nginx-letsencrypt-demo
  namespace: default
  resourceVersion: "4908697"
  selfLink: /apis/extensions/v1beta1/namespaces/default/ingresses/nginx-letsencrypt-demo
  uid: 4a206ab1-100d-11e9-a13e-9600001441cb
spec:
  rules:
  - host: nginx-letsencrypt-demo.159.69.221.89.nip.io
    http:
      paths:
      - backend:
          serviceName: nginx-letsencrypt-demo
          servicePort: 80
        path: /
      - backend:
          serviceName: cm-acme-http-solver-ddtzh
          servicePort: 8089
        path: /.well-known/acme-challenge/SBoTejTEqCr3suAxB_XHPiZLwGBU1X303meQ0hBhhb0
status:
  loadBalancer: {}
The cert-manager has created a second backend to the ingress controller: this backend is used to authenticate the ACME request. Let us check the corresponding URL manually:
# RESOURCE=$(kubectl get ingress nginx-letsencrypt-demo -o yaml | grep acme-challenge | awk '{print $2}'); echo $RESOURCE; curl nginx-letsencrypt-demo.159.69.221.89.nip.io$RESOURCE; echo
/.well-known/acme-challenge/Myq6wRERD8S2hJAPFjMjsDBwr6ImGZPMP36PZiKJxG4
Myq6wRERD8S2hJAPFjMjsDBwr6ImGZPMP36PZiKJxG4.he6wm92_EarVMVZ2pRzXy-hbTrPNaQvcLPEv7k76hg0
Step 6: Validate that the Certificate has created a TLS Secret
We now can watch the events of the certificate in order to check, whether the certificate object has successfully created a TLS secret:
watch 'kubectl describe certificate test-letsencrypt-staging | grep Events -A 40'
First, I did not observe any positive event, but after I have taken a break of an hour or so, I have checked again and I have obtained a message that a certificate is issued:
# kubectl describe certificate
Name:         test-letsencrypt-staging
Namespace:    default
Labels:       <none>
Annotations:  kubectl.kubernetes.io/last-applied-configuration:
                {"apiVersion":"certmanager.k8s.io/v1alpha1","kind":"Certificate","metadata":{"annotations":{},"name":"test-letsencrypt-staging","namespace...
API Version:  certmanager.k8s.io/v1alpha1
Kind:         Certificate
Metadata:
  Creation Timestamp:  2019-01-04T10:52:52Z
  Generation:          1
  Resource Version:    4915051
  Self Link:           /apis/certmanager.k8s.io/v1alpha1/namespaces/default/certificates/test-letsencrypt-staging
  UID:                 e244c65e-100e-11e9-a13e-9600001441cb
Spec:
  Acme:
    Config:
      Domains:
        nginx-letsencrypt-demo.159.69.221.89.nip.io
      Http 01:
        Ingress:  nginx-letsencrypt-demo
  Common Name:    nginx-letsencrypt-demo.159.69.221.89.nip.io
  Issuer Ref:
    Name:       letsencrypt-staging
  Secret Name:  test-letsencrypt-staging-tls
Status:
  Acme:
    Order:
      URL:  https://acme-staging-v02.api.letsencrypt.org/acme/order/7753182/18501635
  Conditions:
    Last Transition Time:  2019-01-04T12:31:44Z
    Message:               Certificate issued successfully
    Reason:                CertIssued
    Status:                True
    Type:                  Ready
    Last Transition Time:  2019-01-04T12:31:42Z
    Message:               Order validated
    Reason:                OrderValidated
    Status:                False
    Type:                  ValidateFailed
Events:
  Type    Reason       Age                  From          Message
  ----    ------       ----                 ----          -------
  Normal  CreateOrder  13m (x44 over 111m)  cert-manager  Created new ACME order, attempting validation...
According to the second message above, the validation has failed two seconds before it was validated successfully, but let us disregard this for now. In any case, the cert-manager should have created a secret by now:
# kubectl get secret test-letsencrypt-staging-tls
NAME                           TYPE                DATA   AGE
test-letsencrypt-staging-tls   kubernetes.io/tls   2      12m
Correct. Let us add the certificate secret to the ingress controller’s configuration now.
Step 7: Use the Certificate in the Ingress Controller
Let us make use of it now in the ingress controller: we add a tls section before the rules section as follows:
kubectl edit ingress nginx-letsencrypt-demo
...
  tls:
    - hosts:
      - nginx-letsencrypt-demo.159.69.221.89.nip.io
      secretName: test-letsencrypt-staging-tls
  rules:
...
If we do not want to wait for the POD to be updated, we can delete it, so the effect is immediate:
# kubectl get pod
NAME                                      READY   STATUS    RESTARTS   AGE
nginx-letsencrypt-demo-7d54866c4c-5ls7l   1/1     Running   0          145m
[root@centos-2gb-nbg1-1 ~]# kubectl delete pod nginx-letsencrypt-demo-7d54866c4c-5ls7l
pod "nginx-letsencrypt-demo-7d54866c4c-5ls7l" deleted
[root@centos-2gb-nbg1-1 ~]# kubectl get pod
NAME                                      READY   STATUS    RESTARTS   AGE
nginx-letsencrypt-demo-7d54866c4c-psktl   1/1     Running   0          7s
Step 8: Access Demo App via HTTPS

Step 9: Move to Production
In order to move to production, we just need to remove the ‚-staging‘ statements on the certificate and ingress.
Step 9.1: Create the Production Issuer
cp -f issuer-staging.yaml issuer.yaml
sed -i 's/-staging//g' issuer.yaml
kubectl apply -f issuer.yaml

# output: 'issuer.certmanager.k8s.io/letsencrypt created'
The following command should indicate that the ACME account is registered:
# kubectl describe issuer letsencrypt
Name:         letsencrypt
Namespace:    default
Labels:       <none>
Annotations:  kubectl.kubernetes.io/last-applied-configuration:
                {"apiVersion":"certmanager.k8s.io/v1alpha1","kind":"Issuer","metadata":{"annotations":{},"name":"letsencrypt","namespace":"default"},"spec...
API Version:  certmanager.k8s.io/v1alpha1
Kind:         Issuer
Metadata:
  Creation Timestamp:  2019-01-04T15:52:35Z
  Generation:          1
  Resource Version:    4931557
  Self Link:           /apis/certmanager.k8s.io/v1alpha1/namespaces/default/issuers/letsencrypt
  UID:                 c136f5bf-1038-11e9-a13e-9600001441cb
Spec:
  Acme:
    Email:  oliver.veits+letsencrypt-test@vocon-it.com
    Http 01:
    Private Key Secret Ref:
      Key:
      Name:  letsencrypt
    Server:  https://acme-v02.api.letsencrypt.org/directory
Status:
  Acme:
    Uri:  https://acme-v02.api.letsencrypt.org/acme/acct/48920128
  Conditions:
    Last Transition Time:  2019-01-04T15:52:41Z
    Message:               The ACME account was registered with the ACME server
    Reason:                ACMEAccountRegistered
    Status:                True
    Type:                  Ready
Events:                    <none>
This has not worked! I got a 301 Moved permanently, which will prevent the ACME to succesfully verify that we have full control over the web site.
# RESOURCE=$(kubectl get ingress nginx-letsencrypt-demo -o yaml | grep acme-challenge | awk '{print $2}'); echo $RESOURCE;
# curl -s -D - nginx-letsencrypt-demo.159.69.221.89.nip.io$RESOURCE
/.well-known/acme-challenge/Sqb42aOWpj8uUbITuPgEBf76e1egLPHc157zGz8fCaA
HTTP/1.1 301 Moved Permanently
Server: nginx/1.15.7
Date: Sat, 05 Jan 2019 07:40:00 GMT
Content-Type: text/html
Content-Length: 169
Connection: keep-alive
Location: https://nginx-letsencrypt-demo.159.69.221.89.nip.io:443/.well-known/acme-challenge/Sqb42aOWpj8uUbITuPgEBf76e1egLPHc157zGz8fCaA

<html>
<head><title>301 Moved Permanently</title></head>
<body>
<center><h1>301 Moved Permanently</h1></center>
<hr><center>nginx/1.15.7</center>
</body>
</html>
Therefore, I had to edit the ingress, remove the tls part. After that, the certificate object has created the corresponding secret with no problems. In order to avoid those problems, I recommend to edit the ingress and remove the tls part altogether and move it back after the certificate was created successfully.
Step 9.2: Create the Production Certificate
cp certificate-staging.yaml certificate.yaml
sed -i 's/-staging//g' certificate.yaml
kubectl apply -f certificate.yaml

# output: 'certificate.certmanager.k8s.io/test-letsencrypt created'
Now, the ingress should show a new backend for the acme challenge again:
# kubectl get ingress.extensions/nginx-letsencrypt-demo -o yaml
...
spec:
  rules:
  - host: nginx-letsencrypt-demo.159.69.221.89.nip.io
    http:
      paths:
      - backend:
          serviceName: nginx-letsencrypt-demo
          servicePort: 80
        path: /
      - backend:
          serviceName: cm-acme-http-solver-l2tm2
          servicePort: 8089
        path: /.well-known/acme-challenge/Sqb42aOWpj8uUbITuPgEBf76e1egLPHc157zGz8fCaA
...
Now the non-staging secret should be available:
# kubectl get secret
NAME                           TYPE                                  DATA   AGE
test-letsencrypt-staging-tls   kubernetes.io/tls                     2      19h
test-letsencrypt-tls           kubernetes.io/tls                     2      15m
Step 10: Configure Secret in Ingress Entry
kubectl edit ingress
kubectl edit ingress nginx-letsencrypt-demo
...
spec:
  tls:
  - hosts:
    - nginx-letsencrypt-demo.159.69.221.89.nip.io
    secretName: test-letsencrypt-tls
...
Step 11: Access the Application via Browser
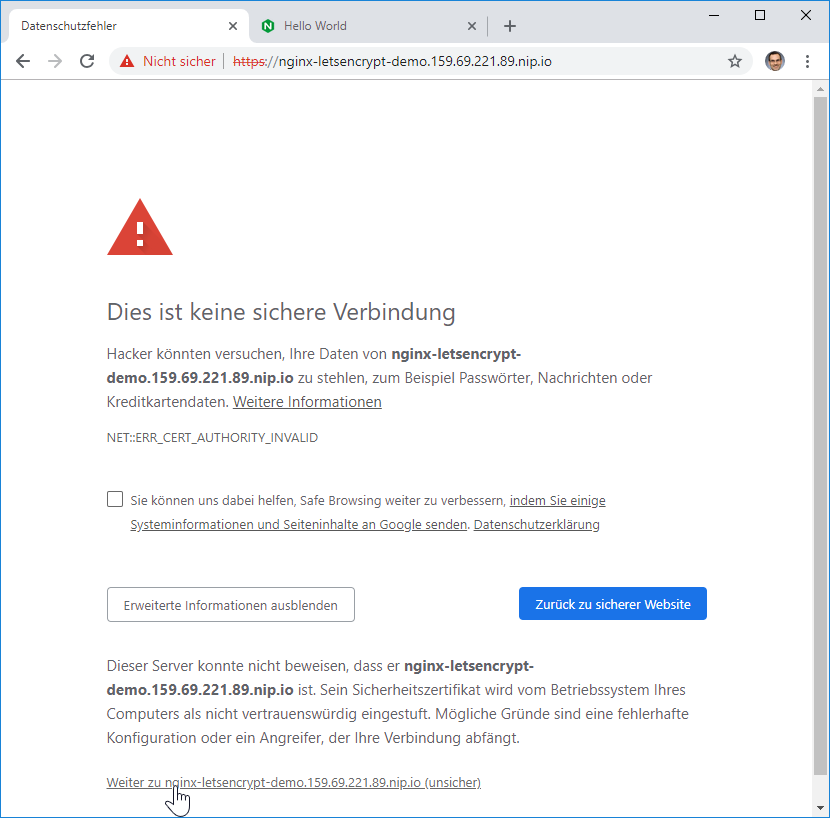
Now we access the application via a browser:

The „not secure“ icon before the URL seems to be an artifact. The certificate itself is valid:

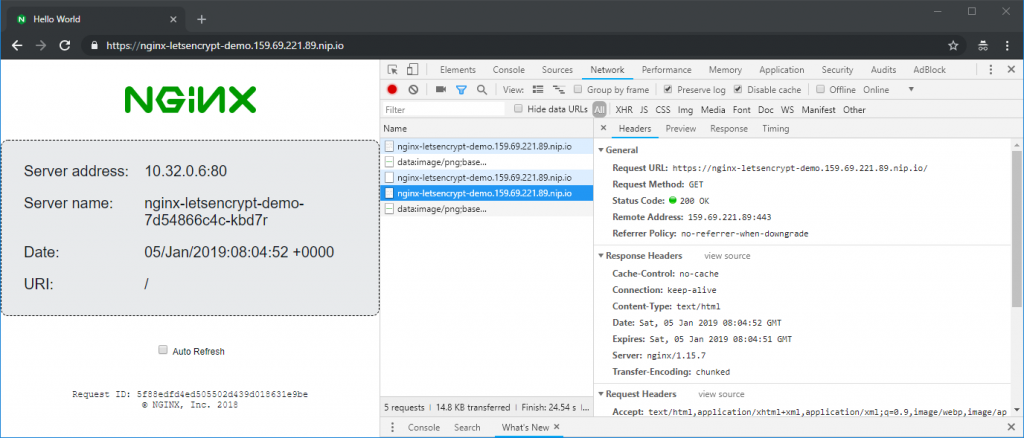
The certificate is valid. We enter the browser’s incognito modus, in order to avoid that the browser is confused by any self-signed certificate it had seen earlier. There, the browser shows the lock sign to the left side of the HTTPS URL:

After a restart of the browser application (all windows of the browser), the broser shows the secure lock sign on the left of the URL also in normal mode:

Note that the kubernetes ingress will redirect the corresponding HTTP connection to HTTPS:

You will receive a ‚301 Moved Permanently‘ message with the HTTPS location header. The browser then will access the HTTPS site and will receive a ‚200 OK‘ message:
We have created our first kubernetes application with a valid Let’s Encrypt certificate.
Summary
In this blog post we have installed cert-manager, which has the following architecture:

The cert-manager issuer registers with the Let’s Encrypt service. Upon successful registration, the cert-manager certificate object will obtain an URL path and a key. It will send a list of domains. At the same time, the certification object creates three temporary objects for the purpose of ACME validation:
- a POD listening on port 8089
- a Service accessing the POD
- a backend entry in the ingress controller
With that, the Let’s Encrypt ACME service can access the POD on the Domain and URL and will receive the key from the POD. With that, the Domain is validated and the ACME service will offer to sign a certificate with its private key. The cert-manager certificate object will encapsulate the signed certificate and private key into a TLS secret.
The ingress controller now can access the certificate and key and use it to terminate HTTPS sessions from the Internet.
For housekeeping purposes, the certificate object will delete the POD, the Service and the backend entry in the ingress controller, once it has received the signed certificate.
WORK in PROGRESS: Appendix A: Wildcard Certificate via DNS Auth
WORK in PROGRESS
The HTTP01 authentication method described above does not support wildcard certificates (e.g. *.example.com). However, Let’s Encrypt supports a DNS authentication that supports wildcard certificates as well as normal certificates. We will follow the instructions on the official Cert-Manager docs in order to test this feature. We will use
A.1 Move your Domain Name Server to CloudFlare
WORK in PROGRESS
In this test, we will use the free version of CloudFlare DNS in order to perform our task. For that, we have imported the Domain configuration to CloudFlare like follows:
- On CloudFlare, create a free account
- Import all Name Server Records from our domain
- Check, that all entries are covered. In our case, some entries were missing, so we had to add those manually
- Switch off the CDN functionality; i.e. the cloud must be grey and the arrow goes around. Example:

- Change the name server on your domain host to the one offered by CloudFlare
- Wait long enought for the Internet to learn about your new Domain Name Server (typically 1 hr, but it depends on your current name server records; best wait 24 hours to be sure)
Step A.1 Create a Key File
WORK in PROGRESS
In our case, we will use a file that holds the CloudFlare secret key and other relevant information:
CREDS=$HOME/.cloudflare/credentials.sh
touch $CREDS; chmod 400 $CREDS
echo "EMAIL=your_cloudflare_email_address@example.com" > $CREDS
echo "ZONE=your_cloudflare_zone >> $CREDS
echo "GLOBAL_API_KEY=your_cloudflare_global_api_key" >> $CREDS
Step A.2 Create Secret from Key File
WORK in PROGRESS
export NAMESPACE=default

source $CREDS
touch cloudflare-api-key.txt
chmod 600 cloudflare-api-key.txt
echo -n $GLOBAL_API_KEY > cloudflare-api-key.txt

kubectl delete secret cloudflare-api-key --namespace=$NAMESPACE 2>/dev/null
kubectl create secret generic cloudflare-api-key --from-file=cloudflare-api-key.txt --namespace=$NAMESPACE

# output:
# secret/cloudflare-api-key created

rm cloudflare-api-key.txt
Step A.3 Create an Issuer
WORK in PROGRESS
In Step 3, we have created an issuer for the HTTP01 authentication method. This time, we will create an issuer for the DNS01 authentication method with CloudFlare as the provider:
[ "$1" == "-d" ] && CMD=delete || CMD=apply

cat <<EOF | kubectl $CMD -f -
---
apiVersion: certmanager.k8s.io/v1alpha1
kind: Issuer
metadata:
  name: letsencrypt-staging-dns
  namespace: ${NAMESPACE}
spec:
  acme:
    server: https://acme-staging-v02.api.letsencrypt.org/directory
    email: ${EMAIL}
    privateKeySecretRef:
      name: letsencrypt-staging-dns
    dns01:
      providers:
        - name: cloudflare
          cloudflare:
            email: ${EMAIL}
            zone: ${ZONE}
            apiKeySecretRef:
              name: cloudflare-api-key
              key: cloudflare-api-key.txt
EOF

# output:
# secret "cloudflare-api-key" deleted  # only, if it had existed
# secret/cloudflare-api-key created
# issuer.certmanager.k8s.io/letsencrypt-staging-dns created
Immediately after the issuer is created, we can check the status of the issuer:
kubectl describe issuer.certmanager.k8s.io/letsencrypt-staging-dns | grep "Message\|Reason"

# output:
#    Message:               The ACME account was registered with the ACME server
#    Reason:                ACMEAccountRegistered
Step A.4 Create Certificate
cat <<EOF | kubectl $CMD -f -
---
apiVersion: certmanager.k8s.io/v1alpha1
kind: Certificate
metadata:
  name: vocon-it-com-staging
  namespace: ${NAMESPACE}
spec:
  secretName: vocon-it-com-staging-tls
  issuerRef:
    name: letsencrypt-staging-dns
  commonName: '*.vocon-it.com'
  dnsNames:
  - vocon-it.com
  acme:
    config:
    - dns01:
        provider: cloudflare
      domains:
      - '*.vocon-it.com'
      - vocon-it.com
EOF

# output:
# certificate.certmanager.k8s.io/vocon-it-com-staging created
Step A.5 Check Status
kubectl describe certificate vocon-it-com-staging | grep 'Message\|Reason' | grep -v 'Type'

# output:
#
#    Message:               Order validated
#    Reason:                OrderValidated
#    Message:               Certificate issued successfully
#    Reason:                CertIssued
You might need to be a little bit patient here. I have seen „slef-check failed“ in the beginning, but the problem has disappeared after 5 to 10 minutes.
Step A.6 Access Secret
kubectl describe secret letsencrypt-staging-dns
This will yield the output as follows:
Name:         letsencrypt-staging-dns
Namespace:    staging
Labels:
Annotations:

Type:  Opaque

Data
====
tls.key:  1675 bytes
Step A.7 Use Secret in Ingress Controller
TODO: Complete this work in latest Cert-Manager Version
Appendix B: WORK IN PROGRESS Upgrade to Cert-Manager v0.12
Step A.1: View Logs
After some time, we have seen that ACME is complaining about our ACME Client version to be too old:
POD=$(kubectl get pod -n kube-system | grep cert-manager | awk '{print $1}'); echo $POD
# output:
cert-manager-6f59bd9578-lgkjg

kubectl logs $POD -n kube-system --tail 5
# output:

I1227 19:37:59.497925       1 prepare.go:279] Cleaning up old/expired challenges for Certificate default/crochunter.codefresh.vocon-it.com
I1227 19:37:59.497944       1 logger.go:38] Calling CreateOrder
I1227 19:38:00.029408       1 sync.go:314] Error preparing issuer for certificate default/crochunter.codefresh.vocon-it.com: acme: urn:ietf:params:acme:error:rateLimited: Your ACME client is too old. Please upgrade to a newer version.
I1227 19:38:00.029614       1 sync.go:206] Certificate default/crochunter.codefresh.vocon-it.com scheduled for renewal in -172 hours
E1227 19:38:00.029648       1 controller.go:180] certificates controller: Re-queuing item "default/crochunter.codefresh.vocon-it.com" due to error processing: acme: urn:ietf:params:acme:error:rateLimited: Your ACME client is too old. Please upgrade to a newer version.
Let us try to upgrade the corresponding client:
Step A.2: Upgrade to v0.10
kubectl apply \
      -f https://raw.githubusercontent.com/jetstack/cert-manager/release-0.10/deploy/manifests/00-crds.yaml

# output:
customresourcedefinition.apiextensions.k8s.io/certificaterequests.certmanager.k8s.io created
Warning: kubectl apply should be used on resource created by either kubectl create --save-config or kubectl apply
customresourcedefinition.apiextensions.k8s.io/certificates.certmanager.k8s.io configured
customresourcedefinition.apiextensions.k8s.io/challenges.certmanager.k8s.io created
Warning: kubectl apply should be used on resource created by either kubectl create --save-config or kubectl apply
customresourcedefinition.apiextensions.k8s.io/clusterissuers.certmanager.k8s.io configured
Warning: kubectl apply should be used on resource created by either kubectl create --save-config or kubectl apply
customresourcedefinition.apiextensions.k8s.io/issuers.certmanager.k8s.io configured
customresourcedefinition.apiextensions.k8s.io/orders.certmanager.k8s.io created
Note: Versions 0.11 and 0.12 have lead to following error:
error: error validating "https://raw.githubusercontent.com/jetstack/cert-manager/release-0.12/deploy/manifests/00-crds.yaml": error validating data: ValidationError(CustomResourceDefinition.spec): unknown field "preserveUnknownFields" in io.k8s.apiextensions-apiserver.pkg.apis.apiextensions.v1beta1.CustomResourceDefinitionSpec; if you choose to ignore these errors, turn validation off with --validate=false
Add Repo:
helm repo add jetstack https://charts.jetstack.io

# output:
"jetstack" has been added to your repositories
Upgrade:
helm upgrade cert-manager \
  --force --namespace kube-system \
  jetstack/cert-manager

# output:
Error: UPGRADE FAILED: no ServiceAccount with the name "cert-manager-cainjector" found
Now tried (found on https://github.com/jetstack/cert-manager/issues/1983):
kubectl replace --force -f https://github.com/jetstack/cert-manager/releases/download/v0.9.1/cert-manager.yaml --validate=false
Now we get the following error clusterissuer.certmanager.k8s.io "letsencrypt-prod" not found:
kubectl logs cert-manager-6f59bd9578-lgkjg --tail 1
E1229 05:20:48.666778       1 controller.go:177] ingress-shim controller: Re-queuing item "jenkins2/release-name-jenkins" due to error processing: clusterissuer.certmanager.k8s.io "letsencrypt-prod" not found
Create a cluster-issuer (as I had found on croc-hunter/cluster-issuer.yaml):
cat <<EOF | kubectl apply -f -
---
apiVersion: certmanager.k8s.io/v1alpha1
kind: ClusterIssuer
metadata:
  name: letsencrypt-prod
spec:
  acme:
    email: issuer-letsencrypt@vocon-it.com
    http01: {}
    privateKeySecretRef:
      key: ""
      name: letsencrypt-prod
    server: https://acme-v02.api.letsencrypt.org/directory
EOF
Now the log changes?
kubectl logs cert-manager-6f59bd9578-lgkjg | grep old | tail -5

# output:
E1229 05:40:04.880553       1 controller.go:180] certificates controller: Re-queuing item "jenkins/jenkins.dev.vocon-it.com" due to error processing: acme: urn:ietf:params:acme:error:rateLimited: Your ACME client is too old. Please upgrade to a newer version.
This is the current date and time. ACME version in cert-manager 0.9.1 is still too old. Trying a newer version (latest non-alpha version found on https://github.com/jetstack/cert-manager/releases):
kubectl replace --force -f https://github.com/jetstack/cert-manager/releases/download/v0.12.0/cert-manager.yaml --validate=false
The output looks as follows:
customresourcedefinition.apiextensions.k8s.io "certificaterequests.cert-manager.io" deleted
customresourcedefinition.apiextensions.k8s.io "certificates.cert-manager.io" deleted
customresourcedefinition.apiextensions.k8s.io "challenges.acme.cert-manager.io" deleted
customresourcedefinition.apiextensions.k8s.io "clusterissuers.cert-manager.io" deleted
customresourcedefinition.apiextensions.k8s.io "issuers.cert-manager.io" deleted
customresourcedefinition.apiextensions.k8s.io "orders.acme.cert-manager.io" deleted
namespace "cert-manager" deleted
serviceaccount "cert-manager-cainjector" deleted
serviceaccount "cert-manager" deleted
serviceaccount "cert-manager-webhook" deleted
clusterrole.rbac.authorization.k8s.io "cert-manager-cainjector" deleted
clusterrolebinding.rbac.authorization.k8s.io "cert-manager-cainjector" deleted
role.rbac.authorization.k8s.io "cert-manager-cainjector:leaderelection" deleted
rolebinding.rbac.authorization.k8s.io "cert-manager-cainjector:leaderelection" deleted
clusterrolebinding.rbac.authorization.k8s.io "cert-manager-webhook:auth-delegator" deleted
rolebinding.rbac.authorization.k8s.io "cert-manager-webhook:webhook-authentication-reader" deleted
clusterrole.rbac.authorization.k8s.io "cert-manager-webhook:webhook-requester" deleted
role.rbac.authorization.k8s.io "cert-manager:leaderelection" deleted
rolebinding.rbac.authorization.k8s.io "cert-manager:leaderelection" deleted
clusterrole.rbac.authorization.k8s.io "cert-manager-controller-issuers" deleted
clusterrole.rbac.authorization.k8s.io "cert-manager-controller-clusterissuers" deleted
clusterrole.rbac.authorization.k8s.io "cert-manager-controller-certificates" deleted
clusterrole.rbac.authorization.k8s.io "cert-manager-controller-orders" deleted
clusterrole.rbac.authorization.k8s.io "cert-manager-controller-challenges" deleted
clusterrole.rbac.authorization.k8s.io "cert-manager-controller-ingress-shim" deleted
clusterrolebinding.rbac.authorization.k8s.io "cert-manager-controller-issuers" deleted
clusterrolebinding.rbac.authorization.k8s.io "cert-manager-controller-clusterissuers" deleted
clusterrolebinding.rbac.authorization.k8s.io "cert-manager-controller-certificates" deleted
clusterrolebinding.rbac.authorization.k8s.io "cert-manager-controller-orders" deleted
clusterrolebinding.rbac.authorization.k8s.io "cert-manager-controller-challenges" deleted
clusterrolebinding.rbac.authorization.k8s.io "cert-manager-controller-ingress-shim" deleted
clusterrole.rbac.authorization.k8s.io "cert-manager-view" deleted
clusterrole.rbac.authorization.k8s.io "cert-manager-edit" deleted
service "cert-manager-webhook" deleted
deployment.apps "cert-manager-cainjector" deleted
deployment.apps "cert-manager" deleted
deployment.apps "cert-manager-webhook" deleted
mutatingwebhookconfiguration.admissionregistration.k8s.io "cert-manager-webhook" deleted
validatingwebhookconfiguration.admissionregistration.k8s.io "cert-manager-webhook" deleted
... here it is hanging since 10 minutes ...
Since it was hanging quite long, I have stopped it with Ctrl-C and tried again:
kubectl replace --force -f https://github.com/jetstack/cert-manager/releases/download/v0.12.0/cert-manager.yaml --validate=false
# output:
Error from server (Conflict): error when deleting "https://github.com/jetstack/cert-manager/releases/download/v0.12.0/cert-manager.yaml": Operation cannot be fulfilled on namespaces "cert-manager": The system is ensuring all content is removed from this namespace.  Upon completion, this namespace will automatically be purged by the system.

k get namespaces | grep cert
# output:
cert-manager                            Terminating   33h
Trying without replace:
kubectl apply -f https://github.com/jetstack/cert-manager/releases/download/v0.12.0/cert-manager.yaml --validate=false

# output:
...
Error from server (Forbidden): error when creating "https://github.com/jetstack/cert-manager/releases/download/v0.12.0/cert-manager.yaml": serviceaccounts "cert-manager-cainjector" is forbidden: unable to create new content in namespace cert-manager because it is being terminated
On https://github.com/kubernetes/kubernetes/issues/19317 I have found, how we can fix the namespace locked in terminating: remove the finalizers:
k edit namespace cert-manager
...
# Please edit the object below. Lines beginning with a '#' will be ignored,
# and an empty file will abort the edit. If an error occurs while saving this file will be
# reopened with the relevant failures.
#
apiVersion: v1
kind: Namespace
metadata:
  annotations:
    kubectl.kubernetes.io/last-applied-configuration: |
      {"apiVersion":"v1","kind":"Namespace","metadata":{"annotations":{},"name":"cert-manager"}}
  creationTimestamp: "2019-12-27T20:02:38Z"
  deletionTimestamp: "2019-12-29T05:46:19Z"
  labels:
    certmanager.k8s.io/disable-validation: "true"
  name: cert-manager
  resourceVersion: "32499388"
  selfLink: /api/v1/namespaces/cert-manager
  uid: d4deb2fc-28e3-11ea-9c9f-960000233a0f
spec:
  finalizers:   #<--------------- remove
  - kubernetes  #<--------------- remove
status:
  phase: Terminating
Still does not help:
Now tried deleting the old resources:
kubectl delete --force -f https://github.com/jetstack/cert-manager/releases/download/v0.9.1/cert-manager.yaml
There were some errors like
Error from server (Conflict): error when deleting "https://github.com/jetstack/cert-manager/releases/download/v0.9.1/cert-manager.yaml": Operation cannot be fulfilled on namespaces "cer
However, it has deleted successfully the namespace:
k get namespaces | grep cert
Now we can try to create the new version again:
helm delete cert-manager --purge  # for cleaning previously installed cert-manater

# create cert-manager:
kubectl apply -f https://github.com/jetstack/cert-manager/releases/download/v0.12.0/cert-manager.yaml --validate=false
Now:
k get pod -n cert-manager
NAME                                       READY   STATUS    RESTARTS   AGE
cert-manager-598bfb5ddb-74n44              1/1     Running   0          6m55s
cert-manager-cainjector-594fd9cc45-xvkwd   1/1     Running   1          6m55s
cert-manager-webhook-785ff8fc78-4t7ll      1/1     Running   0          6m55s

k logs cert-manager-598bfb5ddb-74n44 -n cert-manager
...
I1229 06:15:58.815778       1 controller.go:135] cert-manager/controller/webhook-bootstrap "level"=0 "msg"="finished processing work item" "key"="cert-manager/cert-manager-webhook-tls"
I1229 06:15:58.815840       1 controller.go:129] cert-manager/controller/webhook-bootstrap "level"=0 "msg"="syncing item" "key"="cert-manager/cert-manager-webhook-tls"
I1229 06:15:58.816474       1 controller.go:255] cert-manager/controller/webhook-bootstrap/webhook-bootstrap/ca-secret "level"=0 "msg"="serving certificate already up to date" "resource_kind"="Secret" "resource_name"="cert-manager-webhook-tls" "resource_namespace"="cert-manager"
I1229 06:15:58.816511       1 controller.go:135] cert-manager/controller/webhook-bootstrap "level"=0 "msg"="finished processing work item" "key"="cert-manager/cert-manager-webhook-tls"

k logs cert-manager-598bfb5ddb-74n44 -n cert-manager | grep error
# output:
E1229 06:15:09.277796       1 leaderelection.go:330] error retrieving resource lock kube-system/cert-manager-controller: configmaps "cert-manager-controller" is forbidden: User "system:serviceaccount:cert-manager:cert-manager" cannot get resource "configmaps" in API group "" in the namespace "kube-system"
E1229 06:15:53.553876       1 sync.go:57] cert-manager/controller/ingress-shim "msg"="failed to determine issuer to be used for ingress resource" "error"="failed to determine issuer name to be used for ingress resource" "resource_kind"="Ingress" "resource_name"="croc-hunter-croc-hunter" "resource_namespace"="croc-hunter"
E1229 06:15:53.553981       1 sync.go:57] cert-manager/controller/ingress-shim "msg"="failed to determine issuer to be used for ingress resource" "error"="failed to determine issuer name to be used for ingress resource" "resource_kind"="Ingress" "resource_name"="release-name-jenkins" "resource_namespace"="jenkins2"
E1229 06:15:53.554112       1 sync.go:57] cert-manager/controller/ingress-shim "msg"="failed to determine issuer to be used for ingress resource" "error"="failed to determine issuer name to be used for ingress resource" "resource_kind"="Ingress" "resource_name"="mychart-prod-croc-hunter" "resource_namespace"="default"
E1229 06:15:53.554185       1 sync.go:57] cert-manager/controller/ingress-shim "msg"="failed to determine issuer to be used for ingress resource" "error"="failed to determine issuer name to be used for ingress resource" "resource_kind"="Ingress" "resource_name"="feature-0012-deploy-and--5da24c-croc-hunter" "resource_namespace"="feature-0012-deploy-and--5da24c"
E1229 06:15:53.554342       1 sync.go:57] cert-manager/controller/ingress-shim "msg"="failed to determine issuer to be used for ingress resource" "error"="failed to determine issuer name to be used for ingress resource" "resource_kind"="Ingress" "resource_name"="jenkins" "resource_namespace"="jenkins"
E1229 06:15:53.581131       1 controller.go:230] cert-manager/controller/webhook-bootstrap/webhook-bootstrap/ca-secret "msg"="error decoding CA private key" "error"="error decoding private key PEM block" "resource_kind"="Secret" "resource_name"="cert-manager-webhook-tls" "resource_namespace"="cert-manager"
E1229 06:15:53.581180       1 controller.go:131] cert-manager/controller/webhook-bootstrap "msg"="re-queuing item  due to error processing" "error"="error decoding private key PEM block" "key"="cert-manager/cert-manager-webhook-tls"
Are the errors irrelevant? I do not know yet.
Review resources:
kubectl get crd
NAME                                  CREATED AT
certificaterequests.cert-manager.io   2019-12-29T05:55:55Z
certificates.cert-manager.io          2019-12-29T05:55:55Z
challenges.acme.cert-manager.io       2019-12-29T05:55:55Z
challenges.certmanager.k8s.io         2019-12-27T20:02:38Z
clusterissuers.cert-manager.io        2019-12-29T05:55:55Z
issuers.cert-manager.io               2019-12-29T05:55:55Z
orders.acme.cert-manager.io           2019-12-29T05:55:55Z
Then create an issuer:
# issuer-letsencrypt-prod.yaml
---
apiVersion: cert-manager.io/v1alpha2    # <--- changed
kind: Issuer
metadata:
  name: letsencrypt-prod
spec:
  acme:
    server: https://acme-v02.api.letsencrypt.org/directory
    email: oliver.veits+letsencrypt-test@vocon-it.com
    privateKeySecretRef:
      name: letsencrypt-prod
    solvers:                             # <--- added
    - selector: {}                       # <--- added
      http01:
        ingress:
          class: nginx
Check:
k describe issuer letsencrypt-prod

# output:
Name:         letsencrypt-prod
Namespace:    jenkins2
Labels:       <none>
Annotations:  kubectl.kubernetes.io/last-applied-configuration:
                {"apiVersion":"cert-manager.io/v1alpha2","kind":"Issuer","metadata":{"annotations":{},"name":"letsencrypt-prod","namespace":"jenkins2"},"s...
API Version:  cert-manager.io/v1alpha2
Kind:         Issuer
Metadata:
  Creation Timestamp:  2019-12-29T18:27:15Z
  Generation:          2
  Resource Version:    32613065
  Self Link:           /apis/cert-manager.io/v1alpha2/namespaces/jenkins2/issuers/letsencrypt-prod
  UID:                 d68f3259-2a68-11ea-9c9f-960000233a0f
Spec:
  Acme:
    Email:  oliver.veits+letsencrypt-test@vocon-it.com
    Private Key Secret Ref:
      Name:  letsencrypt-prod
    Server:  https://acme-v02.api.letsencrypt.org/directory
    Solvers:
      Http 01:
        Ingress:
          Class:  nginx
      Selector:
Status:
  Acme:
    Last Registered Email:  oliver.veits+letsencrypt-test@vocon-it.com
    Uri:                    https://acme-v02.api.letsencrypt.org/acme/acct/74769023
  Conditions:
    Last Transition Time:  2019-12-29T18:27:16Z
    Message:               The ACME account was registered with the ACME server
    Reason:                ACMEAccountRegistered
    Status:                True
    Type:                  Ready
Events:                    <none>
And we need a new ingress:
# ingress-jenkins2.yaml
---
---
apiVersion: extensions/v1beta1
kind: Ingress
metadata:
  annotations:
#    certmanager.k8s.io/cluster-issuer: letsencrypt-prod
    cert-manager.io/issuer: letsencrypt-prod
#    certmanager.k8s.io/clusterissuer: letsencrypt-prod
    ingress.kubernetes.io/secure-backends: "true"
    kubernetes.io/ingress.class: nginx
    kubernetes.io/tls-acme: "true"

  name: jenkins2
spec:
  rules:
  - host: "jenkins2.dev.vocon-it.com"
    http:
      paths:
      - backend:
          serviceName: jenkins2
          servicePort: 8080
  tls:
    - hosts:
      - jenkins2.dev.vocon-it.com
      secretName: jenkins2.dev.vocon-it.com
Now a secret should be created:
k get secret jenkins2
NAME       TYPE     DATA   AGE
jenkins2   Opaque   2      2d10h
And a certificate is created:
k get certificate
NAME                        READY   SECRET                      AGE
jenkins2.dev.vocon-it.com   True    jenkins2.dev.vocon-it.com   4h6m
More details:
k describe certificate

# output:
Name:         jenkins2.dev.vocon-it.com
Namespace:    jenkins2
Labels:       <none>
Annotations:  <none>
API Version:  cert-manager.io/v1alpha2
Kind:         Certificate
Metadata:
  Creation Timestamp:  2019-12-29T18:39:30Z
  Generation:          1
  Owner References:
    API Version:           extensions/v1beta1
    Block Owner Deletion:  true
    Controller:            true
    Kind:                  Ingress
    Name:                  jenkins2
    UID:                   f488961d-2a68-11ea-9c9f-960000233a0f
  Resource Version:        32613234
  Self Link:               /apis/cert-manager.io/v1alpha2/namespaces/jenkins2/certificates/jenkins2.dev.vocon-it.com
  UID:                     8cb1c901-2a6a-11ea-9c9f-960000233a0f
Spec:
  Dns Names:
    jenkins2.dev.vocon-it.com
  Issuer Ref:
    Group:      cert-manager.io
    Kind:       Issuer
    Name:       letsencrypt-prod
  Secret Name:  jenkins2.dev.vocon-it.com
Status:
  Conditions:
    Last Transition Time:  2019-12-29T18:58:39Z
    Message:               Certificate is up to date and has not expired
    Reason:                Ready
    Status:                True
    Type:                  Ready
  Not After:               2020-03-28T17:58:38Z
Events:                    <none>
Note: for the acme verification, remote access to ports 80, 443 must be enabled (was not enabled in my case because of my iptables rules)
Now access to the URL via HTTPS is possible:
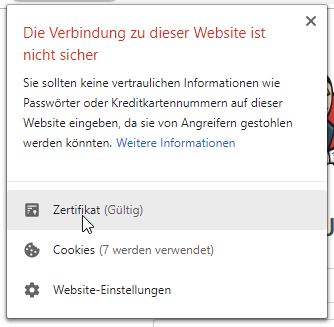
The certificate is shown as invalid, but it is valid, as you can see when looking at the details of the certificate:
References
- We are closely following the youtube videos Automatically Provision TLS Certificates in K8s with cert-manager and Use cert-manager with Let’s Encrypt® Certificates Tutorial: Automatic Browser-Trusted HTTPS by kubucation. Thanks to kubucation for sharing!
- Other blog posts of this kubernetes series:
- (1) Installing Minikube on CentOS
- (2) Kubernetes Service on Minikube
- (3) Kubernetes Cluster with Kubeadm
- (4) Kubernetes Persistent Volumes (a hello world a la hostPath)
- (5) Kubernetes local persistent volumes
- (6) Kubernetes Ingress Controller on minikube
- (7) Kubernetes Ingress Controller on a multi-node Cluster

Thanks, team https://www.dumpscafe.com/ for preparing real exam dumps. It not only shortened my preparation period but also helped me to get high-flying numbers while doing 8 hours job in my office. Highly motivated, and highly recommended to all my colleagues to try DumpsCafe real exam questions and answers to pass it in their maiden attempt.
The HPE0-V25 Practice Test Examsvce is a resource designed to help individuals prepare for the HPE0-V25 exam, which is associated with the certification for the Designing HPE Hybrid IT Solutions. This practice test offers a simulated exam environment with questions that closely resemble those found in the actual exam.
Thanks for sharing. I read many of your blog posts, cool, your blog is very good.