In the step-by-step tutorial Getting Started with DC/OS on Vagrant, we have learned how to install a MesosPhere DC/OS data center operating system locally. This time, we will install a DC/OS system on AWS Cloud: existing AWS CloudFormation templates will help us create a fully functional DC/OS data center with a Mesos master and five Mesos slaves within less than two hours. At the end, we will test the environment by starting a „Hello World“ service based on Docker from DC/OS‘ administration panel and accessing the application from the Internet.
MesoSphere DC/OS is a Data Center Operating System, which is built upon Apache Mesos and Mesosphere Marathon, an open source container orchestration platform. It has the target to hide the complexity of data centers when deploying applications.
AWS, Amazon Web Services is the leading provider offering Infrastructure as a Service and more.
Beware that running DC/OS on AWS does not come for free. I am still in the free tier period, so I had to pay only $0.48 for a test duration of less than 45 minutes (measured from the time I have created to the point in time I have terminated the stack). However, the induced cost might be higher in your case. Also, I had to pay a lot more, as the time of usage increased and some of the free usage limits were exceeded.
I recommend to check your current bill before and after the the test on the AWS Billing Home for the region US-West-2.
The guide has been tested for the region us-west-2 and us-east-2. However, it has worked only for us-west-2; probably because the correct image IDs are missing for us-east-2.
We are loosely following https://aws.amazon.com/blogs/apn/announcing-mesosphere-dcos-on-aws/, but we had to add correct some commands and add some instructions on user permissions.
See also
- Official DCOS documentation v1.10 on AWS installation
- Part 1 of this series: Getting Started with Mesos Resource Reservation & Marathon Watchdog – A “Hello World” Example
- Part 2 of this series: Getting Started with DC/OS on Vagrant
Prerequisites
- You need an AWS account
- A command line environment
- A fully configured AWS CLI installation (see the AWS CLI installation instructions for detailed requirements and installation steps)
- Curl or GNU Wget
- Python (2.7 or 3.4)
Step 1: Configure your Credentials
You need to have entered your AWS Access Key and Secret on the ~/.aws/credentials file:
[default]
aws_access_key_id = XXXXXXX
aws_secret_access_key = KKKKKKKK
Step 2: Create an SSH Key for DC/OS
aws --region us-west-2 ec2 create-key-pair --key-name dcos-demo-key --output text --query KeyMaterial > dcos-demo-key_us-west-2.pem
cp dcos-demo-key_us-west-2.pem dcos-demo-key.pem
chmod 600 dcos-demo-key.pem
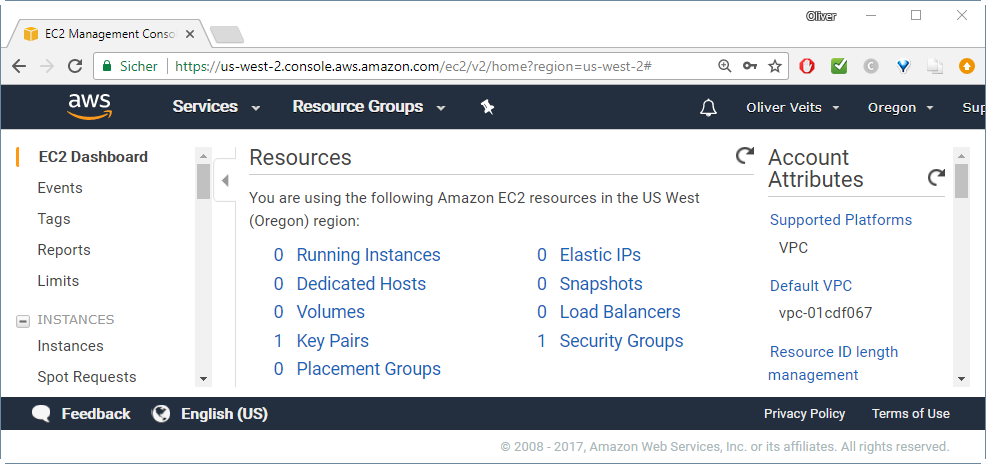
This will create an additional key pair on region us-west-2 (before, I had no key pair on this region; now it is one key):
Step 3: Find Cloud Formation Template URL
The official DCOS documentation v1.10 on AWS installation offers two options:
For our tests, we will choose the basic variant with one Mesos master and five Mesos slaves.
The corresponding CloudFormation Templates can be found on this page.

We copy the „Launch Stack“ link for us-west-2 with Single Master and paste it here:
https://console.aws.amazon.com/cloudformation/home?region=us-west-2#/stacks/new?templateURL=https://s3-us-west-2.amazonaws.com/downloads.dcos.io/dcos/EarlyAccess/commit/a5ecc9af5d9ca903f53fa16f6f0ebd597095652e/cloudformation/single-master.cloudformation.json
From the link, we can see that the template URL is as follows. On a Linux shell (e.g. GIT Bash on Windows), we define:
TEMPLATE_URL=https://s3-us-west-2.amazonaws.com/downloads.dcos.io/dcos/EarlyAccess/commit/a5ecc9af5d9ca903f53fa16f6f0ebd597095652e/cloudformation/single-master.cloudformation.json
Step 4: Launch the CloudFormation Stack from AWS CLI
Step 4.1: First Attempt to launch the Stack
From our main instructions page, we find something like:
aws --region us-west-2 cloudformation create-stack --stack-name dcos-demo \
    --template-url ${TEMPLATE_URL} \
    --parameters ParameterKey=AcceptEULA,ParameterValue="Yes",ParameterKey=KeyName,ParameterValue="dcos-demo-key" \
    --capabilities CAPABILITY_IAM
Note that there were some errors in the instructions page: the line feed formatting was wrong and a comma was missing. This has been corrected above.
If your AWS CLI is using a user without CloudFormation permissions, you will receive the following error message:
A client error (AccessDenied) occurred when calling the CreateStack operation: User: arn:aws:iam::924855196031:user/secadmin is not authorized to perform: cloudformation:CreateStack on resource: arn:aws:cloudformation:us-east-2:924855196031:stack/dcos-demo/*
If you have not encountered this error, you can skip the next three substeps.
Step 4.2: Create Policy for CloudFormation Permissions
On the EC2 Dashboard of the AWS Console for us-west-2 (choose right region in the URL), choose
–> Services
–> IAM
–> Policies
–> Create Policy
–> Select Policy Generator
–> Choose Parameters:
Effect: Allow
AWS Service: AWS CloudFormation
Actions: All
Actions ARN: *
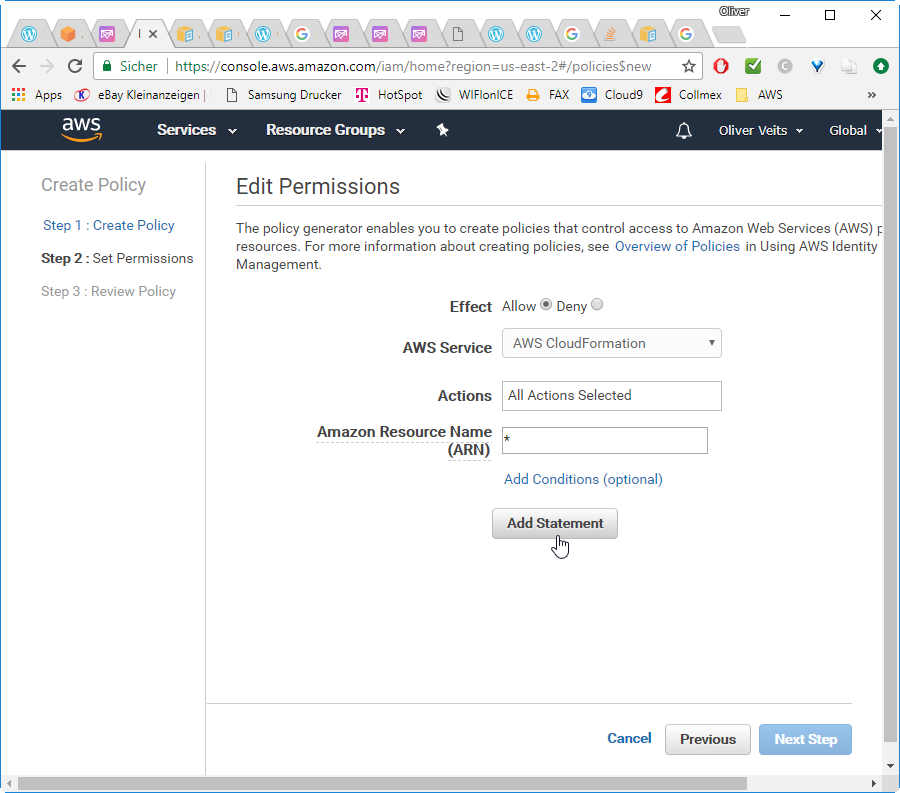
–> Add Statement
–> edit Name, e.g. „CloudFormation“
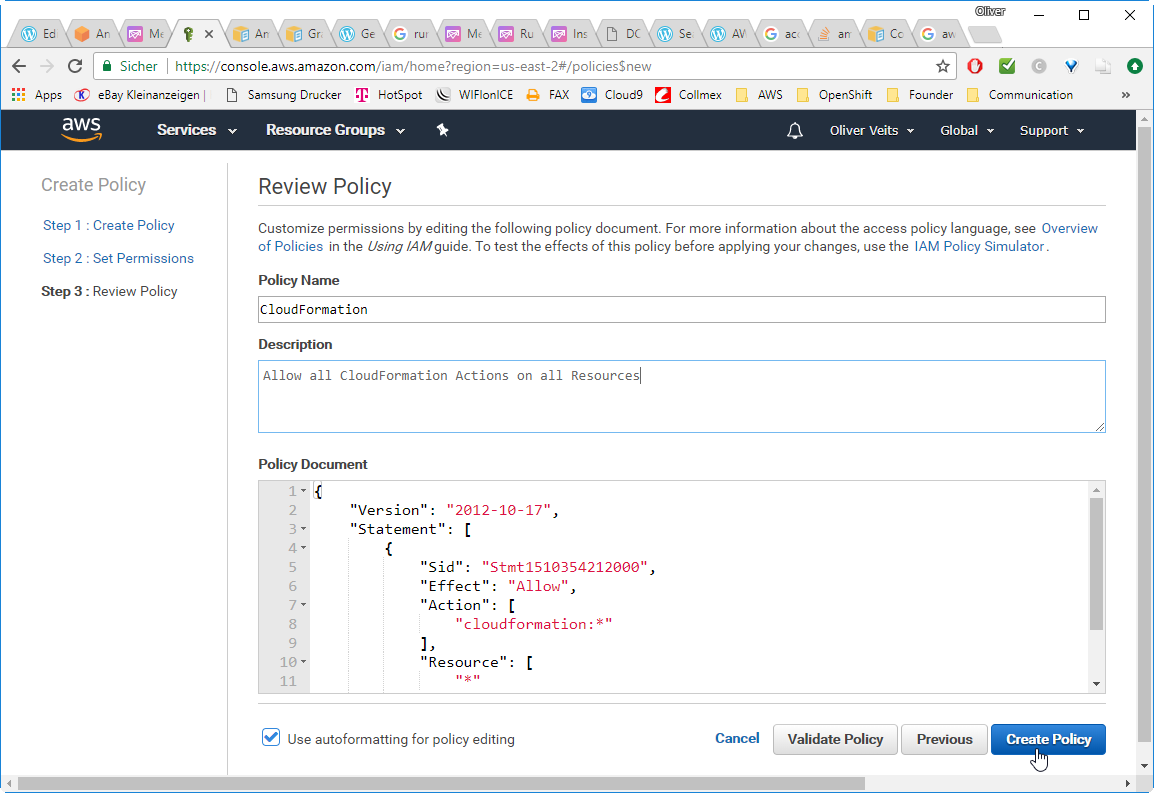
–> Create Policy
Step 4.3: Attach Policy to User
–> Users
–> Choose your user
–> Add Permission
–> Attach existing policies directly
–> check „CloudFormation“

–> Next Review
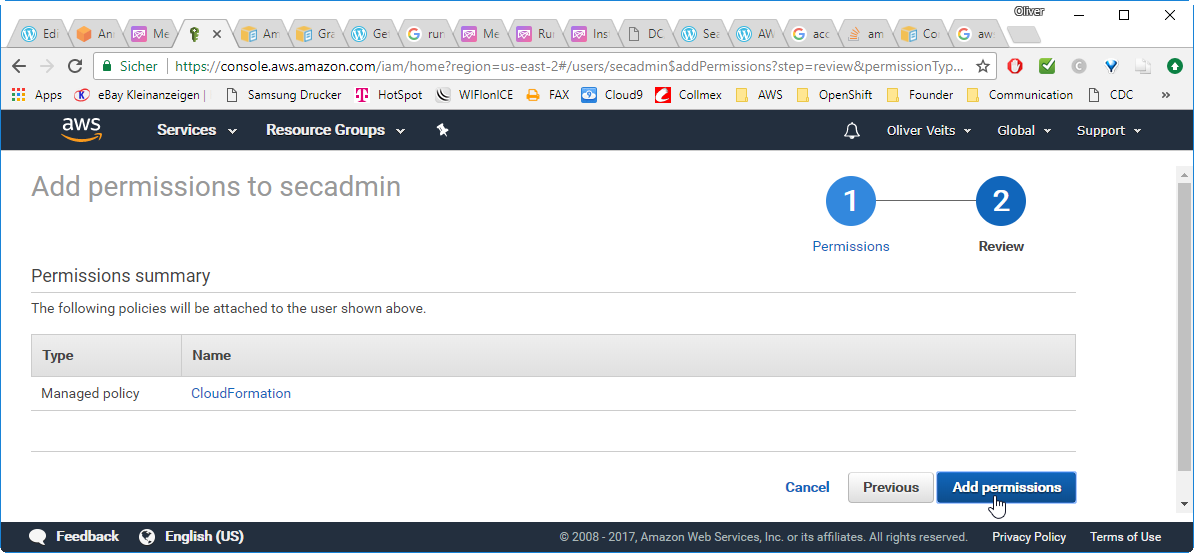
–> Add permissions
Step 4.4: Try again: Create Policy for CloudFormation Permissions
TEMPLATE_URL=https://s3-us-west-2.amazonaws.com/downloads.dcos.io/dcos/EarlyAccess/commit/a5ecc9af5d9ca903f53fa16f6f0ebd597095652e/cloudformation/single-master.cloudformation.json
aws --region us-west-2 cloudformation create-stack --stack-name dcos-demo \
    --template-url ${TEMPLATE_URL} \
    --parameters ParameterKey=AcceptEULA,ParameterValue="Yes",ParameterKey=KeyName,ParameterValue="dcos-demo-key" \
    --capabilities CAPABILITY_IAM
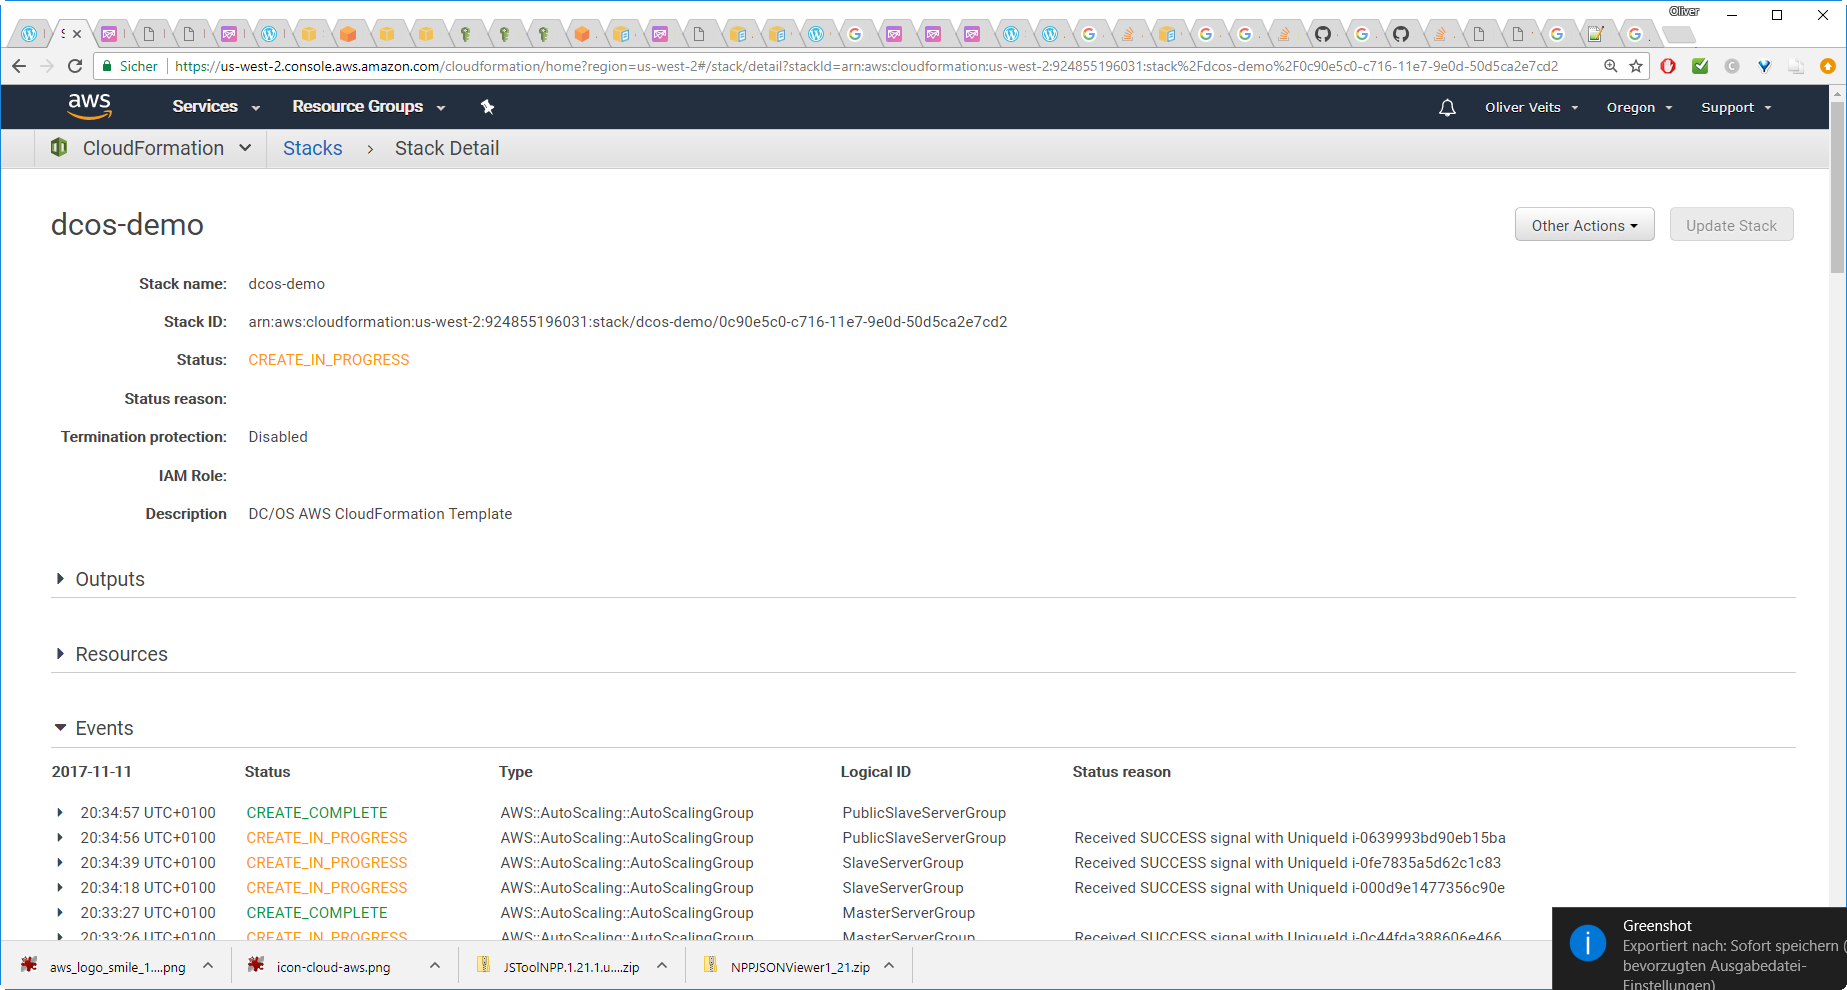
This time we get following Response:
{
„StackId“: „arn:aws:cloudformation:us-west-2:924855196031:stack/dcos-demo/0c90e5c0-c716-11e7-9e0d-50d5ca2e7cd2“
}
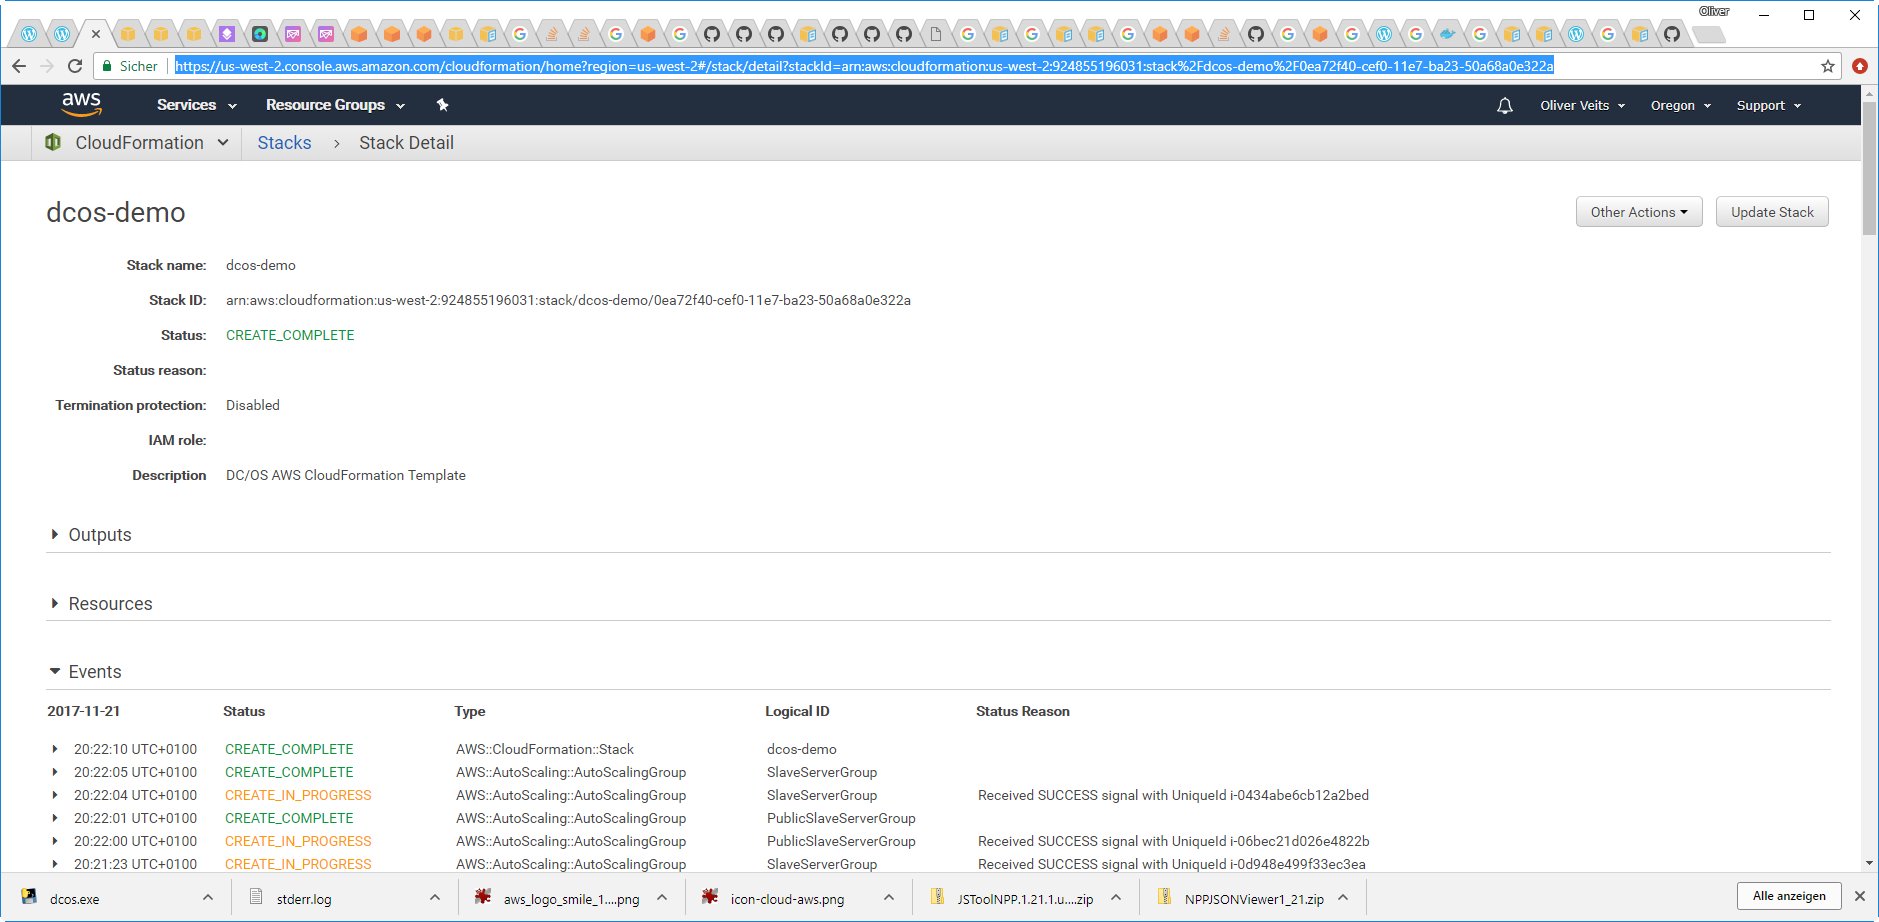
After some minutes, we will see CREATE_COMPLETE in the AWS Console of US West 2:
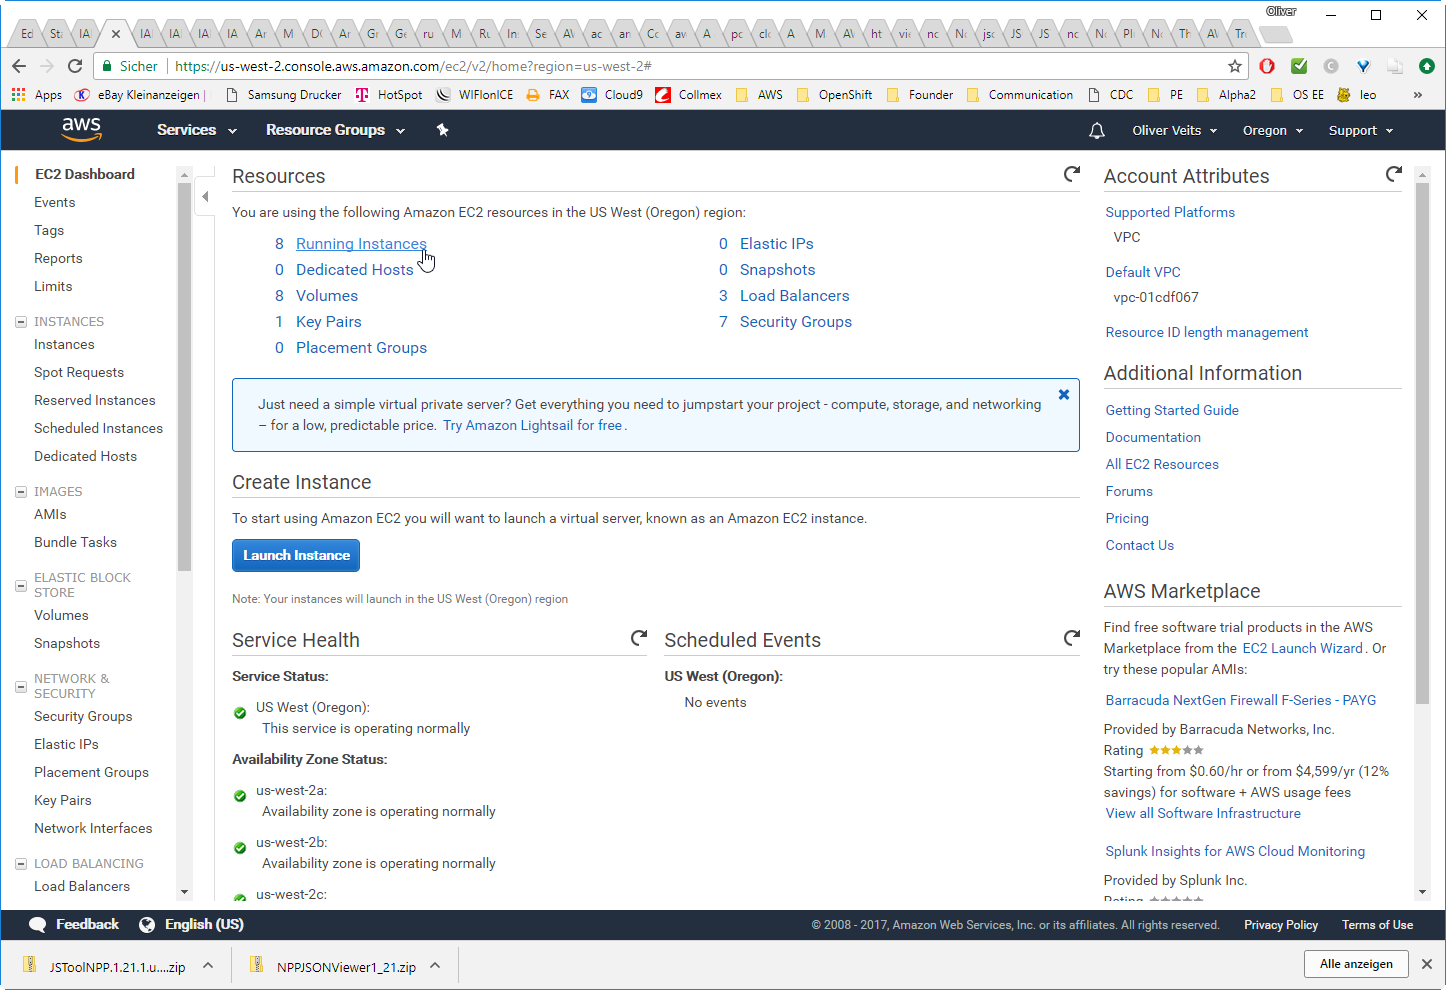
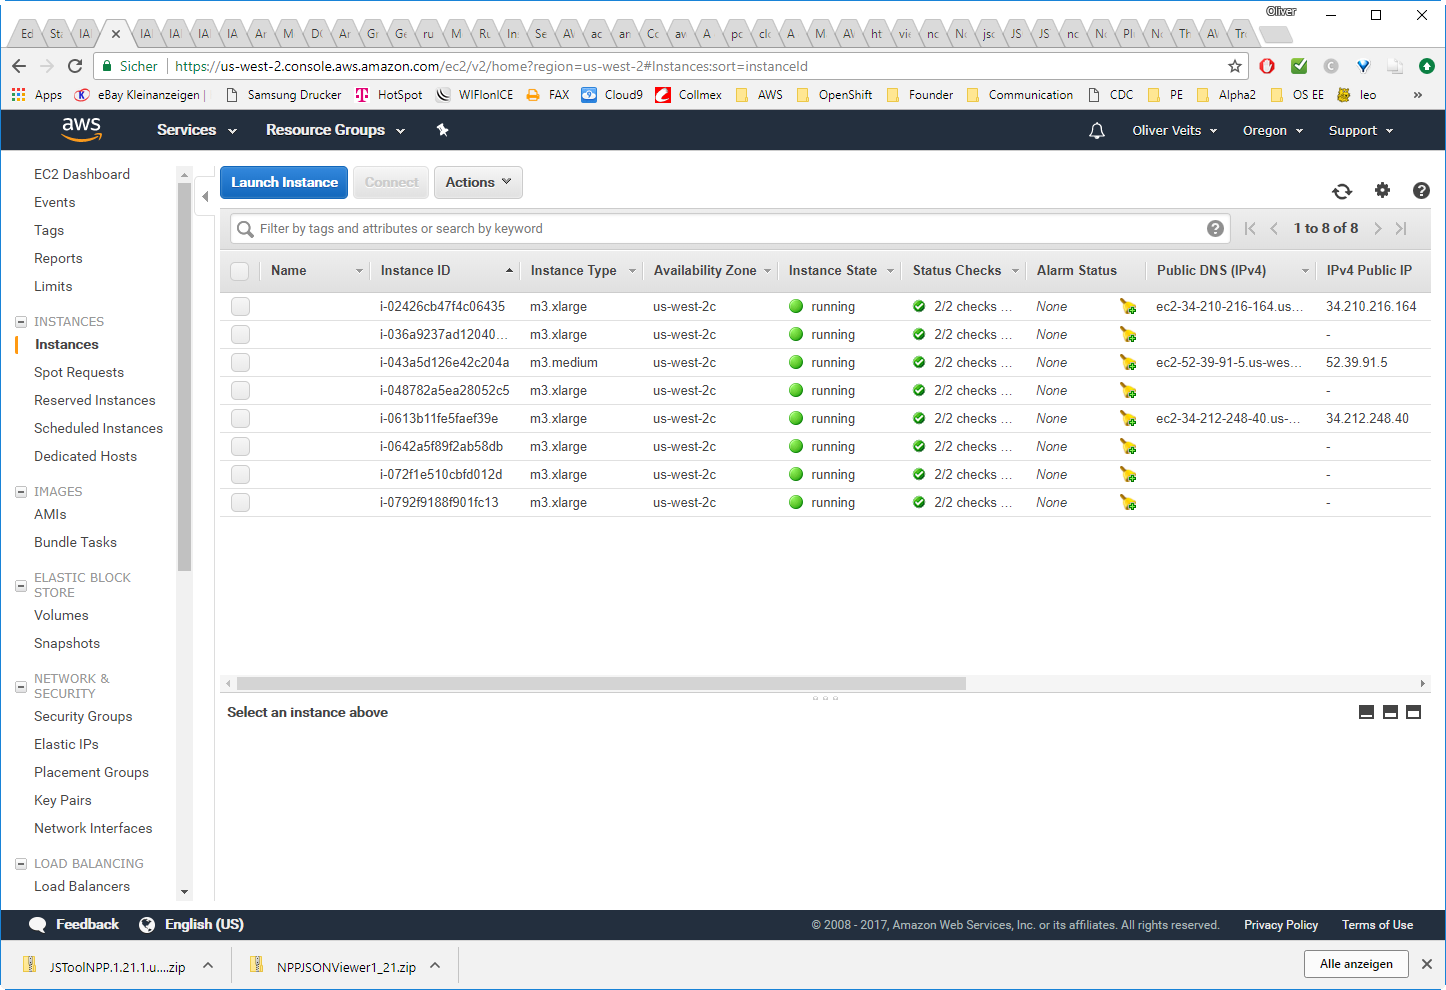
On the EC2 Dashboard, we see:
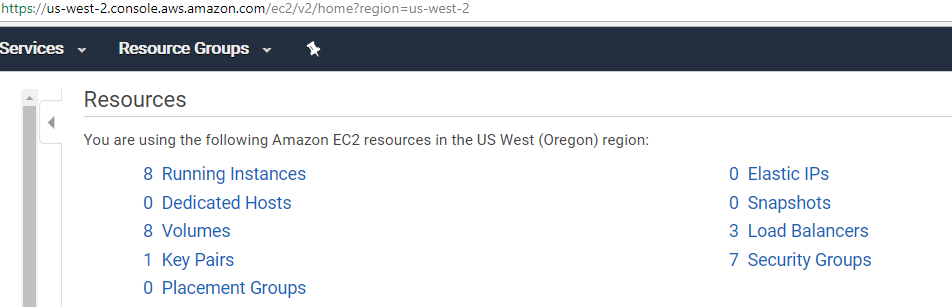
After clicking the „8 Running Instances“ link, we see:

The DC/OS is up and running!
If you see other errors like
- API: s3:CreateBucket Access Denied
- API: iam:CreateRole User: arn:aws:iam::924855196031:user/secadmin is not authorized to perform: iam:CreateRole on resource: arn:aws:iam::924855196031:role/dcos-demo-SlaveRole-LP582D7P32GZ
- The following resource(s) failed to create: [Vpc, ExhibitorS3Bucket, SlaveRole, DHCPOptions]. . Rollback requested by user.
then follow the instructions in Appendix A. Those are permissions issues.
Step 5 (recommended): Restrict Admin Access
The default is that the machines are open to the Internet world. I recommend to change the settings, so only you can access your systems.
On the EC2 Dashboard -> Security Groups, check out the security group with the description „Enable admin access to servers“ and edit the source IP addresses:
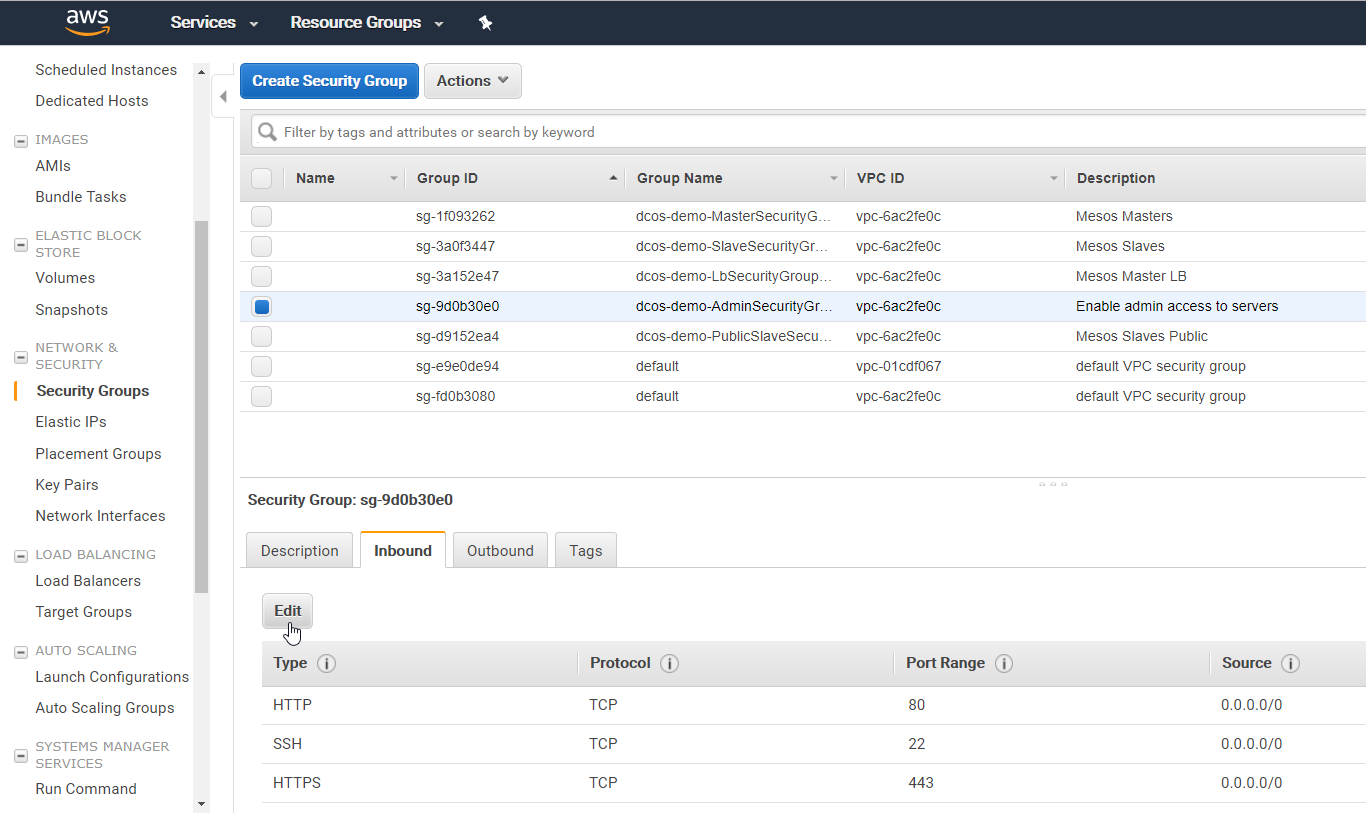
Replace 0.0.0.0/0 (any) to „My IP“ for all sources.
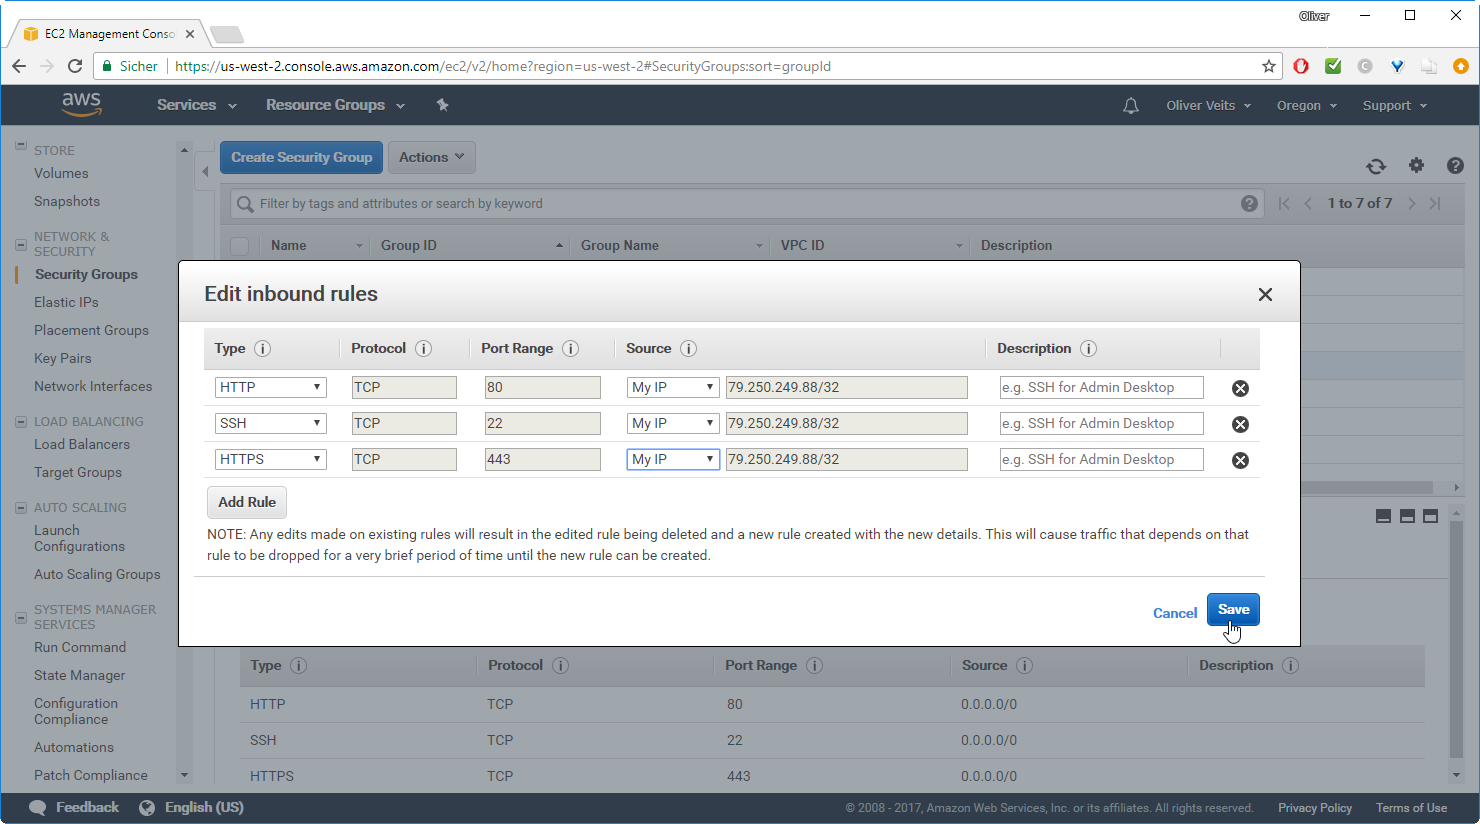
–> Save
Note, this step needs to be repeated any time your source IP address changes. See Step B6 of AWS Automation based on Vagrant — Part 2: Installation and Usage of the Vagrant AWS Plugin, if you are interested in an example that shows how to update the security rules to point to „My IP“ per shell script based on AWS CLI.
TODO: find a better way to secure the admin interfaces, e.g. by adapting the CloudFoundation templates before starting the stack. This way, the admin interfaces are not open to the world from the beginning on.
Step 6: Access the DC/OS Admin Console
Now let us access our DC/OS Admin Console. For that, let us find the public DNS name of the master:
$ aws cloudformation describe-stacks --region us-west-2 | grep dcos-demo-ElasticL | awk -F '"' '{print $4}'
dcos-demo-ElasticL-XRZ8I3ZZ2BB2-549374334.us-west-2.elb.amazonaws.com
This is the DNS name we can connect to:
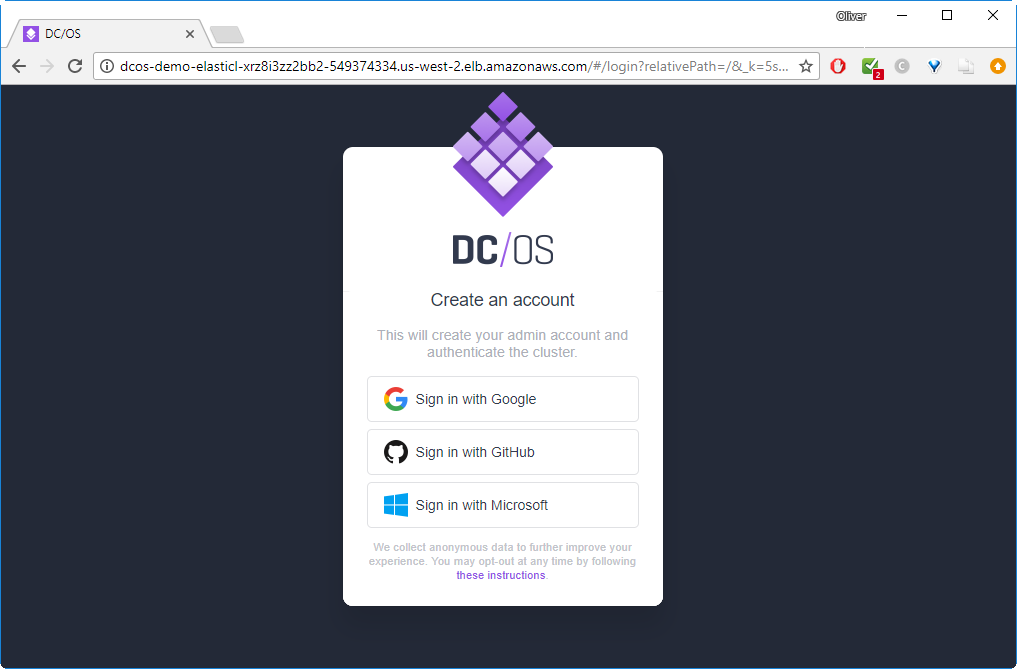
In my case, I have signed in with Google.
We reach a nice dashboard:

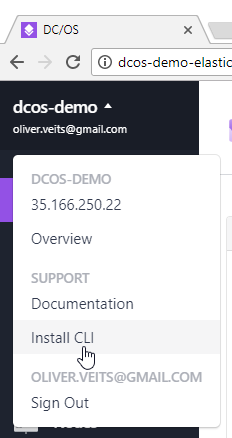
Step 7: Install DCOS CLI
The easiest way to automate application orchestration is to make use of the DCOS CLI. For that, click on your name and then „Install CLI“ and follow the instructions. You will find some dcos command examples in my previous blog post on DC/OS.
I have followed the Windows instructions, i.e.
dcos cluster setup http://dcos-demo-elasticl-pu3fgu8047kg-271238338.us-west-2.elb.amazonaws.com
A browser window was started and I have logged into the browser session via Google. Then the token was offered:

I had to Copy and paste the token into the command line:
Enter OpenID Connect ID Token: eyJ0eXAiOiJKV1QiLCJ…
After that you should be able to see the dcos services:
dcos service
NAME              HOST     ACTIVE  TASKS  CPU    MEM    DISK  ID
marathon       10.0.5.242   True     4    2.75  1836.0  0.0   d456c8ce-f0e6-4c61-9974-94e3426f5fe8-0001
metronome      10.0.5.242   True     0    0.0    0.0    0.0   d456c8ce-f0e6-4c61-9974-94e3426f5fe8-0000
Marathon and Metronome are already running.
Step 8: Install Marathon LB
(dcos package describe --config marathon-lb)
dcos package install marathon-lb
By Deploying, you agree to the Terms and Conditions https://mesosphere.com/catalog-terms-conditions/#community-services
We recommend at least 2 CPUs and 1GiB of RAM for each Marathon-LB instance.

*NOTE*: For additional ```Enterprise Edition``` DC/OS instructions, see https://docs.mesosphere.com/administration/id-and-access-mgt/service-auth/mlb-auth/
Continue installing? [yes/no] yes
Installing Marathon app for package [marathon-lb] version [1.11.1]
Marathon-lb DC/OS Service has been successfully installed!
See https://github.com/mesosphere/marathon-lb for documentation.

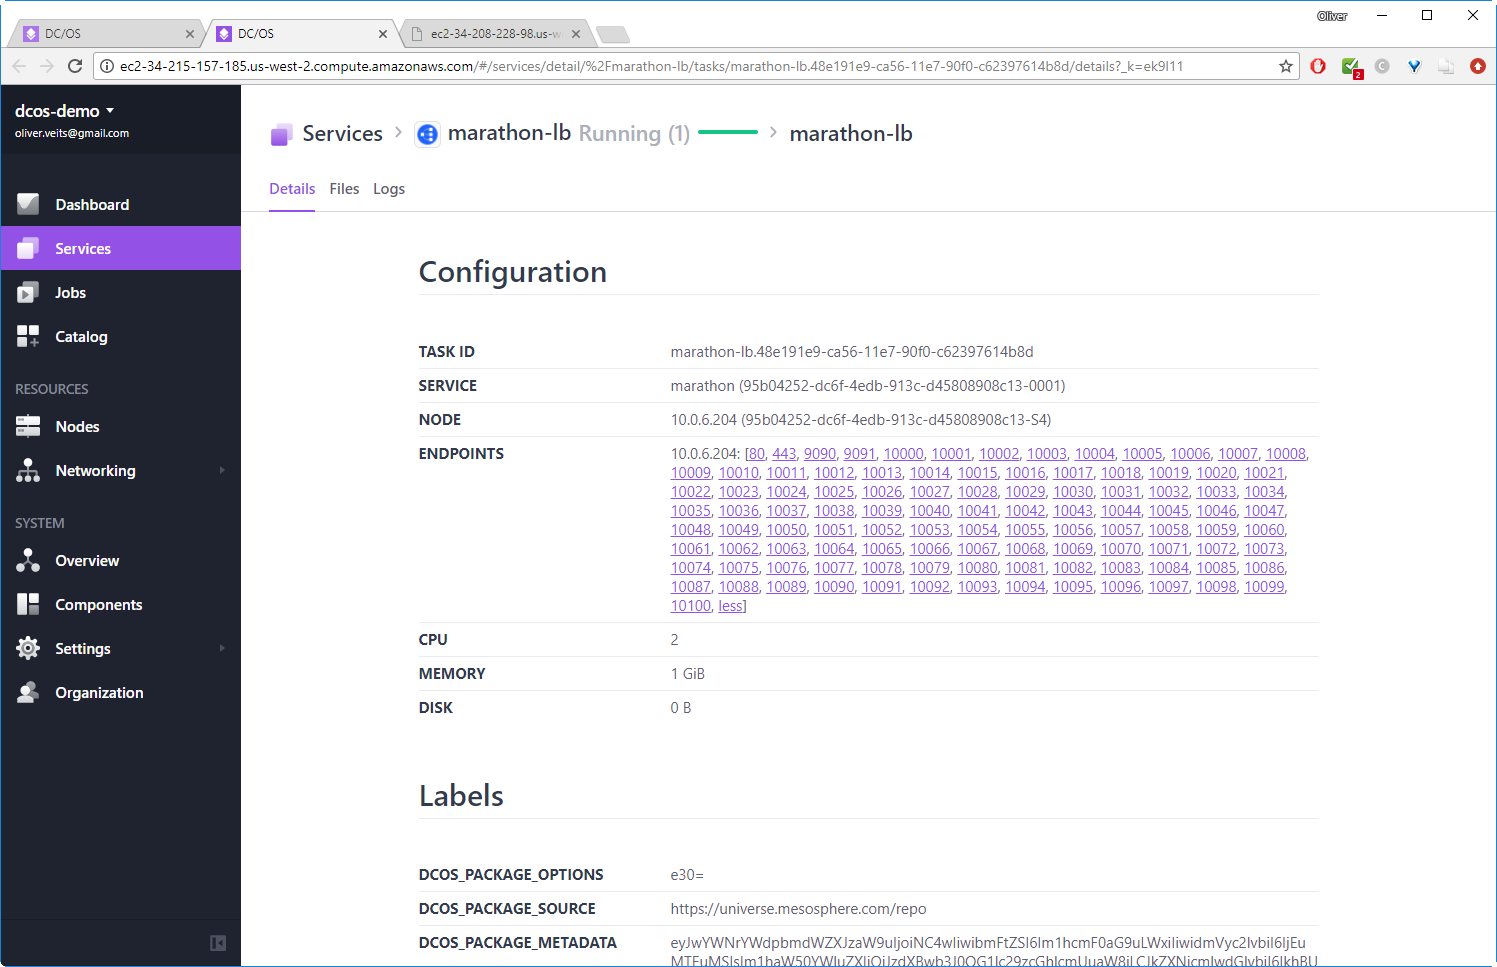
After clicking on marathon-lb, we the details of the configuration of the marathon load balancer:
Step 9: Create a Hello World Application
Similar to the blog post, where we have installed DC/OS locally via Vagrant, let us create a hello world application. We choose a NginX application that is displaying some information on the source and destination IP addresses and ports seen from within the container. For that, let us click
–> Services
–> RUN A SERVICE
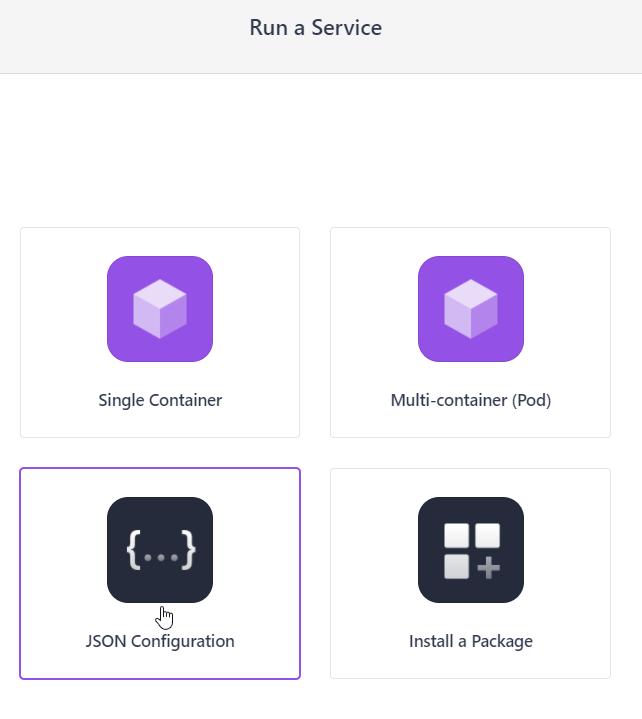
–> JSON Configuration
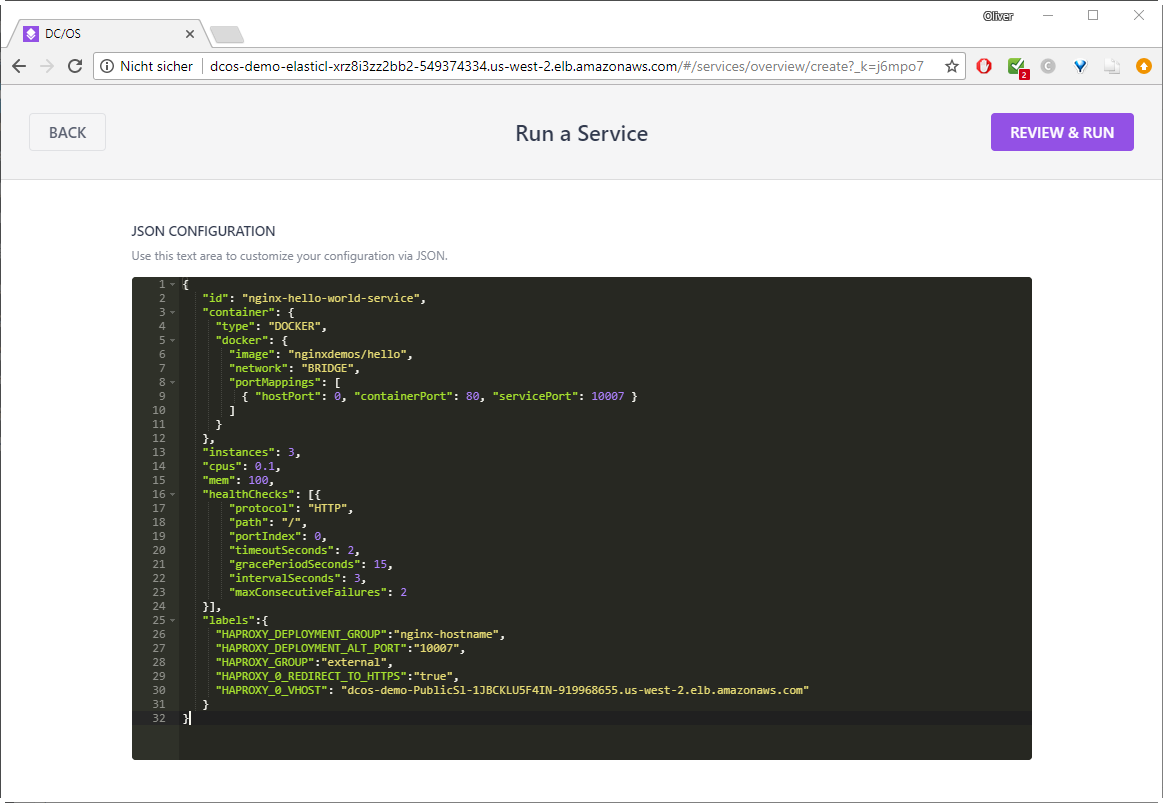
Cut and paste following text into the field:
{
   "id": "nginx-hello-world-service",
   "container": {
     "type": "DOCKER",
     "docker": {
       "image": "nginxdemos/hello",
       "network": "BRIDGE",
       "portMappings": [
         { "hostPort": 0, "containerPort": 80, "servicePort": 10007 }
       ]
     }
   },
   "instances": 3,
   "cpus": 0.1,
   "mem": 100,
   "healthChecks": [{
       "protocol": "HTTP",
       "path": "/",
       "portIndex": 0,
       "timeoutSeconds": 2,
       "gracePeriodSeconds": 15,
       "intervalSeconds": 3,
       "maxConsecutiveFailures": 2
   }],
   "labels":{
     "HAPROXY_DEPLOYMENT_GROUP":"nginx-hostname",
     "HAPROXY_DEPLOYMENT_ALT_PORT":"10007",
     "HAPROXY_GROUP":"external",
     "HAPROXY_0_REDIRECT_TO_HTTPS":"true",
     "HAPROXY_0_VHOST": "dcos-demo-PublicSl-1NSRAFIDG6VZS-267420313.us-west-2.elb.amazonaws.com"
   }
}
As HAPROXY_0_VHOST you need to use the public slave’s load balancer address you can retrieve via AWS CLI via:
$ aws cloudformation describe-stacks --region us-west-2 | grep dcos-demo-PublicSl | awk -F '"' '{print $4}'
dcos-demo-PublicSl-1NSRAFIDG6VZS-267420313.us-west-2.elb.amazonaws.com
Now:
–> REVIEW & RUN
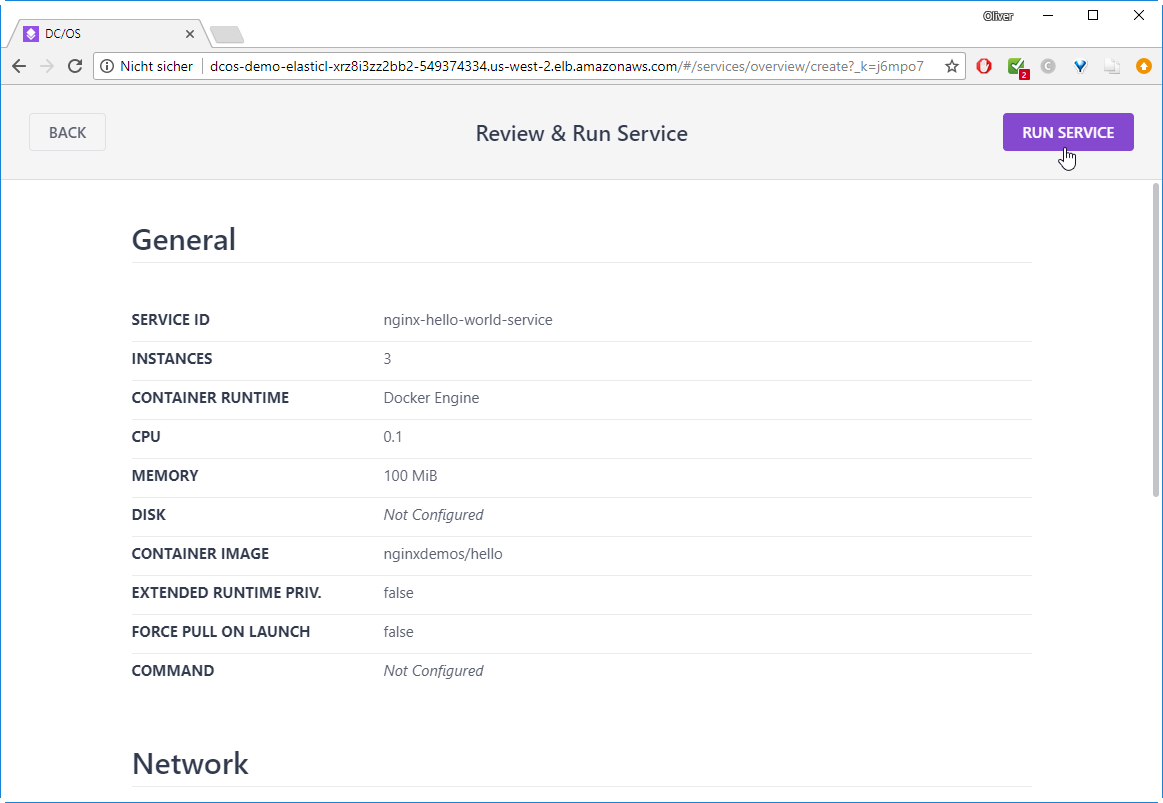
–> RUN SERVICE
You will see that the nginx-hello-world-service is being deployed:

After some seconds, the 3 containers are up&running:
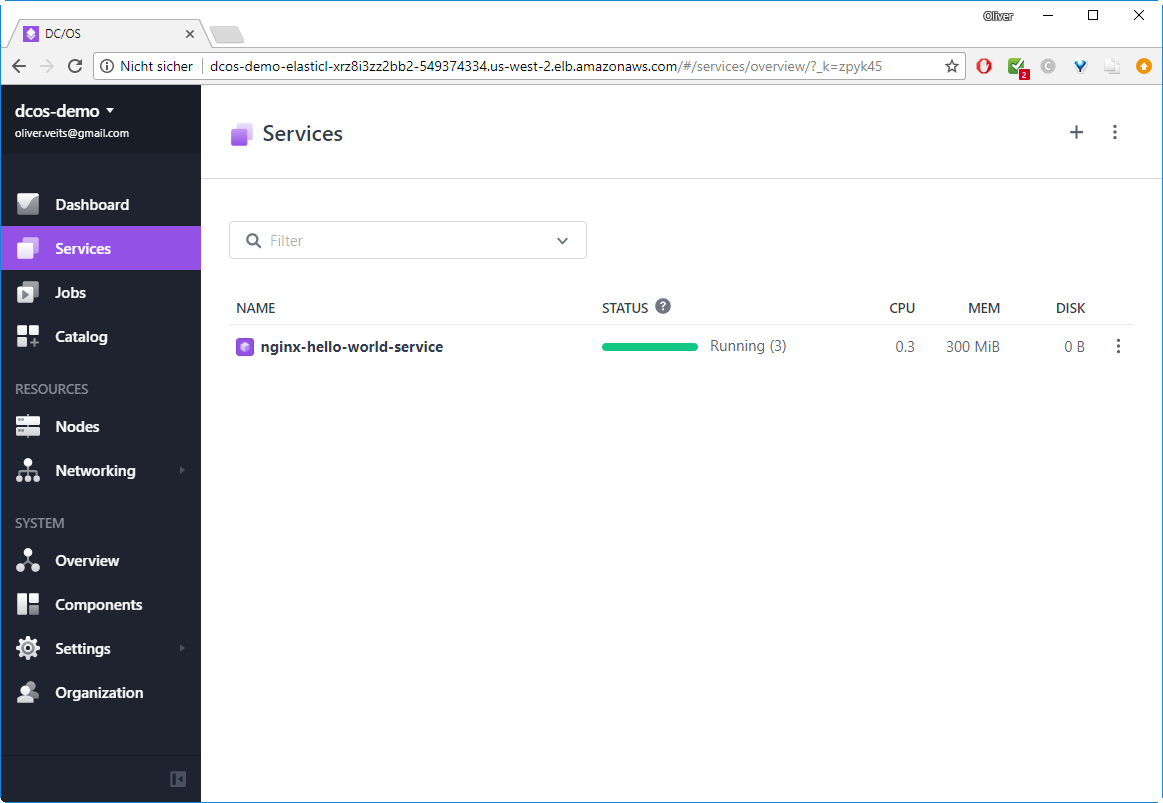
After clicking on the name of the service, you will see the three containers:
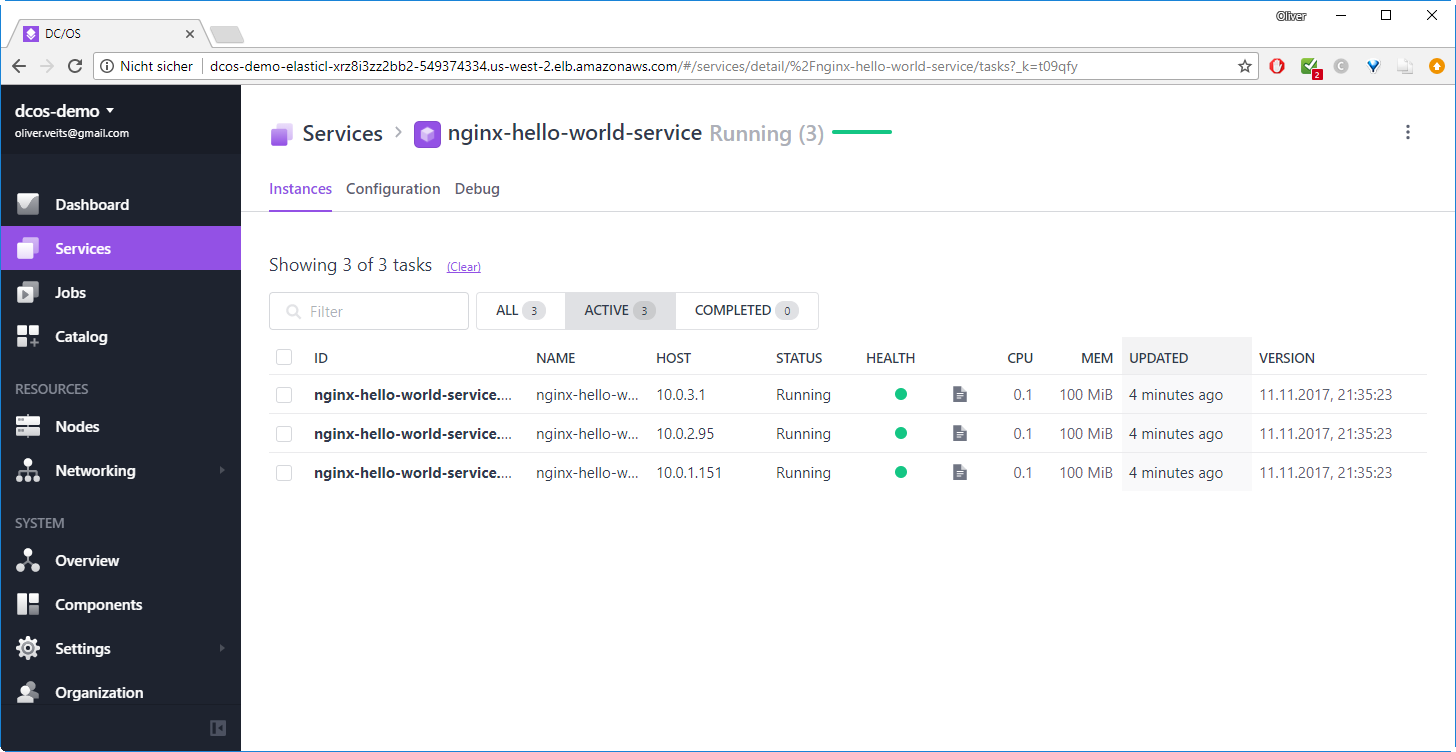
Note that the column „UPDATED“ will disappear, if the browser width is too low. If you have a small screen, you can scale the browser content with CTRL and Minus.
Step 10 (optional): Reach the service from inside
On an internal host, I can reach the NginX server via two ways:
Step 10.1: Access Application Container on a Private Slave
The following command will return the HTML code of the single container running on a private slave:
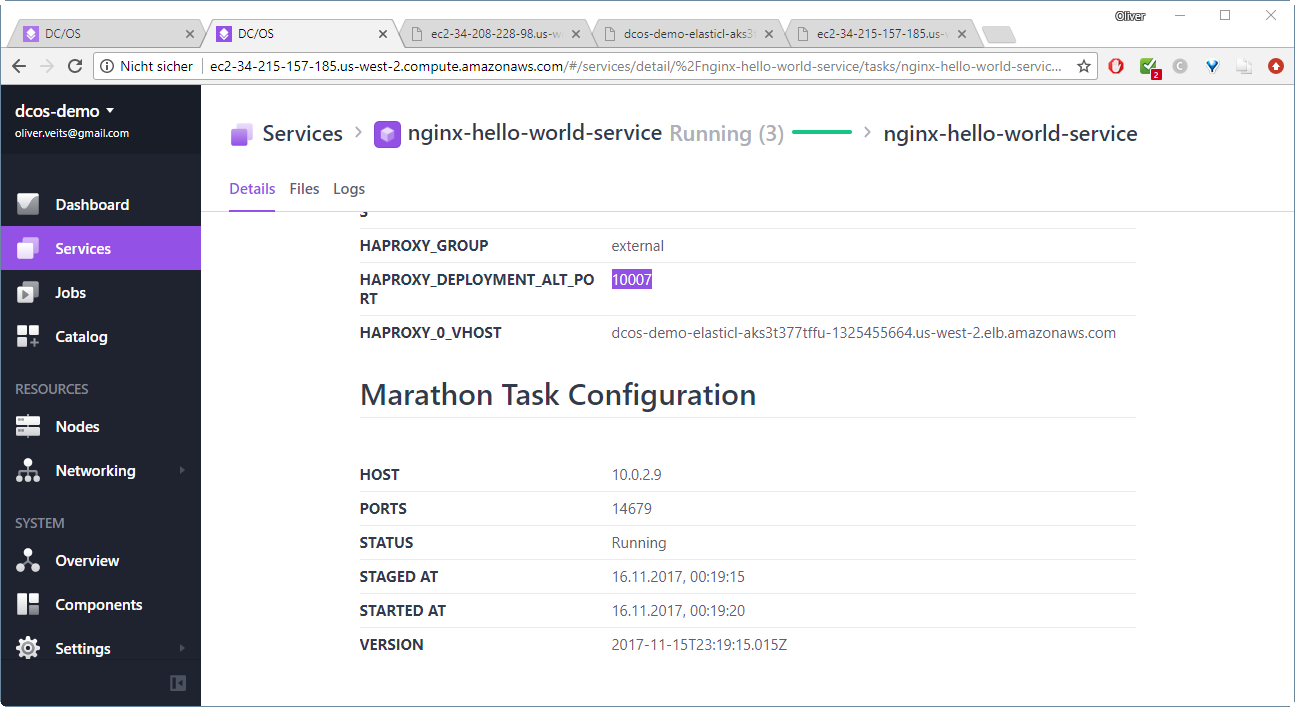
curl 10.0.2.9:14679 # SlaveServerGroup
Here, we have chosen the Endpoint address we can retrieve from the services details page:

Step 10.2: Access the Load Balancer Address
We can also contact the internal load balancer endpoint for the service. This has the advantage that the access is load balanced among the different containers we have started for the service.
curl 10.0.6.204:10007 # PublicSlaveServerGroup
Here we have combined the Public slave IP address with the HAPROXY port we have configured as a label:
In the next step, we will access the load balancer endpoint via the Internet.
Step 11: Connect to the Service via Internet
Step 11.1: Direct Connection to the Public Slave
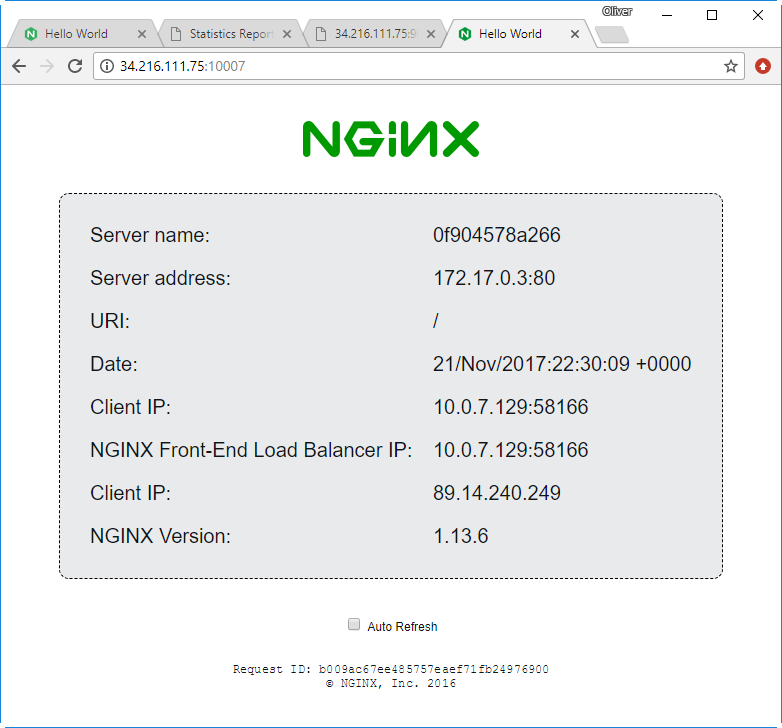
The CloudFormation stack is configured in a way that allows reaching the public slave via the Internet on port 10007. This allows us to access the hello world application directly:
Step 11.2: Connection via AWS Load Balancer
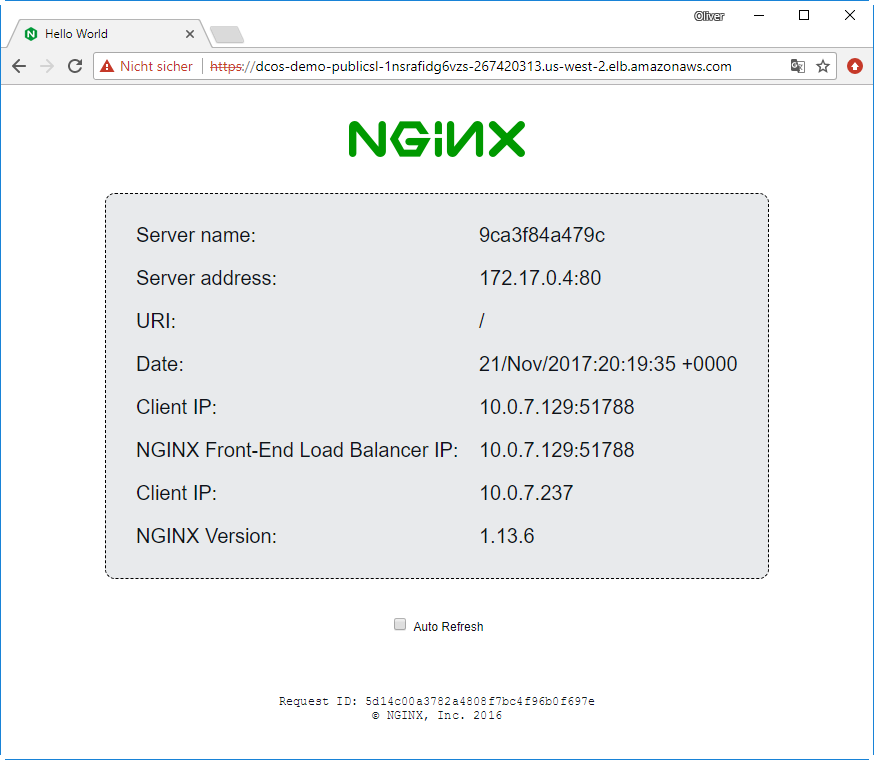
Consider a case where we have more than one public slave. In those situations, it is better to access the service via AWS load balancer, which will distribute the load among the different public slave marathon load balancers (i.e. HAPROXY load balancers). In our case, we access the service on port 80: http://dcos-demo-PublicSl-1NSRAFIDG6VZS-267420313.us-west-2.elb.amazonaws.com
The load balancer address can be retrieved via
$ aws cloudformation describe-stacks --region us-west-2 | grep dcos-demo-PublicSl | awk -F '"' '{print $4}'
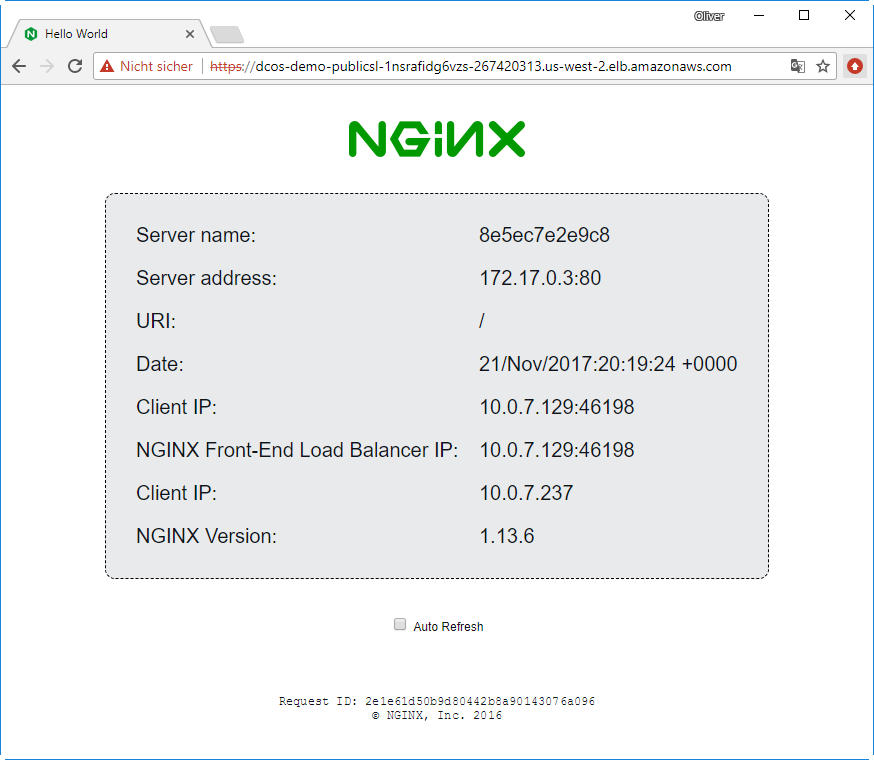
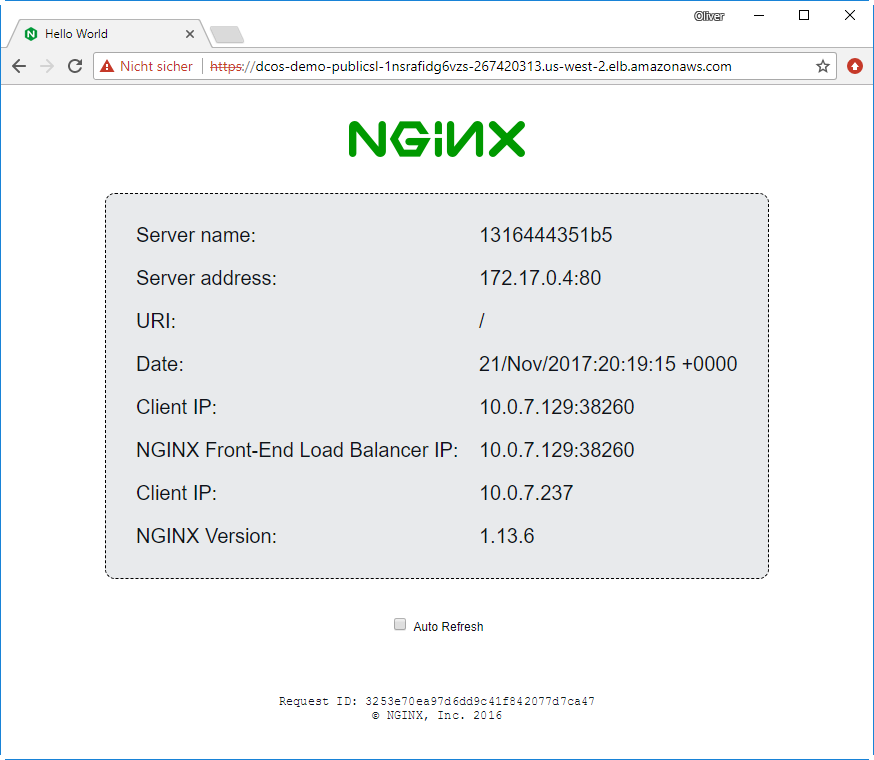
dcos-demo-PublicSl-1NSRAFIDG6VZS-267420313.us-west-2.elb.amazonaws.comBy pasting the return value into the browser, we are redirected to the corresponding https page:
After refreshing the page, we will see that we will get answers from the other two containers as well:
With that, we have learned how to create a service and access it from the Internet.
Step 12: Explore the Marathon Load Balancer
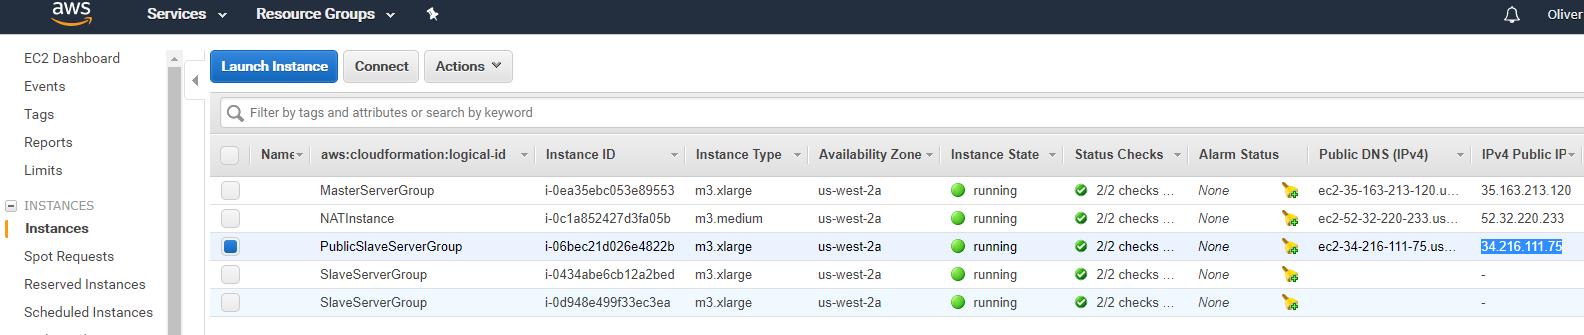
You can access the marathon load balancer by retrieving the public IP address of the public slave from the AWS console (EC2):
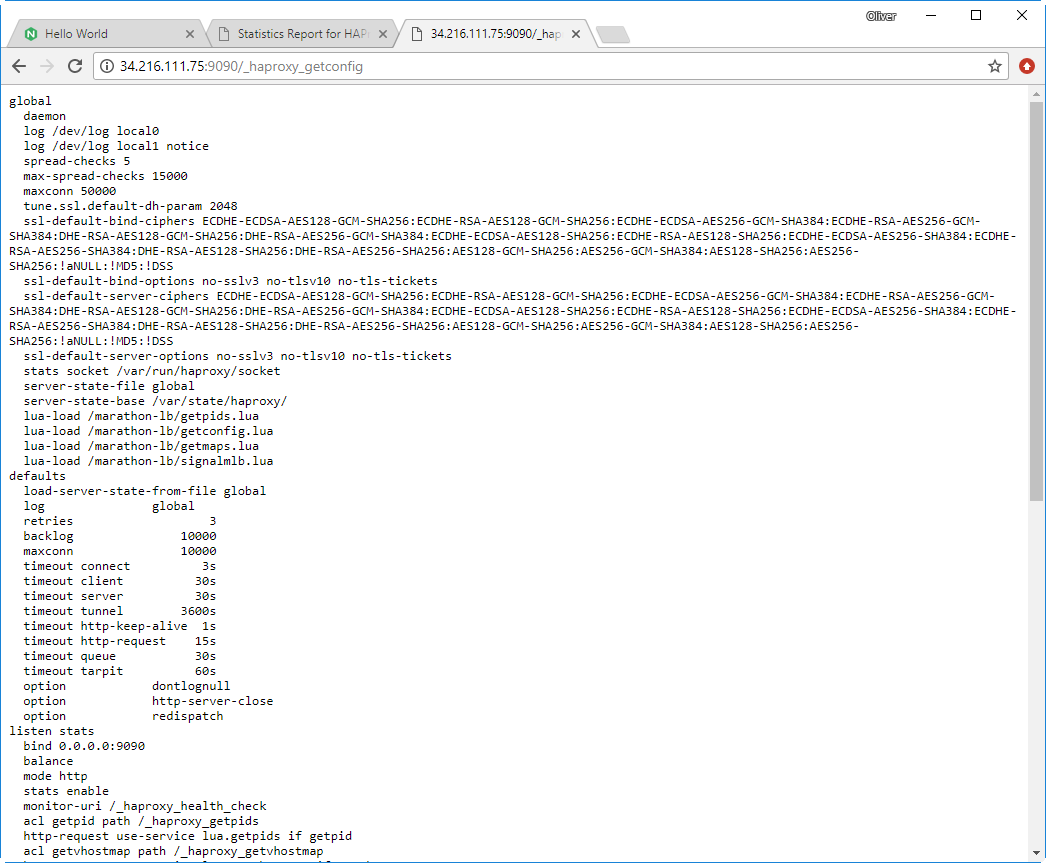
We then access the HA Proxy statistics page and configuration page by entering the public IP address or DNS name into the URL field, and adding one of the following strings:
- :9090/haproxy?stats
- :9090/_haproxy_getconfig

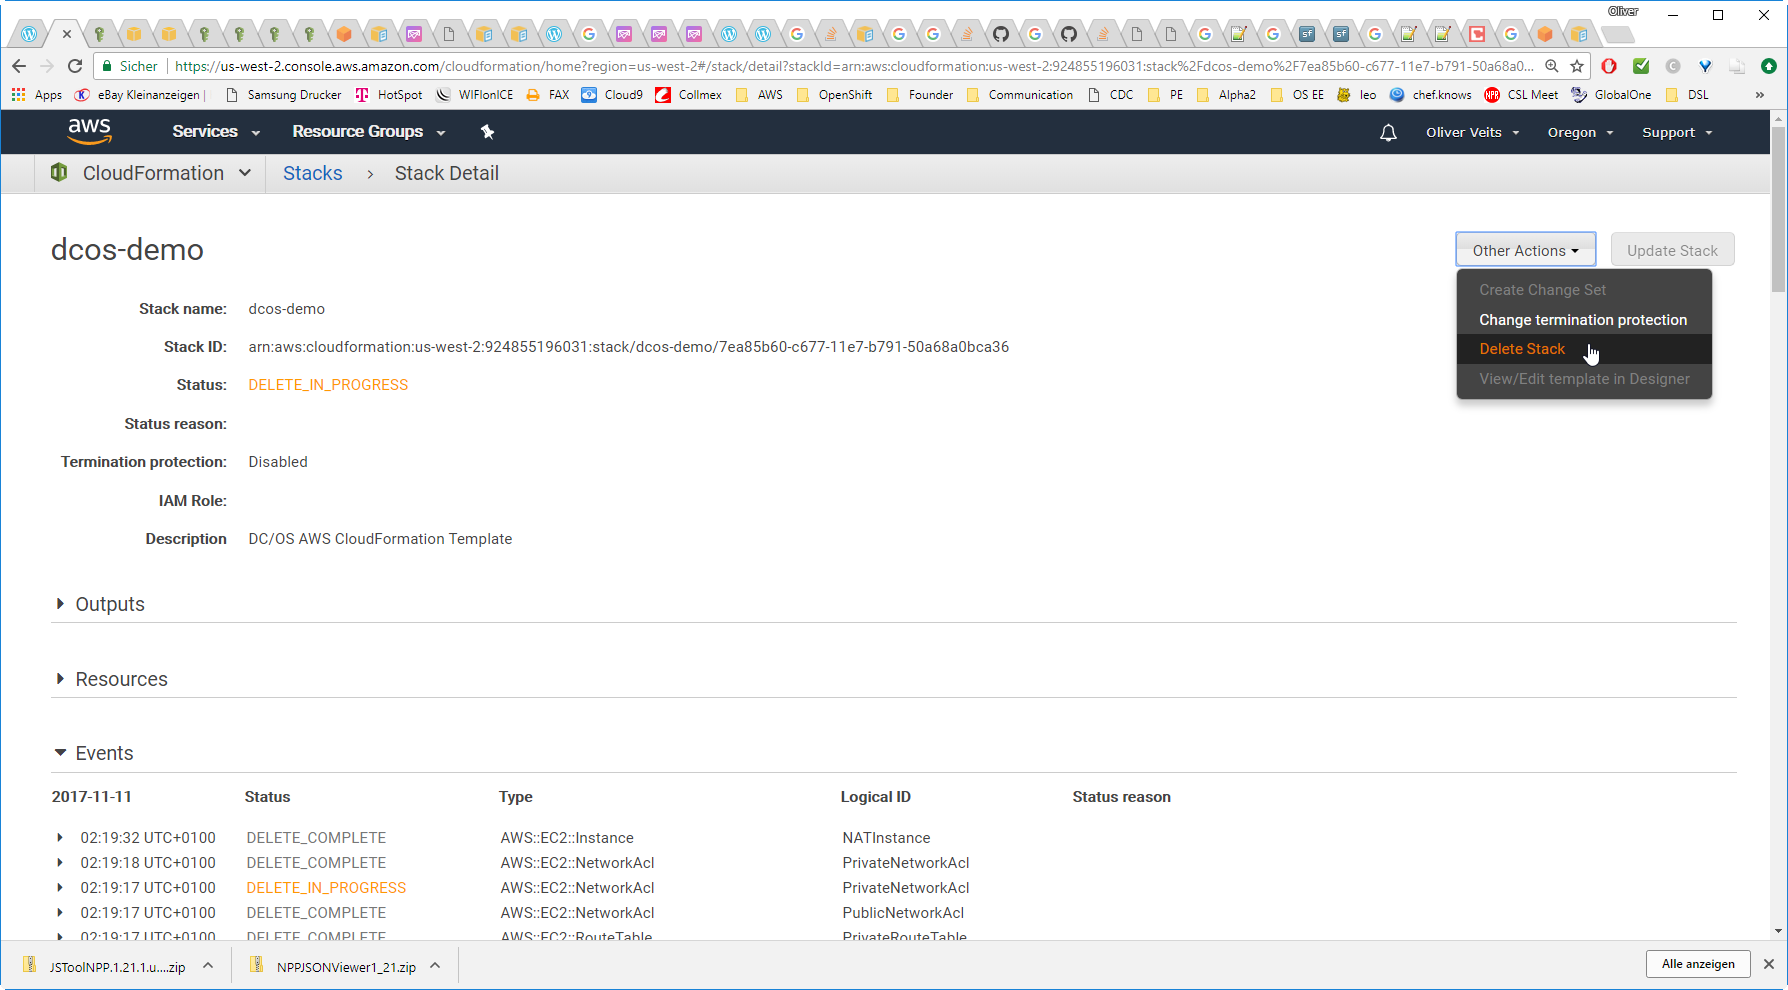
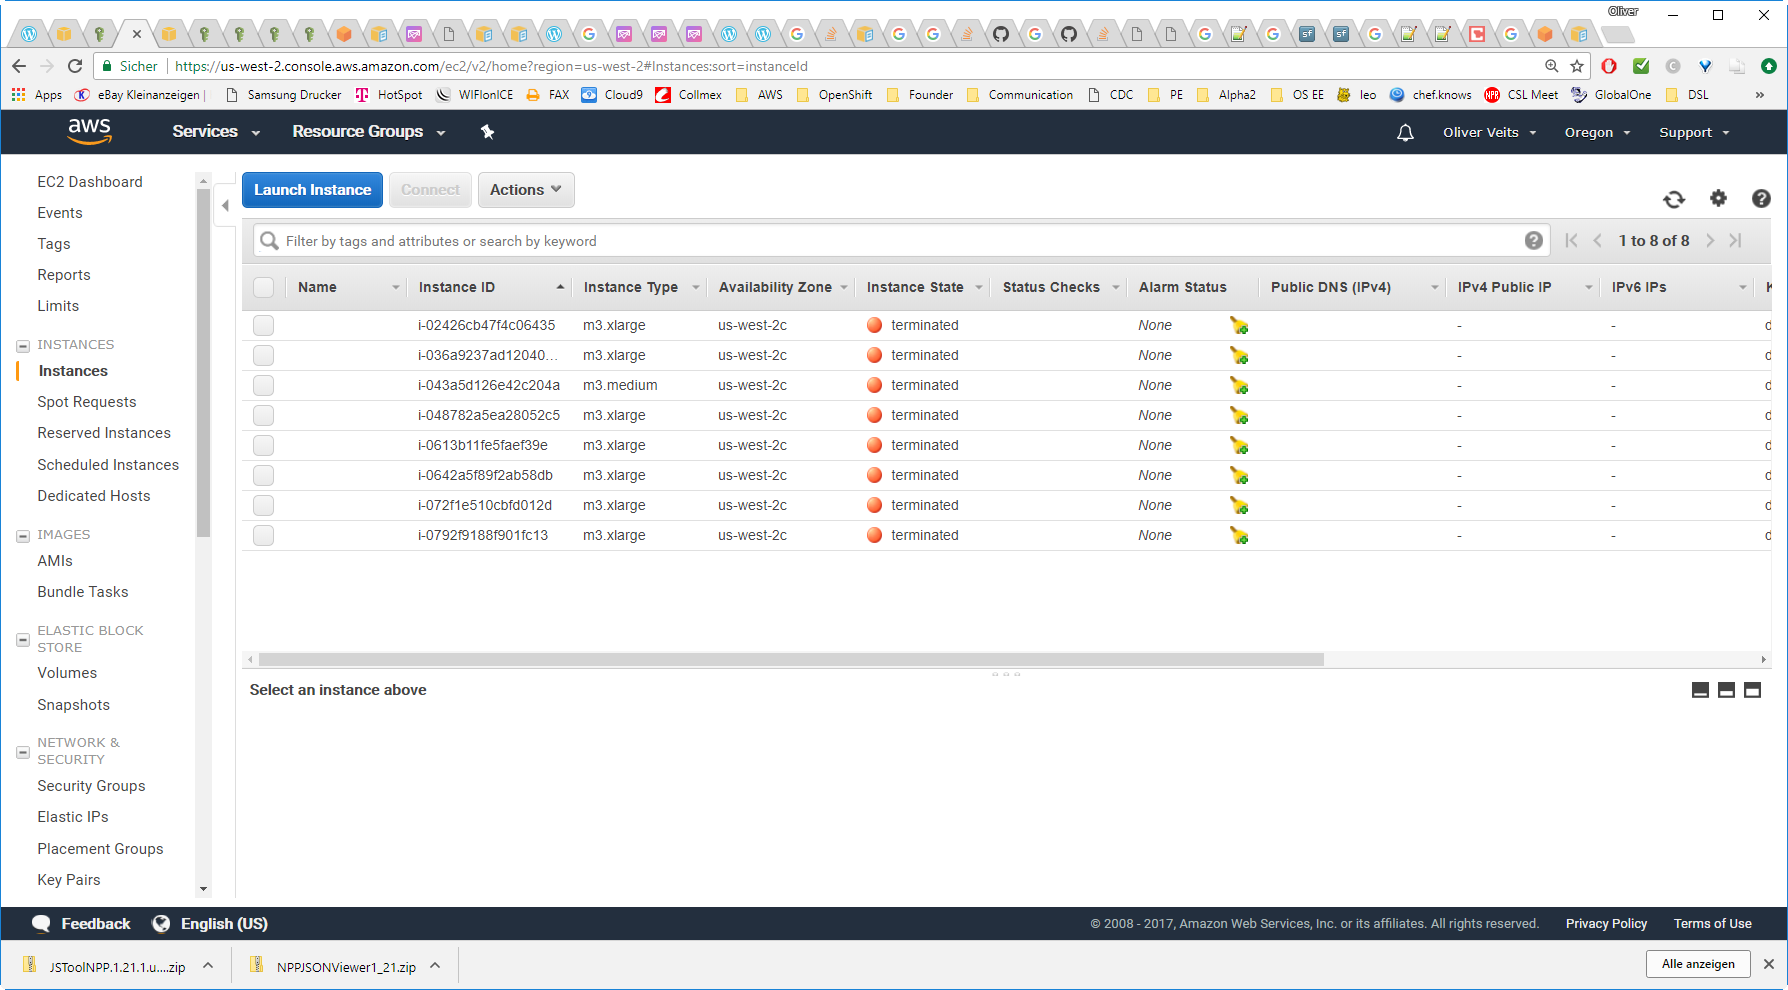
Step13: Delete the Stack
Do not forget to delete the stack, since it will induce quite a bit of cost if you fail to do so. The stack can be deleted via AWS CLI as follows:
aws --region us-west-2 cloudformation delete-stack --stack-name dcos-demo
Better you check on the AWS Console that all resources have been deleted successfully:
Summary
In this blog post, we have learned to install a DC/OS Cluster on AWS using an existing CloudFormation template. For that, we have used AWS CLI to spin up a DC/OS environment with a single master, a single public slave, and five private slaves (see Appendix ?? below how to tweak the template to run only two private slaves in order to save some money).
Similar to the tests we had performed on a local machine using Vagrant described in the post Getting Started with DC/OS on Vagrant, we have installed a marathon load balancer, before we have deployed a three-container hello-world application. We have shown how to access this application from the public Internet using the AWS elastic load balancer that has been installed automatically via the CloudFormation stack. Moreover, we have shown how to access the marathon load balancer’s statistics and configuration page.
In the course of this step by step tutorial, we have mastered
- user permission challenges (see step 4 and Appendix A)
- networking challenges
We had to figure out that the services are only reachable via the AWS load balancers.
Appendix A: Add required User Permissions
Appendix A1: Remedy S3 Permission Error
Symptoms
If your user lacks the correct S3 permissions, we will get following errors in the AWS Console, when trying to start the CloudFormation stack:
- API: s3:CreateBucket Access Denied
- API: iam:CreateRole User: arn:aws:iam::924855196031:user/secadmin is not authorized to perform: iam:CreateRole on resource: arn:aws:iam::924855196031:role/dcos-demo-SlaveRole-LP582D7P32GZ
- The following resource(s) failed to create: [Vpc, ExhibitorS3Bucket, SlaveRole, DHCPOptions]. . Rollback requested by user.
Resolution
- Add S3 Permissions
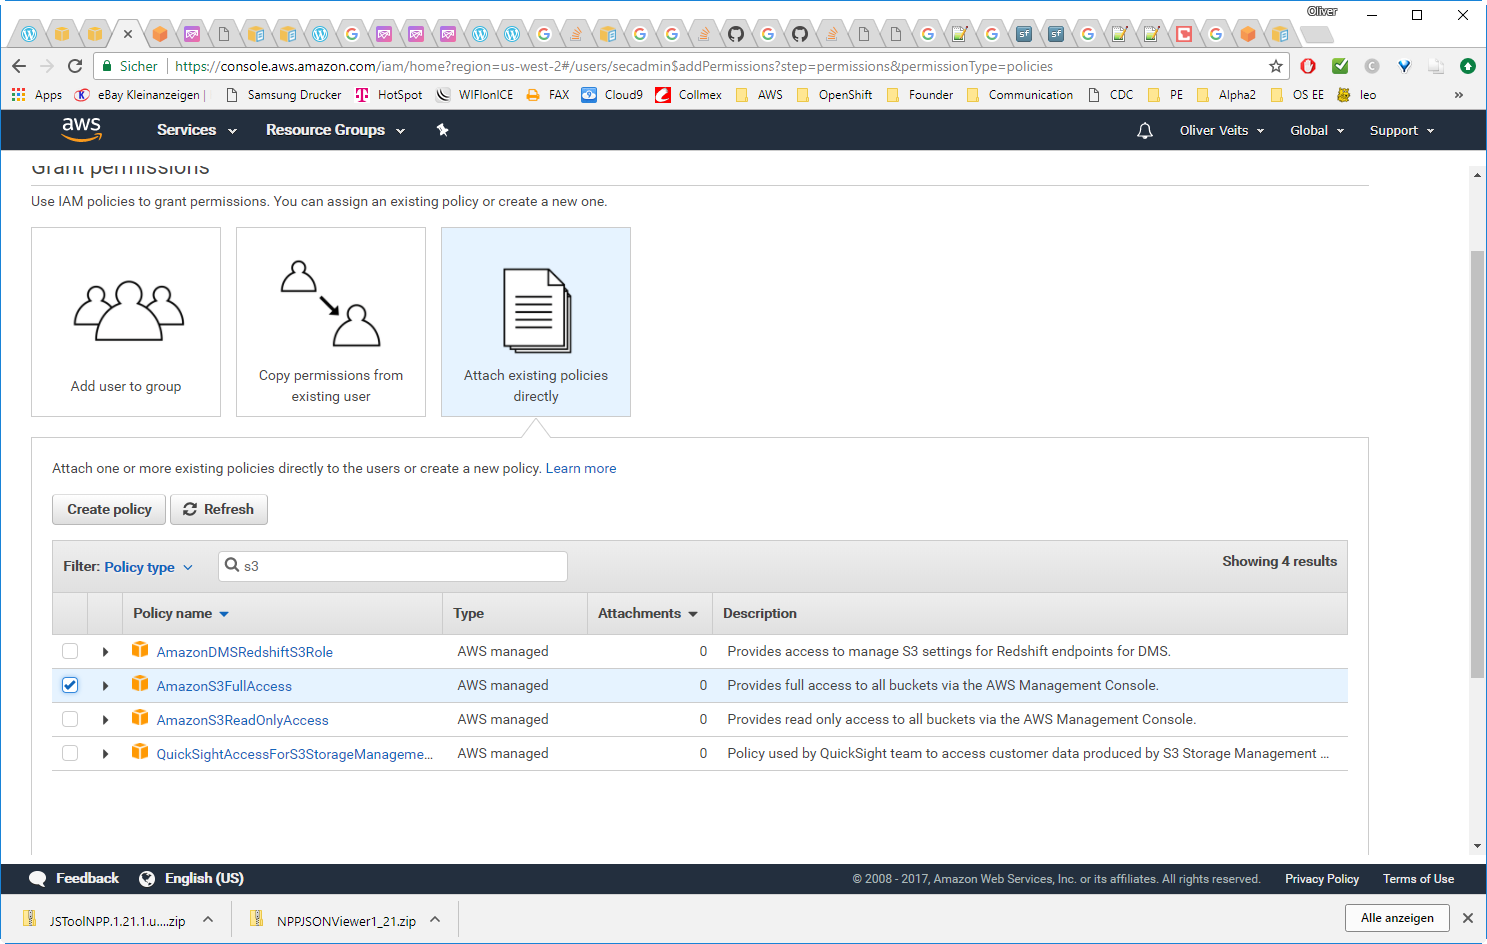
2) Add IAM Policy:
Add Permissions -> Create policy
-> Policy Generator -> Select ->
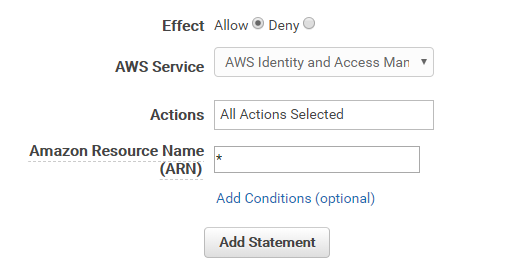
-> Add Statement -> Next Step -> Edit Name „IAM“ -> Create Policy
-> Filter: Policy Type: Custom managed
-> Choose „IAM“
Let us delete it via console and try again:
TEMPLATE_URL=https://s3-us-west-2.amazonaws.com/downloads.dcos.io/dcos/EarlyAccess/commit/14509fe1e7899f439527fb39867194c7a425c771/cloudformation/single-master.cloudformation.json
aws --region us-west-2 cloudformation create-stack --stack-name dcos-demo \
    --template-url ${TEMPLATE_URL} \
    --parameters ParameterKey=AcceptEULA,ParameterValue="Yes",ParameterKey=KeyName,ParameterValue="dcos-demo-key" \
    --capabilities CAPABILITY_IAM
Now we get following success messages on the AWS console:

After some minutes in the EC2 console:
Appendix B: [AcceptEULA] do not exist in the template
TEMPLATE_URL=https://s3-us-west-2.amazonaws.com/downloads.dcos.io/dcos/EarlyAccess/commit/14509fe1e7899f439527fb39867194c7a425c771/cloudformation/single-master.cloudformation.json
aws --region us-east-2 cloudformation create-stack --stack-name dcos-demo \
    --template-url ${TEMPLATE_URL} \
    --parameters ParameterKey=AcceptEULA,ParameterValue="Yes" ParameterKey=KeyName,ParameterValue="dcos-demo-key" \
    --capabilities CAPABILITY_IAM
This time we get:
A client error (ValidationError) occurred when calling the CreateStack operation: Parameters: [AcceptEULA] do not exist in the template
This StackOverflow Q&A has pointed to the right direction: I tried to wrap all parameters in “, but then I got a syntax error, that a comma is expected. The correct syntax turned out to be:
TEMPLATE_URL=https://s3-us-west-2.amazonaws.com/downloads.dcos.io/dcos/EarlyAccess/commit/14509fe1e7899f439527fb39867194c7a425c771/cloudformation/single-master.cloudformation.json
aws --region us-east-2 cloudformation create-stack --stack-name dcos-demo \
    --template-url ${TEMPLATE_URL} \
    --parameters ParameterKey=AcceptEULA,ParameterValue="Yes",ParameterKey=KeyName,ParameterValue="dcos-demo-key" \
    --capabilities CAPABILITY_IAM
with commata between all parameters.
Appendix C: „Template error: Unable to get mapping for NATAmi::us-east-2::default“
How to Reproduce:
Get Key for region=us-east-2 from here: copy the link address of the corresponding Launch Stack Link and paste it somewhere:
https://console.aws.amazon.com/cloudformation/home?region=us-east-1#/stacks/new?templateURL=https://s3-us-west-2.amazonaws.com/downloads.dcos.io/dcos/EarlyAccess/commit/a5ecc9af5d9ca903f53fa16f6f0ebd597095652e/cloudformation/single-master.cloudformation.json
TEMPLATE_URL=https://s3-us-west-2.amazonaws.com/downloads.dcos.io/dcos/EarlyAccess/commit/a5ecc9af5d9ca903f53fa16f6f0ebd597095652e/cloudformation/single-master.cloudformation.json;
Create a key for US East:
aws --region us-east-2 ec2 create-key-pair --key-name dcos-demo-key --output text --query KeyMaterial > dcos-demo-key_us-east-2.pem;
cp -i dcos-demo-key_us-east-2.pem dcos-demo-key.pem;
chmod 600 dcos-demo-key.pem;
Try starting the Stack:
aws --region us-east-2 cloudformation create-stack --stack-name dcos-demo \
    --template-url ${TEMPLATE_URL} \
    --parameters ParameterKey=AcceptEULA,ParameterValue="Yes",ParameterKey=KeyName,ParameterValue="dcos-demo-key" \
    --capabilities CAPABILITY_IAM;
If the user has all needed permissions (see steps 4.x above), then we get the following error:
A client error (ValidationError) occurred when calling the CreateStack operation: Template error: Unable to get mapping for NATAmi::us-east-2::default
Workaround
I have not investigated this issue. However, I guess that the error has to do with missing mappings for the images (AMI). A workaround is to use region=us-west-2 instead of us-east-2.
Appendix D: ERROR: „parameter value decos-demo-key for parameter name KeyName does not exist“
Reproduce
If you closely follow the instructions on https://aws.amazon.com/blogs/apn/announcing-mesosphere-dcos-on-aws/, correct the syntax errors in the aws commands, but keep the wrong key name „decos-demo-key“ instead of „dcos-demo-key“, you will encounter the following problem:
After creation of the stack, we ask for the status:
aws --region us-west-2 cloudformation describe-stacks --stack-name dcos-demo --query Stacks[0].StackStatus
You will get the response:
"ROLLBACK_COMPLETE"
On the AWS Console of US West 2 we get:
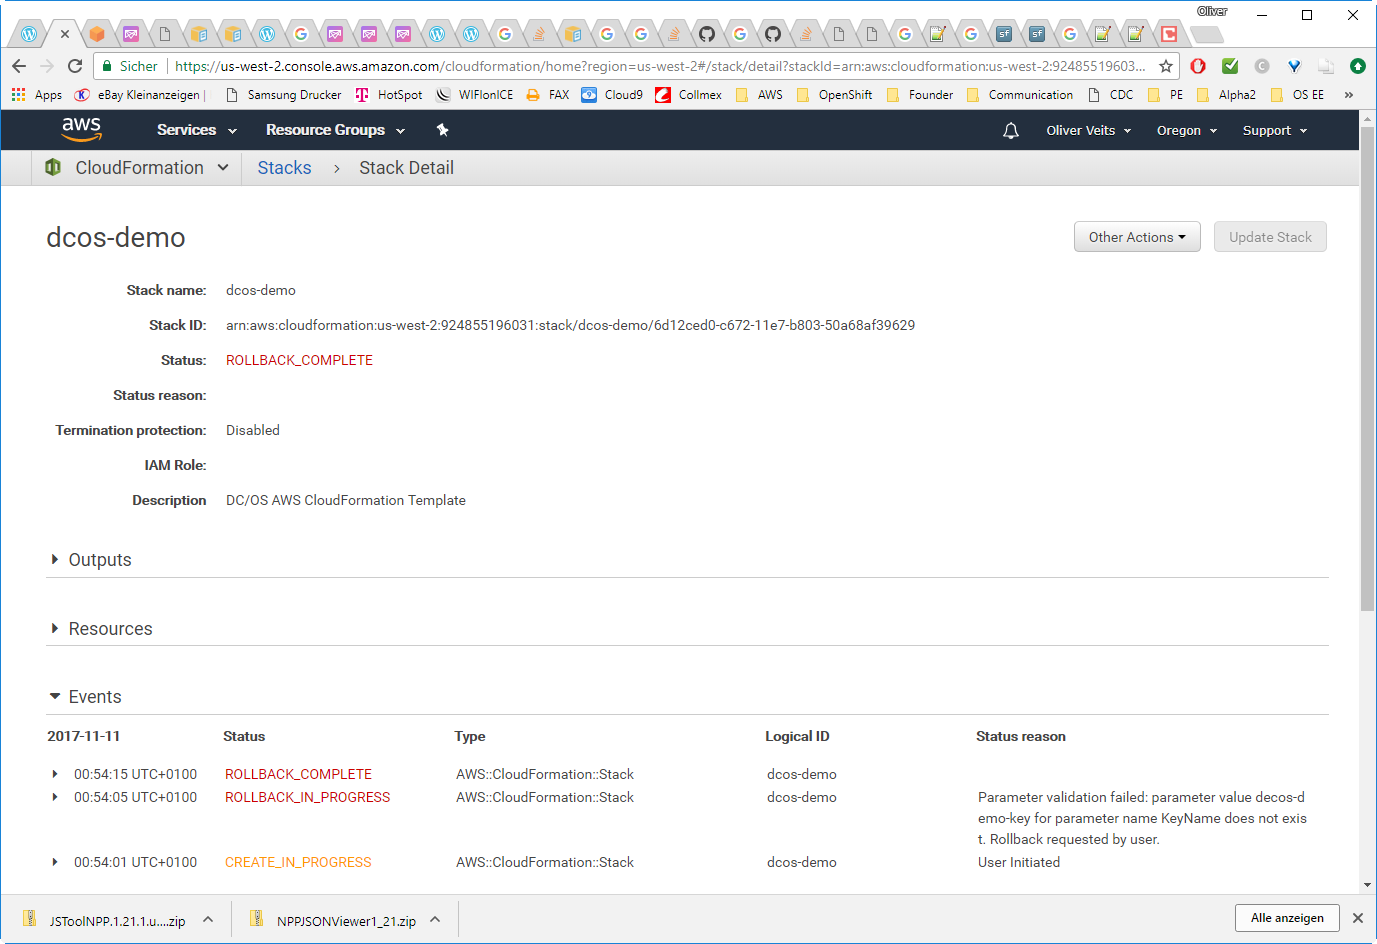
The following error message is displayed:
Parameter validation failed: parameter value decos-demo-key for parameter name KeyName does not exist. Rollback requested by user.
Solution:
Correct the demo key name: „dcos-demo-key“ instead of „decos-demo-key“
Appendix E: Adapt the CloudFormation Template to your Needs
The CloudFormation template is spinning up one master, one public slave, a NAT machine and five (!) private slaves. For the purpose of hello world testing we are performing, two instead of five private slaves are plenty. For that, I have adapted the CloudFormation template as follows:
Step E.1: Download CloudFormation Template
curl https://s3-us-west-2.amazonaws.com/downloads.dcos.io/dcos/EarlyAccess/commit/a5ecc9af5d9ca903f53fa16f6f0ebd597095652e/cloudformation/single-master.cloudformation.json
Step E.2 Adapt CloudFormation Template
I have added following parameter to the template (in blue):
        "SlaveInstanceCount": {
            "Description": "Required: Specify the number of private agent nodes or accept the default.",
            "Default": "5",
            "Type": "Number"
        },
        "SlaveInstanceCountDesired": {
            "Description": "Required: Specify the number of private agent nodes or accept the default.",
            "Default": "2",
            "Type": "Number"
        },
        "PublicSlaveInstanceCount": {
            "Description": "Required: Specify the number of public agent nodes or accept the default.",
            "Default": "1",
            "Type": "Number"
        },
The default of this parameter is two instead of five.
In the same template, I have changed following parts (in blue)
        "SlaveServerGroup": {
            "CreationPolicy": {
                "ResourceSignal": {
                    "Timeout": {
                        "Fn::FindInMap": [
                            "Parameters",
                            "StackCreationTimeout",
                            "default"
                        ]
                    },
                    "Count": {
                        "Ref": "SlaveInstanceCountDesired"
                    }
                }
            },
            "Properties": {
                "MaxSize": {
                    "Ref": "SlaveInstanceCount"
                },
                "DesiredCapacity": {
                    "Ref": "SlaveInstanceCountDesired"
                },
                "MinSize": {
                    "Ref": "SlaveInstanceCountDesired"
                },
Note that the stack will be stuck in CREATE_IN_PROGRESS if the first Count is not changed from SlaveInstanceCount to SlaveInstanceCountDesired.
Step E.3: Create S3 Bucket
The template is too large to use it directly per file: you will get following error if you try to use the template as file TEMPLATE_FILE=template-file-name:
aws --region us-west-2 cloudformation create-stack --stack-name dcos-demo \
 --template-body ${TEMPLATE_FILE} \
 --parameters ParameterKey=AcceptEULA,ParameterValue="Yes",ParameterKey=KeyName,ParameterValue="AWS_SSH_Key" \
 --capabilities CAPABILITY_IAM
An error occurred (ValidationError) when calling the CreateStack operation: 1 validation error detected: Value '<the json cloudformation template is printed>' at 'templateBody' failed to satisfy constraint: Member must have length less than or equal to 51200The solution is to move the template to an S3 bucket in the same region. Now let us create the bucket:
aws s3api create-bucket --bucket my-us-west-2-bucket --region us-west-2
Step E.4: Copy Template to S3 Bucket
The template file can be copied to the S3 bucket via a command like:
aws s3 cp template_filename s3://my-us-west-2-bucket/
Step E.5: Use Template
Now we are ready to use the S3 bucket URL to create the stack:
TEMPLATE_URL='https://s3.amazonaws.com/my-us-west-2-bucket/template_filename'
SSH_KEY=dcos-demo-key
   aws --region us-west-2 cloudformation create-stack --stack-name dcos-demo \
       --template-url ${TEMPLATE_URL} \
       --parameters ParameterKey=AcceptEULA,ParameterValue="Yes",ParameterKey=KeyName,ParameterValue="AWS_SSH_Key" \
       --capabilities CAPABILITY_IAM
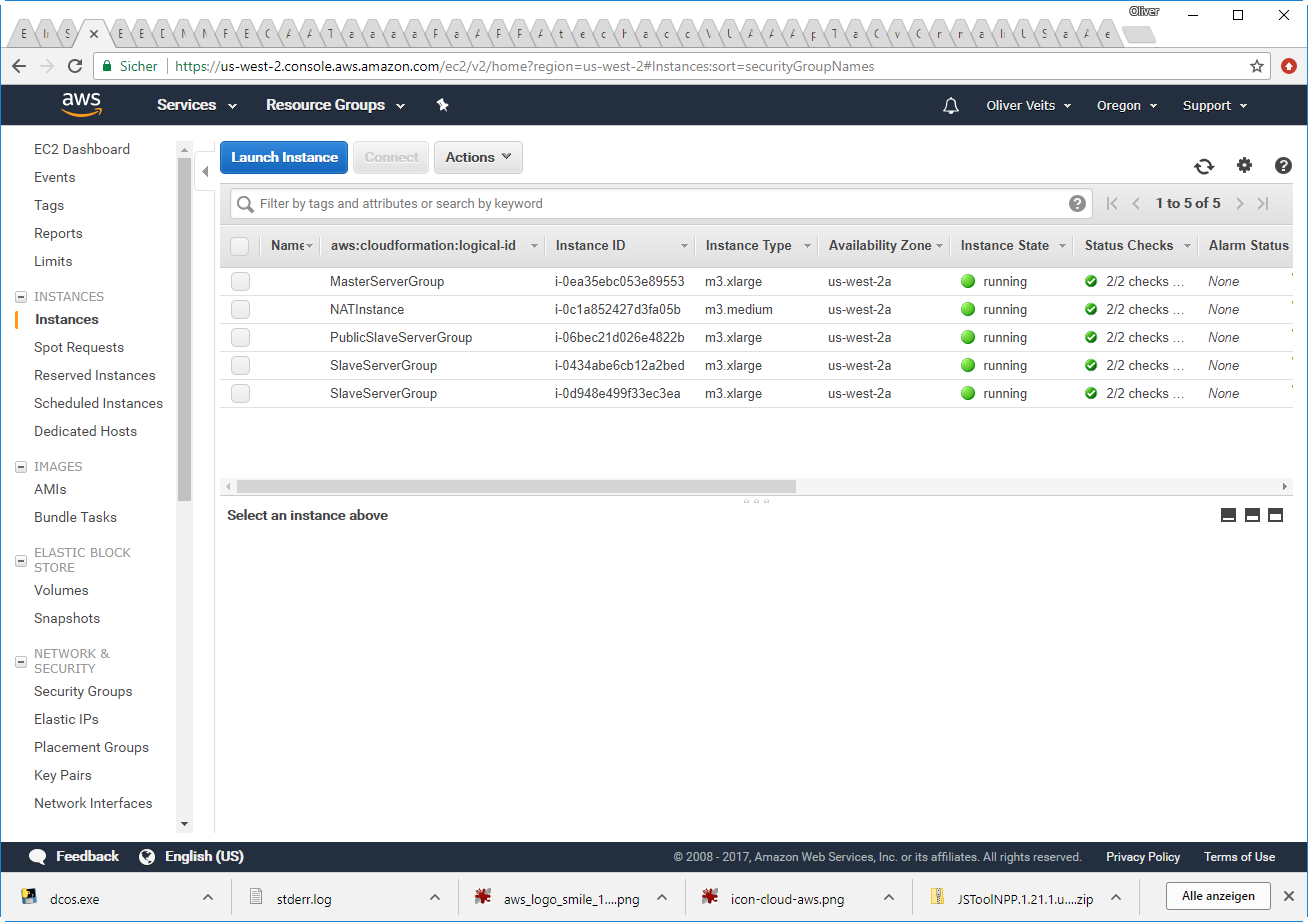
After 15 minutes or so, you should see that the stack is up and running with two private slave instances:
Appendix F: Configuration
F.1 Master cloud-config.yml
Is found on /usr/share/oem/cloud-config.yml:
#cloud-config

coreos:
  units:
    - name: etcd.service
      runtime: true
      drop-ins:
        - name: 10-oem.conf
          content: |
            [Service]
            Environment=ETCD_PEER_ELECTION_TIMEOUT=1200

    - name: etcd2.service
      runtime: true
      drop-ins:
        - name: 10-oem.conf
          content: |
            [Service]
            Environment=ETCD_ELECTION_TIMEOUT=1200

    - name: user-configdrive.service
      mask: yes

    - name: user-configvirtfs.service
      mask: yes

    - name: oem-cloudinit.service
      command: restart
      runtime: yes
      content: |
        [Unit]
        Description=Cloudinit from EC2-style metadata

        [Service]
        Type=oneshot
        ExecStart=/usr/bin/coreos-cloudinit --oem=ec2-compat

  oem:
    id: ami
    name: Amazon EC2
    version-id: 0.0.7
    home-url: http://aws.amazon.com/ec2/
    bug-report-url: https://github.com/coreos/bugs/issues
F.2 Public Slave cloud-config.yml
#cloud-config

coreos:
  units:
    - name: etcd.service
      runtime: true
      drop-ins:
        - name: 10-oem.conf
          content: |
            [Service]
            Environment=ETCD_PEER_ELECTION_TIMEOUT=1200

    - name: etcd2.service
      runtime: true
      drop-ins:
        - name: 10-oem.conf
          content: |
            [Service]
            Environment=ETCD_ELECTION_TIMEOUT=1200

    - name: user-configdrive.service
      mask: yes

    - name: user-configvirtfs.service
      mask: yes

    - name: oem-cloudinit.service
      command: restart
      runtime: yes
      content: |
        [Unit]
        Description=Cloudinit from EC2-style metadata

        [Service]
        Type=oneshot
        ExecStart=/usr/bin/coreos-cloudinit --oem=ec2-compat

  oem:
    id: ami
    name: Amazon EC2
    version-id: 0.0.7
    home-url: http://aws.amazon.com/ec2/
    bug-report-url: https://github.com/coreos/bugs/issues
References
- In this blog post, we are loosely following https://aws.amazon.com/blogs/apn/announcing-mesosphere-dcos-on-aws/. However, we have improved the documentation by correcting some typos and by showing more closely, which permissions the user needs and how to get them.
- Official DCOS documentation v1.10 on AWS installation
- Part 1 of this series: Getting Started with Mesos Resource Reservation & Marathon Watchdog – A “Hello World” Example
- Part 2 of this series: Getting Started with DC/OS on Vagrant