In this blog post, we will show how to create Kubernetes HTTPS applications with a redirection from HTTP to HTTPS. For that, we will create a and mount a self-signed wildcard certificate to an NginX-based Kubernetes ingress controller.

We will perform the test on a CentOS minikube (single node) system. By starting from scratch on a fresh CentOS system, we first show how to install Docker and minikube. After having installed the prerequisites, we will add an HTTP application and use an NginX-based Kubernetes ingress controller to make it available from the Internet. Then we will cast a self-signed certificate to a Kubernetes secret. Once, we have mounted the Kubernetes secret to the ingress controller we will show that kubernetes used the certificate to offer HTTPS services to the same application we had accessed via HTTP before.
References
- We are closely following the youtube video „Create a Kubernetes TLS Ingress from scratch in Minikube“ by kubucation. Thanks to kubucation for sharing!
- Other Kubernetes Series posts in this blog:
Prerequisites
- We have used a fresh cloud CentOS 7 system with 4 GB RAM and 2 vCPU.
- All commands are performed as root.
Phase 1: Install Minikube
Step 1.1: Install Docker and Minikube
As a start, we follow the instructions on Kubernetes (1) – Installing Minikube on CentOS and install Docker and minikube:
Step 1.1.1: Install Docker v18.06
sudo echo nothing 2>/dev/null 1>/dev/null || alias sudo='$@'

sudo tee /etc/yum.repos.d/docker.repo <<-'EOF'
[docker-ce-edge]
name=Docker CE Edge - $basearch
baseurl=https://download.docker.com/linux/centos/7/$basearch/edge
enabled=1
gpgcheck=1
gpgkey=https://download.docker.com/linux/centos/gpg
EOF
Last time, when we had installed minikube v0.30.0, we had experienced problems with Docker versions newer than v18.06. Therefore, we choose to install the latest bugfix-version of Docker v18.06 on the host machine:
yum install -y docker-ce-18.06.1.ce-3.el7.x86_64 \
  && sudo systemctl start docker \
  && sudo systemctl status docker \
  && sudo systemctl enable docker
...
We verify the correctness of the Docker installation by a simple docker search command:
# docker search hello
NAME                                       DESCRIPTION                                     STARS               OFFICIAL            AUTOMATED
hello-world                                Hello World! (an example of minimal Dockeriz…   730                 [OK]
tutum/hello-world                          Image to test docker deployments. Has Apache…   56                                      [OK]
...
Step 1.1.2: Install & Start Minikube v0.32.0
Since Docker is up and running now, it is time to install and activate Minikube as follows:
MINIKUBE_VERSION=v0.32.0
curl -sLO https://storage.googleapis.com/minikube/releases/${MINIKUBE_VERSION}/minikube-linux-amd64 \
   && install minikube-linux-amd64 /usr/local/bin/minikube \
   && minikube version \
   && minikube start --vm-driver=none
This will start minikube natively on Linux without the need to install VirtualBox or KVM.
Note: running minikube natively as shown above is not recommended on workstations or on production. We can use it on a throw-away cloud systems, though. If no throw-away cloud system is available, try one of the other methods of installing minikube described on minikube’s GIT repository.
Step 1.2: Activate Ingress Controller
In our minikube system, activating the NginX ingress controller is as easy as issuing the following command on the minikube system:
minikube addons enable ingress
This will spin up an NginX system in a POD:
# kubectl get pods -n kube-system | grep 'NAME\|ingress'
NAME                                        READY   STATUS    RESTARTS   AGE
nginx-ingress-controller-6958898f8f-w7948   0/1     Running   0          5s
Note: For listing all addons, you can issue the command ‚minikube addons list‘:
# minikube addons list
- addon-manager: enabled
- dashboard: enabled
- default-storageclass: enabled
- efk: disabled
- freshpod: disabled
- gvisor: disabled
- heapster: disabled
- ingress: enabled
- metrics-server: disabled
- nvidia-driver-installer: disabled
- nvidia-gpu-device-plugin: disabled
- registry: disabled
- registry-creds: disabled
- storage-provisioner: enabled
Phase 2: Create a public Kubernetes HTTP Application
In this phase, we will create a publicly accessible HTTP service. We will first create a hello world application, a service before we configure an entry in the NginX-based Kubernetes Ingress service. This will allow us to access the HTTP service from the Internet.
Step 2.1: Creating a Hello World App Deployment
The easiest way to create a Hello-World is to use an imperative kubectl command. The imperative ‚kubectl run‘ command is deprecated. However, the kubectl create deployment is almost as simple as the ‚kubectl run‘ command:
kubectl create deployment nginx-demo --image=nginxdemos/hello
At least, the ‚kubectl create deployment‘ command is much simpler as the equivalent descriptive ‚kubectl apply -f‘ command:
cat <<EOF | kubectl apply -f -
apiVersion: extensions/v1beta1
kind: Deployment
metadata:
  labels:
    app: nginx-demo
  name: nginx-demo
  namespace: default
spec:
  progressDeadlineSeconds: 600
  replicas: 1
  revisionHistoryLimit: 10
  selector:
    matchLabels:
      app: nginx-demo
  strategy:
    rollingUpdate:
      maxSurge: 25%
      maxUnavailable: 25%
    type: RollingUpdate
  template:
    metadata:
      creationTimestamp: null
      labels:
        app: nginx-demo
    spec:
      containers:
      - image: nginxdemos/hello
        imagePullPolicy: Always
        name: hello
        resources: {}
        terminationMessagePath: /dev/termination-log
        terminationMessagePolicy: File
      dnsPolicy: ClusterFirst
      restartPolicy: Always
      schedulerName: default-scheduler
      securityContext: {}
      terminationGracePeriodSeconds: 30
EOF
However, the descriptive version is much better suited for source code versioning than the imperative, short commands. The exact result of the latter often depends of the kubectl version. Still, for our quick tests, the imperative commands will do fine.
This will create a deployment, which in turn will create a POD almost immediately:
# kubectl get deployment
NAME         DESIRED   CURRENT   UP-TO-DATE   AVAILABLE   AGE
nginx-demo   1         1         1            1           84s

# kubectl get pod
NAME                          READY   STATUS    RESTARTS   AGE
nginx-demo-75556867d5-tdd4t   1/1     Running   0          95s
Step 2.2: Exposing the Hello World App internally
We now want to reach the application from the outside world. For that, we expose the application to the Internet:
kubectl expose deployment nginx-demo --port=80
We now can reach the demo from within the minikube cluster like follows:
CLUSTER_IP=$(kubectl get svc nginx-demo -o yaml | grep clusterIP | awk '{print $2}')
PORT=$(kubectl get svc nginx-demo -o yaml | grep '\- port' | awk '{print $3}')

curl $CLUSTER_IP:$PORT
However, the cluster IP address is a private address that is not reachable from outside of the kubernetes cluster. We will take care of this in the next step.
Note: We could have spedified the
--type=NodePortoption in thekubectl create deploymentcommand in order to expose the application to the Internet. We had done so previously in our minikube Hello World blog post. With that, we had not needed to create a Kubernetes Ingress controller for accessing the service from the Internet. However, the NodePort option has following disadvantages:
- A load balancing of a service running on a NodePort still requires an external load balancer
- each and every application that wants to be reachable on a secured HTTPS data channel needs to take care of TLS certificates on its own.
The Kubernetes Ingress way will solve this once and for all applications. Therefore, this is the way, we have chosen here.
Step 2.3: Creating an Ingress Entry
In order to access the service from the Internet, we create an ingress entry. In order to be flexible, we create a template first:
---
# ingress.yml.tmpl
apiVersion: extensions/v1beta1
kind: Ingress
metadata:
  name: ninx-demo
spec:
  rules:
    - host: ${INGRESS_HOST}
      http:
        paths:
          - backend:
             serviceName: nginx-demo
             servicePort: 80
We now specify the ingress fully qualified domain name:
# export INGRESS_HOST=minikube.$(minikube ip).nip.io; echo $INGRESS_HOST
minikube.116.203.44.29.nip.io
Here we have made use of the wildcard DNS service from nip.io, that will map any domain name of the format *.w.x.y.z.nip.io to the IP address w.x.y.z.
We now can use this information to create and apply the ingress.yml file:
envsubst < ingress.yml.tmpl > ingress.yml
Let us check the content of the YAML file:
# cat ingress.yml
---
apiVersion: extensions/v1beta1
kind: Ingress
metadata:
  name: ninx-demo
spec:
  rules:
    - host: minikube.116.203.44.29.nip.io
      http:
        paths:
          - backend:
             serviceName: nginx-demo
             servicePort: 80
Okay, the environment variable has been replaced successfully.
We now apply the YAML file:
# kubectl apply -f ingress.yml
ingress.extensions/ninx-demo created
Let us review the result:
# kubectl get ingress
NAME        HOSTS                           ADDRESS   PORTS   AGE
ninx-demo   minikube.116.203.44.29.nip.io             80      15s
Step 2.4: Access the HTTP Service from the Internet
Since the ingress entry is created, we now can access the service from the outside world in a browser: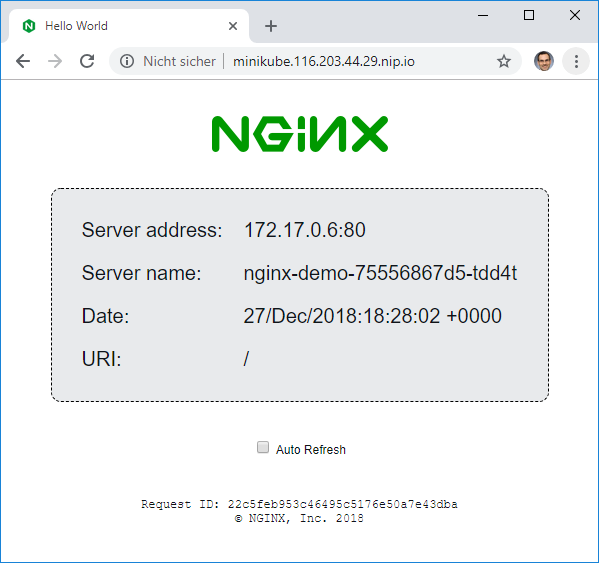
Our goal of phase 1 is achieved: we have access to an HTTP service from the Internet. Perfect. Let us move on to creating an HTTPS service.
Phase 3: Create a public Kubernetes HTTPS Application
In phase 2 above, we had created a publicly accessible HTTP service. In the current phase, we will add a self-signed TLS certificate to Kubernetes Ingress in order to access the same service on a secured, encrypted data channel via HTTPS.
Step 3.1: Create a Certificate and Key
For the current phase, it is sufficient to create a self-signed key and certificate like follows:
export DOMAIN=$(minikube ip).nip.io
openssl req -x509 -newkey rsa:4096 -sha256 -nodes -keyout tls_self.key -out tls_self.crt -subj "/CN=*.${DOMAIN}" -days 365
Here, we have chosen to create a self-signed certificate with wildcard domain „/CN=*.${DOMAIN}“. This helps us later to re-use the certificate for more than one application.
The output of the above commands will look as follows:
Generating a 4096 bit RSA private key
........................................................................................................................................................................................................++
..................................++
writing new private key to 'tls_self.key'
-----
Step 3.2: Create Kubernetes Secret
We now will create a kubernetes secret and feed the previously created key and certification into it.
The naming convention for TLS secrets is to use the Domain, replace all dots by hyphens and append ‚-tls‘:
# SECRET_NAME=$(echo $DOMAIN | sed 's/\./-/g')-tls; echo $SECRET_NAME
116-203-44-29-nip-io-tls
We now will create a type ‚tls‘ secret. For type ‚tls‘ secrets, we just need to specify the certification file and key file and kubernetes will take care of the rest:
# kubectl create secret tls $SECRET_NAME --cert=tls_self.crt --key=tls_self.key
secret/116-203-44-29-nip-io-tls created
The content of the secret can be reviewed with
# kubectl get secret $SECRET_NAME -o yaml
apiVersion: v1
data:
  tls.crt: LS0...
  tls.key: LS0...
kind: Secret
metadata:
  creationTimestamp: 2018-12-30T17:49:54Z
  name: 116-203-44-29-nip-io-tls
  namespace: default
  resourceVersion: "360910"
  selfLink: /api/v1/namespaces/default/secrets/116-203-44-29-nip-io-tls
  uid: 509eead9-0c5b-11e9-8943-96000017327f
type: kubernetes.io/tls
Step 3.3: Use Certification Secret within Kubernetes Ingress
We now need to add the secret to the kubernetes ingress. This is done by adding the blue part to the ingress YAML template file named ingress.yml.tmpl:
---
# ingress.yml.tmpl
apiVersion: extensions/v1beta1
kind: Ingress
metadata:
  name: nginx-demo
spec:
  tls:
    - secretName: ${SECRET_NAME}
      hosts:
        - '*.${DOMAIN}'
  rules:
    - host: ${INGRESS_HOST}
      http:
        paths:
          - backend:
             serviceName: nginx-demo
             servicePort: 80
Here I am trying to use the *.${DOMAIN} wildcard as a hosts entry. I am not yet sure, whether this will work.
Note: in my first attempt, it had not worked, since I had forgotten to add the single quotes (‚) before and after the wildcard pattern. With the quotes, it works well.
We create the actual ingress file using ‚envsubst‘ as follows:
export DOMAIN=$(minikube ip).nip.io
export INGRESS_HOST=nginx-demo.$DOMAIN
export SECRET_NAME=$(echo $DOMAIN | sed 's/\./-/g')-tls
envsubst < ingress.yml.tmpl > ingress.yml
sed -i 's/ingress.yml.tmpl/ingress.yml/' ingress.yml
After checking the content of the ingress YAML file,
# cat ingress.yml
---
# ingress.yml
apiVersion: extensions/v1beta1
kind: Ingress
metadata:
  name: nginx-demo
spec:
  tls:
    - secretName: 116-203-44-29-nip-io-tls
      hosts:
        - '*.116.203.44.29.nip.io'
  rules:
    - host: nginx-demo.116.203.44.29.nip.io
      http:
        paths:
          - backend:
             serviceName: nginx-demo
             servicePort: 80
we apply it:
# kubectl apply -f ingress.yml
ingress.extensions/nginx-demo created
Step 3.3: Access the Application via HTTPS
Accessing the application via HTTPS is simple: we just need to add ‚https://‘ in front of the domain:
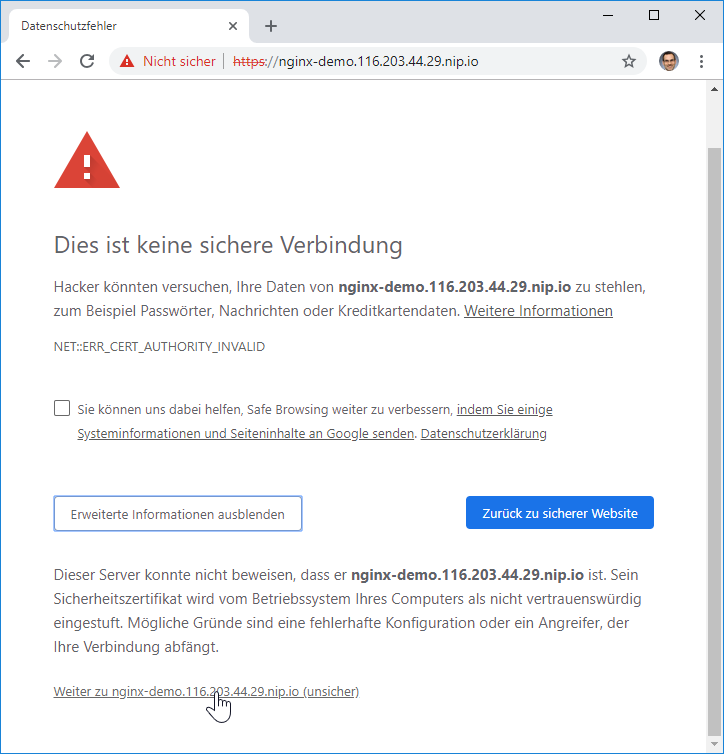
curl -k https://$INGRESS_HOST
After acknowledging the usage of a self-signed certificate, we reach the HTTPS-secured application:


Step 3.4: Verify the Certificate
Note: Kubernetes minikube also uses its own self-signed certificate named „Kubernetes Ingress Controller Fake Certificate“. It happened to me that this fake certificate was used instead. Therefore, it makes sense to verify that the correct certificate was used in our case.
There are many possibilites why the wrong certificate may be used by kubernetes. In my case, this was, because I have tried to create a wildcard certificate without the explicit wildcard ‚*.‘ in the CN openssl argument. I have found errors like „wrong secret name in ingress.yaml“ and „missing servername“ in the Internet as well.
When clicking on the „Not Secure“ sign in front of the URL, we can verify that the certificate is the one we have just created:


Yes, it is the certificate I have created today, 2018-12-30 for the wildcard domain *.116.203.44.29.nip.io.
Another way of verifying the correct certificate is to replace the ‚-k‘ curl option by a ‚–cacert <file>‘ option:
# curl --cacert tls_self.crt https://$INGRESS_HOST
<!DOCTYPE html>
<html>
<head>
<title>Hello World</title>
...
</body>
</html>
Step 3.5: Verify the HTTP to HTTPS Redirection
Even if we use the ‚http://‘ prefix in the Browser, the Kubernetes ingress controller will redirect us to the HTTPS counterpart. We can see that easily by using curl:
# curl -s -D - http://$INGRESS_HOST
HTTP/1.1 308 Permanent Redirect
Server: nginx/1.15.6
Date: Sat, 29 Dec 2018 14:20:38 GMT
Content-Type: text/html
Content-Length: 171
Connection: keep-alive
Location: https://nginx-demo.116.203.44.29.nip.io/

<html>
<head><title>308 Permanent Redirect</title></head>
<body>
<center><h1>308 Permanent Redirect</h1></center>
<hr><center>nginx/1.15.6</center>
</body>
</html>
The same can be seen on a Chrome Browser in development mode (F12):
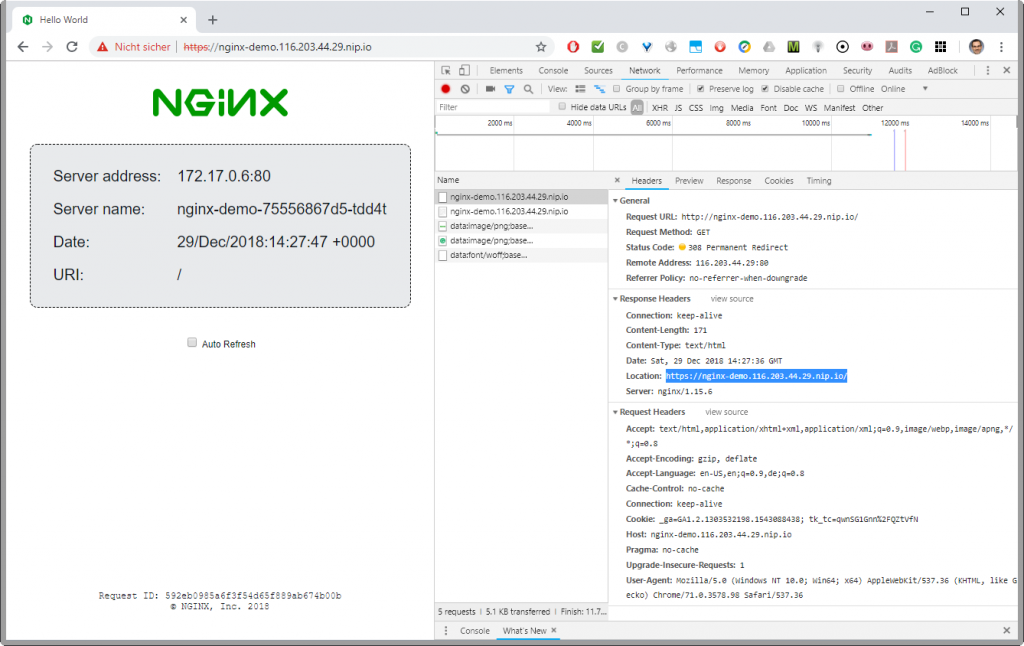
We receive a ‚308 Permanent redirect‘ to location ‚https://…‘.
We have reached our goal: the application is reachable via HTTPS and as a goodie, we get an automatic redirection from HTTP to HTTPS.
Summary
In this blog post, we have created an HTTPS-based application on Kubernetes minikube. We have started our journey from scratch by installing Docker and minikube on a CentOS system. Then we have created an HTTP service that is reachable from the Internet. After that, we have created and imported a self-signed certificate to the NginX-based Kubernetes Ingress for making the application reachable on an encrypted HTTPS data channel. Finally, we have verified that the correct certificate is used and that the browser is redirected from HTTP to HTTPS.