- Ansible Tower – a Hello World Example
- Salt Hello World
- Ansible Hello World – Ansible vs. Salt vs. Chef vs. Puppet
This is part IV of a little „Hello World“ example for Ansible, an IT automation (DevOps) tool. This time, we will get acquainted with Ansible Tower, a web front end for Ansible. The post has following content:
- Quickest way of „installing“ an Ansible Tower trial system (via Vagrant this time)
- Step by step guide for a minimalistic „Hello World!“ example, following closely the official documentation with following differences:
- more insights on the dependencies of the steps (discussed with a simple dependency diagram)
- shorter, simple page step by step tutorial with links to the official documentation at each step
- Ansible Tower Benefits
Posts of this series:
- Part I: Ansible Hello World with a comparison of Ansible vs. Salt vs. Chef vs. Puppet and a hello world example with focus on Playbooks (i.e. tasks), Inventories (i.e. groups of targets) and remote shell script execution.
- Part II: Ansible Hello World reloaded with focus on templating: create and upload files based on jinja2 templates.
- Part III: Salt Hello World example: same content as part I, but with Salt instead of Ansible
- Part IV: Ansible Tower Hello World: investigates Ansible Tower, a professional Web Portal for Ansible
Why not „Installing“ Ansible Tower via Docker?
In parts I to III of this blog series, I have made good experience downloading Docker images from Docker Hub instead of installing the software in question. This is, how we had „installed“ Ansible and Saltstack. Also this time, I have tried to do so, but the attempts were less successful. I have tested following images:
- leowmjw/ubuntu-ansible-tower is a manual build and 8 months old at the time of writing. I had succeeded to accomplish almost all steps, but at the end, the launched jobs were stuck in the „pending“ state and I could not find out, what is wrong.
- ybalt/ansible-tower is an automated build, but still 6 months old. The services seem to start, but first greeting I got was a „Fatal Error“ welcome screen (maybe, since I did not map the certs private folder, but I did not want to mess around with certifications)
At this point, I had given up following the Docker path for now, even though there are many other public Ansible Tower images on Docker Hub I could test. Instead, I have found that installing Ansible Tower on a VirtualBox image by using Vagrant is a very convenient way of tackling the installation part. It is recommended for proof of concept purposes only, but it is an officially offered way of creating an Ansible Tower service; see this official documentation.
Installing Ansible Tower via Vagrant
Prerequisites
- VirtualBox 5 is installed. You can get the software from here. See the Appendix A of part 1 of this series for some possible workarounds, if you have problems installing VirtualBox on a Windows system.
- Vagrant is installed. Get the software from here.
- Enough resources on the host system: additional 2 GB RAM and 2 vCPUs. However, the top command on my Notebook shows that the host system is running with less than 20% CPU load, although the Ansible Tower is running.
Step 1: install Ansible Tower via Vagrant and connect via SSH
Following this instructions, you can issue the following commands in order to download, start and connect to the Ansible Tower image:
$ vagrant init ansible/tower # creates the Vagrantfile
$ vagrant box add ansible/tower # optional; downloads the Vagrant box
As an addition to the official documentation, I have added the second command. The download might take a long time, and the next command will require your attention.
give you some time for a long coffee break, while the next command requires your immediate attention: I had been prompted for the Administrator password twice. If you fail to provide the password in time, you might come back from the coffee break and be surprised by an error with a message like: VBoxManage.exe: error: Failed to create the host-only adapter.
$ vagrant up --provider virtualbox # the --provider option is optional, since virtualbox is the default provider
$ vagrant ssh # connects to the machine
The following (or similar) content will be shown:
$ vagrant ssh
Last login: Sat Jun 11 00:16:51 2016 from gateway

  Welcome to Ansible Tower!

  Log into the web interface here:

    https://10.42.0.42/

    Username: admin
    Password: <some_random_password>

  The documentation for Ansible Tower is available here:

    http://www.ansible.com/tower/

  For help, email support@ansible.com
[vagrant@ansible-tower ~]$
Step 2: follow the official quick start guide (with minor changes)
We closely follow the official quick start guide with a minor adaption at step „4. Create the Credential“ below. This is, because Vagrant does not allow for password login of the root user.
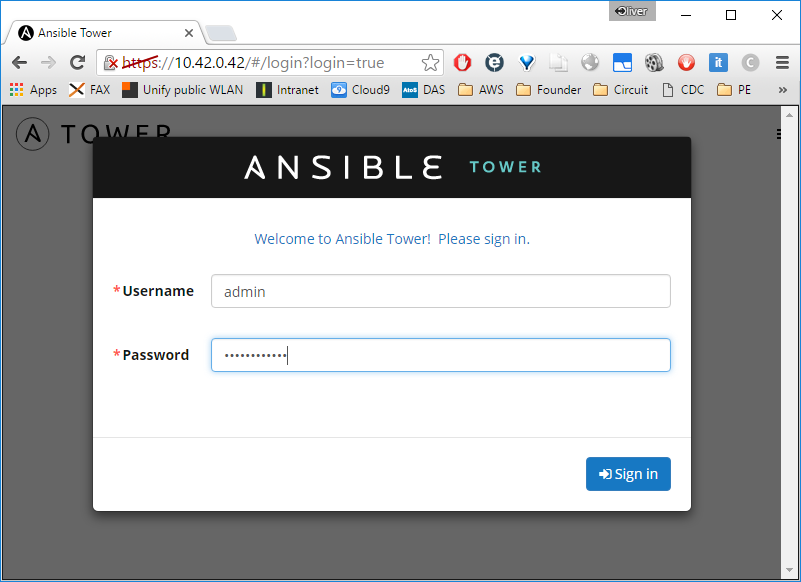
Step 2.1: Log into Ansible Tower
We now can connect via browser to http://www.ansible.com/tower/ and log in with the credentials:
Step 2.2 Import a License
Since we are logged in the first time ever, we will be provided with a pop-up like follows:

Click on „Get a Free Tower Trial License“ and choose the appropriate license version. I have applied for the permanent free license for up to 10 nodes, and I have received an email from support@ansible.com with the license file. You can either drag&drop the license file to the browser, or you can copy the license file content into the corresponding field, so the content of the License File field looks similar to:
{
    "company_name": "YourCompanyName",
    "contact_email": "youremail@company.com",
    "contact_name": "Your Name",
    "hostname": "yourhostname",
    "instance_count": 10,
    "license_date": 2128169547,
    "license_key": "your_license_key",
    "license_type": "basic",
    "subscription_name": "Basic Tower up to 10 Nodes"
}
After checking the „I agree …“ checkbox and submitting the form, you will be rewarded with a License Accepted pop-up window:

After clicking OK, you will reach the Dashboard:

Step 2.3: Add all elements needed for a minimum Hello World Example
Now: where to start? For that, let us have a look at the data model and the dependencies. The data model of Ansible Tower, as provided by the Ansible Tower documentation looks like follows:
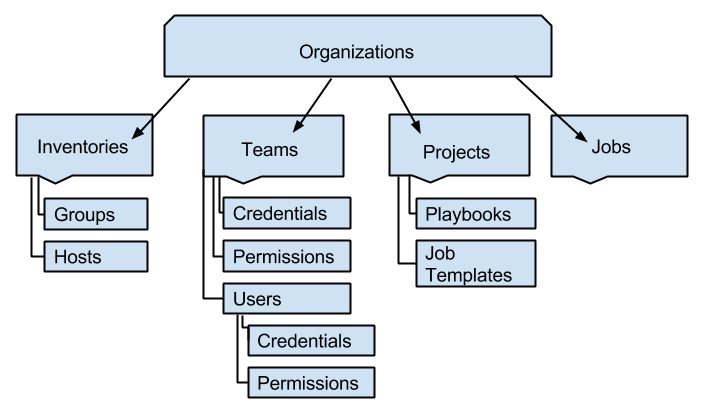
Note that (at least for new versions of Ansible), users can be directly attached to an organization with no need to create a team. The same holds for inventory groups. Let us get rid of those and perform a „Hello World“ in following simplified model:

Okay, the figure might look slightly more complex than the one in the Ansible Tower documentation. This is, because I have added all mandatory parent to child dependencies, similar to the Unified Modeling Language notation.
Note: In the Ansible Tower model, each child has only a single parent, while each parent can have an arbitrary number of children. The only exception I have found so far are the Projects: each project can be assigned to one or more organizations.
As in the real world, you need to follow the arrows, if you want to reach your goal:
- Users, inventories and projects depend on organizations. However an organization named „default“ is already pre-installed, so we do not need to do anything here.
- we need to create a user before we can create a credential
- we need to create an inventory before we can create a host
- we need to add a playbook directory, before we can define a project
- we need to create a playbook file, before we can define a job template. In addition, a credentials, an inventory and a project needs to be available.
- A job can be launched from a job template panel only
The official quick start guide goes through this model like follows:

Let us follow the same order. Nothing needs to be done for the organization („Step 0“): a „default“ organization exists already. So, let us start with Step 1:
- Create a User
Click on and then on Users and then on
  and add and save following data:

- Create an Inventory
Click on Inventories, then and and and save following data:

- Create a Host
Click on Inventories, then on the newly created inventory, and then on on the far right. Add and save following data:

- Create a Credential
Click on and then on Credentials and then on . Here we deviate a little bit from the official documentation. The documentation asks to add and save following data:

However, we have installed Ansible Tower using Vagrant, and per default, the root user cannot log in with a password. Therefore we will use the vagrant user and log in with the private SSH key like follows:

The private SSH key can be found on the host system, from where you have started the ansible tower. From the directory containing the Vagrantfile, you need to navigate to CODE .vagrant/machines/default/virtualbox CODE and open the file CODE private_key. The content needs to be cut & paste into the Private Key field above. - Create a Playbook Directory
Start an ssh session to the Ansible Tower host. In our case, this is done by issuing
CODE vagrant ssh CODE
as shown above. Issue the command
CODE sudo mkdir /var/lib/awx/projects/helloworld CODE - Create a Playbook
In the ssh session, start an editor session, e.g.
CODE vi /var/lib/awx/projects/helloworld/helloworld.yml CODE:
cut&paste following content into the file:--- - name: Hello World! hosts: all tasks: - name: Hello World! shell: echo "Hi! Tower is working!" - Create a Project
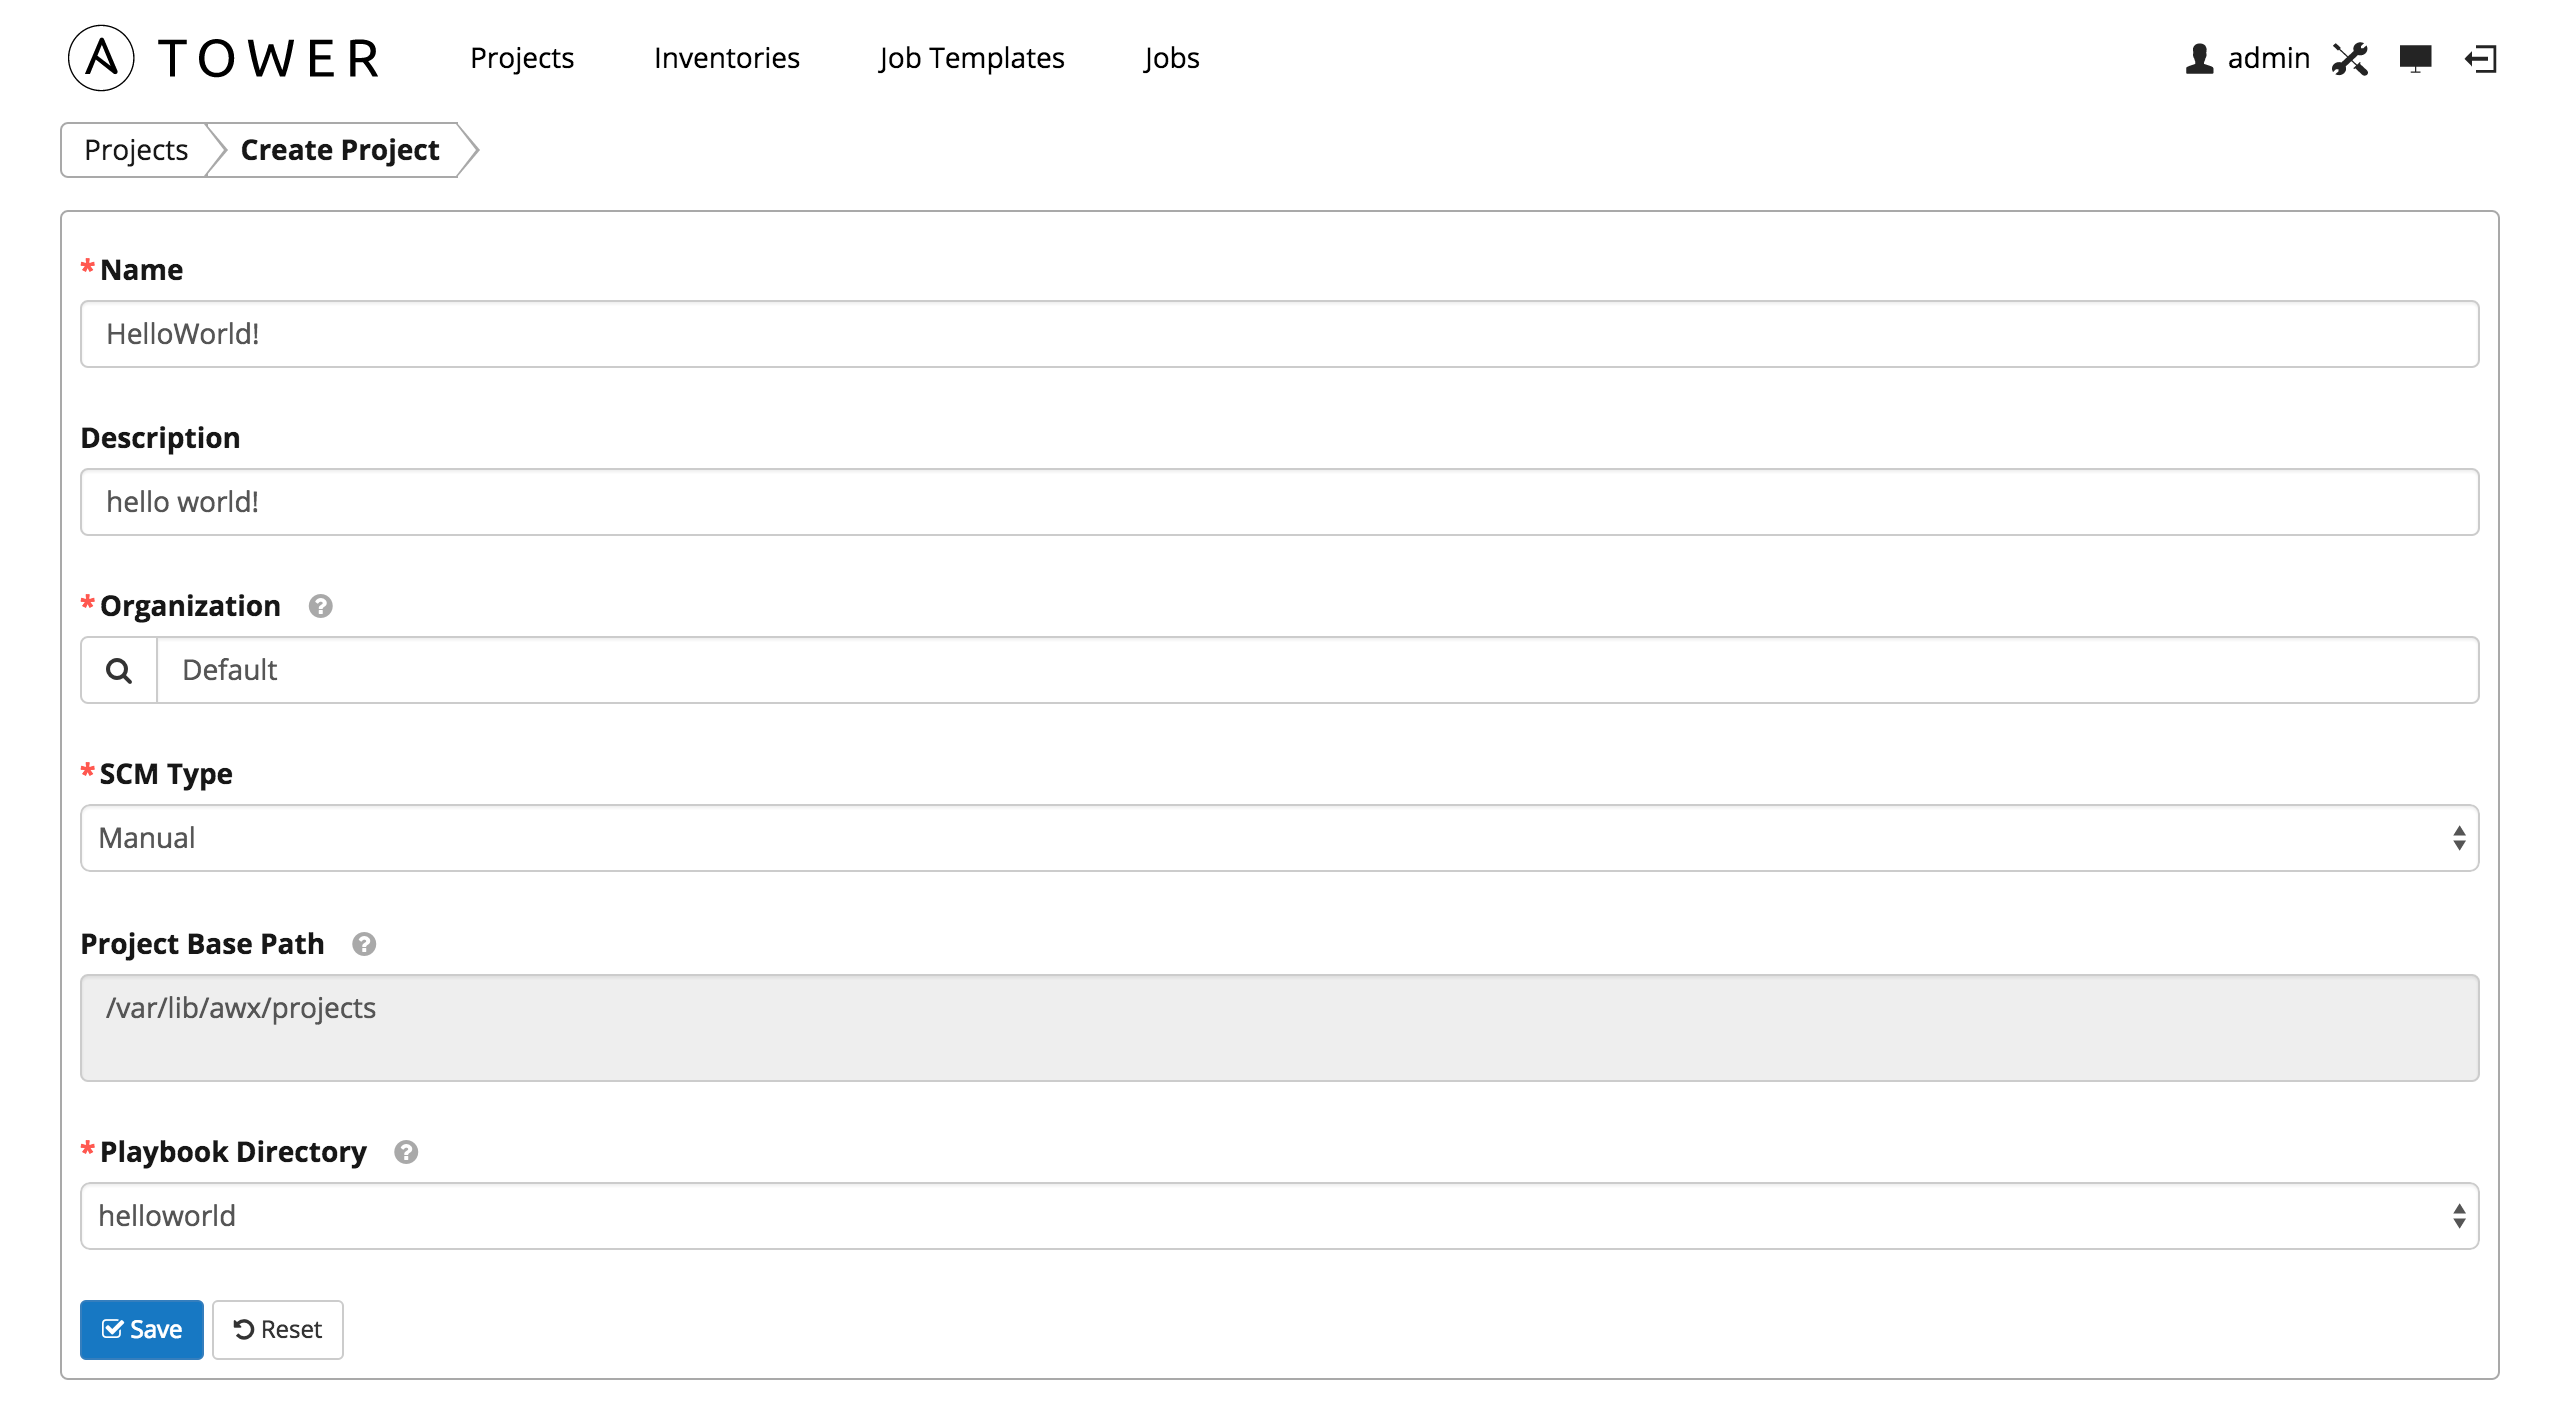
Click on Projects and on and add and save following data:

- Create a Job Template
Click on Job Templates and on and add and save following data:

Note that you need to use the other credential named „Vagrant User per SSH Key“ we have created in Step 4 above. - Create (Launch) a Job
Click on Job Templates and on in the corresponding line of the job template. In case of a password credential, add the password into the prompt (not needed for SSH key authentication):


This will lead to following result:

The command line output can be checked by clicking the ![]() button:
button:

Why Ansible Tower?
When we compare the many steps needed to run a simple „Hello World“ example we could have accomplished on the command-line in less than half of the time (see e.g. part 1 of this blog series), we could ask ourselves, why someone would like to use Ansible tower at all. The main reasons (as I see it) are like follows:
- Fine-grained role-based access control: in a real-world example, most steps above would be performed by an Ansible Tower administrator. As an example, you could define a team that is allowed to launch certain jobs only. Moreover, Ansible Tower seems to allow a quite fine-grained access control on what a team or user is allowed to do with Inventories and Job Templates (see
 -> Teams -> Permissions):
- Unlike StaltStack, Ansible (without Tower) does not have any notion of immediate or scheduled background jobs. In addition, it does not automatically record the execution time and results of any performed jobs, making audit trails a complex task. Ansible Tower is filling this gap.
- Nice and easy graphical handling including statistics etc.
- Ansible Tower offers a modern RESTful API, which allows it to integrate with existing tools and processes

Summary
In this blog post we have shown how Vagrant can help to quickly set up a local Ansible Tower trial. We have discussed the Ansible Tower object model in its simplest form, and could explain, why and which minimal steps are needed to perform a simple „Hello World“. At the end, we have compared Ansible Tower with simple command-line based Ansible (without Tower).