This time we will show, how to use server side rendering with Angular 4 (or Angular 2). Like in my previous blog post, we will consume a RESTful Web Service with Angular 4. However, the web page will be displayed almost immediately because of server side rendering, as opposed to the client side rendered situation described in my previous blog post about Angular consuming a REST API. There, we had observed load times of several seconds in situations with low bandwidth between Angular server and REST service.
Why Server Side Rendering?
In our last blog post, Consuming a RESTful Web Service with Angular 4, we have created an Angular simple single page application that has displayed data from an external resource, the WordPress API. In case of limited bandwidth between client and WordPress API, the latency for some responses were several seconds (!). Because of this fact, the perceived performance of the application was quite poor.
Angular Universal offers a possibility to mitigate the problem: it offers a combination of server side rendering and client side rendering. When the client contacts its server, the complete HTML page is downloaded to the client and the client can display the content immediately. Then the client will perform the REST call and will replace the server-side rendered page by a client-side rendered page. In case of a low performance link to the RESTful interface, this can be perceived by a flickering of the page. This is not perfect, but it is much better than waiting for the page display for seconds.
Now let us begin with our step by step guide.
Phase 1: Run a Server Side Rendered Hello World Page
Step 1.0: Get a Docker Host
This time again, our application will need more than 750 MB RAM. Therefore, we cannot use my beloved Katacoda as our Docker playground, which is limited to this amount of DRAM. Instead, you need to get access to a Docker host with, >~ 2 GB RAM. A nice way of installing an Ubuntu Docker host via Vagrant is described here (search for the term “Install a Docker Host”).
Step 1.1 Run my CentOS Angular Image
On the Docker host, let us start my angular image like follows (the -v $(pwd):/localdir option is only needed, if you want to keep the project folder for later use)
(dockerhost)$ docker run -it -p 8000:8000 -v $(pwd):/localdir oveits/angular_hello_world:centos bash
Then, on the container, we perform following commands:
(container)# git clone https://github.com/FrozenPandaz/ng-universal-demo
(container)# cd ng-universal-demo
(container)# npm i
(container)# npm run watch &
[1] 37

> ng-universal-demo@1.0.0 watch /ng-universal-demo
> webpack --watch


Webpack is watching the files…

Hash: 068db451109474765aa6ca44939d0968e157c122
Version: webpack 2.6.1
Child
    Hash: 068db451109474765aa6
    Time: 15786ms
              Asset       Size  Chunks                    Chunk Names
        0.client.js    2.13 kB       0  [emitted]
          client.js     2.5 MB       1  [emitted]  [big]  main
    0.client.js.map    1.04 kB       0  [emitted]
      client.js.map    3.03 MB       1  [emitted]         main
         index.html  222 bytes          [emitted]
       [0] ./~/rxjs/Observable.js 11.4 kB {1} [built]
       [3] ./~/rxjs/util/root.js 885 bytes {1} [built]
       [7] ./~/@angular/platform-browser/@angular/platform-browser.es5.js 141 kB {1} [built]
       [9] (webpack)/buildin/global.js 509 bytes {1} [built]
      [19] ./~/rxjs/add/operator/map.js 187 bytes {1} [built]
      [39] ./~/@angular/platform-browser-dynamic/@angular/platform-browser-dynamic.es5.js 5.88 kB {1} [built]
      [40] ./src/app/browser-app.module.ts 1.4 kB {1} [built]
      [41] ./~/reflect-metadata/Reflect.js 48 kB {1} [built]
      [42] ./~/zone.js/dist/zone.js 96 kB {1} [built]
      [44] ./~/@angular/compiler/@angular/compiler.es5.js 1.02 MB {1} [built]
      [45] ./src/app/app.module.ts 1.61 kB {1} [built]
      [47] ./src/main.browser.ts 350 bytes {1} [built]
      [49] ./src/modules/transfer-state/browser-transfer-state.module.ts 1.35 kB {1} [built]
      [50] ./~/process/browser.js 5.42 kB {1} [built]
      [78] ./~/rxjs/util/toSubscriber.js 760 bytes {1} [built]
        + 66 hidden modules

    ERROR in /ng-universal-demo/node_modules/rxjs/Subject.d.ts (16,22): Class 'Subject' incorrectly extends base class 'Observable'.
      Types of property 'lift' are incompatible.
        Type '(operator: Operator<T, R>) => Observable' is not assignable to type '(operator: Operator<T, R>) => Observable'.
          Type 'Observable' is not assignable to type 'Observable'.
            Type 'T' is not assignable to type 'R'.
    Child html-webpack-plugin for "index.html":
           [0] ./~/html-webpack-plugin/lib/loader.js!./src/index.html 193 bytes {0} [built]
Child
    Hash: ca44939d0968e157c122
    Time: 21298ms
              Asset     Size  Chunks                    Chunk Names
        0.server.js  2.14 kB       0  [emitted]
          server.js  4.23 MB       1  [emitted]  [big]  main
    0.server.js.map  1.04 kB       0  [emitted]
      server.js.map  5.18 MB       1  [emitted]         main
       [4] ./~/@angular/core/@angular/core.es5.js 489 kB {1} [built]
     [145] ./src/api/app.ts 222 bytes {1} [built]
     [146] ./src/app/server-app.module.ts 2.2 kB {1} [built]
     [147] ./src/routes.ts 80 bytes {1} [built]
     [148] ./~/@nguniversal/express-engine/index.js 196 bytes {1} [built]
     [149] ./~/express/index.js 224 bytes {1} [built]
     [150] ./~/reflect-metadata/Reflect.js 48 kB {1} [built]
     [151] ./~/rxjs/Rx.js 9.65 kB {1} [built]
     [152] ./~/zone.js/dist/zone-node.js 71.1 kB {1} [built]
     [158] ./src/main.server.ts 1.22 kB {1} [built]
     [245] ./~/rxjs/add/operator/bufferCount.js 235 bytes {1} [built]
     [336] ./~/rxjs/add/operator/windowTime.js 229 bytes {1} [built]
     [337] ./~/rxjs/add/operator/windowToggle.js 241 bytes {1} [built]
     [338] ./~/rxjs/add/operator/windowWhen.js 229 bytes {1} [built]
     [339] ./~/rxjs/add/operator/withLatestFrom.js 253 bytes {1} [built]
        + 475 hidden modules

    WARNING in ./~/express/lib/view.js
    80:29-41 Critical dependency: the request of a dependency is an expression

    ERROR in /ng-universal-demo/node_modules/rxjs/Subject.d.ts (16,22): Class 'Subject' incorrectly extends base class 'Observable'.
      Types of property 'lift' are incompatible.
        Type '(operator: Operator<T, R>) => Observable' is not assignable to type '(operator: Operator<T, R>) => Observable'.
          Type 'Observable' is not assignable to type 'Observable'.
            Type 'T' is not assignable to type 'R'.

    ERROR in /ng-universal-demo/node_modules/rxjs/observable/dom/WebSocketSubject.d.ts (24,22): Class 'WebSocketSubject' incorrectly extends base class 'AnonymousSubject'.
      Types of property 'lift' are incompatible.
        Type '(operator: Operator<T, R>) => WebSocketSubject' is not assignable to type '(operator: Operator<T, R>) => Observable'.
          Type 'WebSocketSubject' is not assignable to type 'Observable'.
            Types of property 'operator' are incompatible.
              Type 'Operator<any, R>' is not assignable to type 'Operator<any, T>'.
                Type 'R' is not assignable to type 'T'.
Let us ignore the error in red for now.
(container)# npm run server
[2] 60

> ng-universal-demo@1.0.0 server /ng-universal-demo
> nodemon dist/server.js

[nodemon] 1.11.0
[nodemon] to restart at any time, enter `rs`
[nodemon] watching: dist/*server.js src/index.html
[nodemon] starting `node dist/server.js`
Listening at http://localhost:8000
GET: /: 187.390ms
GET: /data: 3.213ms
or if you want to avoid the npm run watch error described as issue on git:angular/angular, you either can fix the typescript version in package.js:
"typescript": "2.3.4". Alternatively you can replace the previous two commands bynpm run start(thenpm run servercommand, which needs to be restarted often below, is quicker though):(container)# npm run start> ng-universal-demo@1.0.0 start /localdir/FrozenPandaz__ng-universal-demo > npm run build && npm run server > ng-universal-demo@1.0.0 prebuild /localdir/FrozenPandaz__ng-universal-demo > npm run clean > ng-universal-demo@1.0.0 clean /localdir/FrozenPandaz__ng-universal-demo > rimraf dist > ng-universal-demo@1.0.0 build /localdir/FrozenPandaz__ng-universal-demo > webpack Hash: a746c6e416ab32c2fe97cac872fdf2e493c7e402 Version: webpack 2.6.1 Child Hash: a746c6e416ab32c2fe97 Time: 18765ms Asset Size Chunks Chunk Names 0.client.js 2.07 kB 0 [emitted] client.js 2.5 MB 1 [emitted] [big] main 0.client.js.map 1.07 kB 0 [emitted] client.js.map 3.03 MB 1 [emitted] main index.html 222 bytes [emitted] [0] ./~/rxjs/Observable.js 11.4 kB {1} [built] [3] ./~/rxjs/util/root.js 885 bytes {1} [built] [7] ./~/@angular/platform-browser/@angular/platform-browser.es5.js 141 kB {1} [built] [9] (webpack)/buildin/global.js 509 bytes {1} [built] [19] ./~/rxjs/add/operator/map.js 187 bytes {1} [built] [39] ./~/@angular/platform-browser-dynamic/@angular/platform-browser-dynamic.es5.js 5.88 kB {1} [built] [40] ./src/app/browser-app.module.ts 1.35 kB {1} [built] [41] ./~/reflect-metadata/Reflect.js 48 kB {1} [built] [42] ./~/zone.js/dist/zone.js 96 kB {1} [built] [44] ./~/@angular/compiler/@angular/compiler.es5.js 1.02 MB {1} [built] [45] ./src/app/app.module.ts 1.55 kB {1} [built] [47] ./src/main.browser.ts 350 bytes {1} [built] [49] ./src/modules/transfer-state/browser-transfer-state.module.ts 1.31 kB {1} [built] [50] ./~/process/browser.js 5.42 kB {1} [built] [78] ./~/rxjs/util/toSubscriber.js 760 bytes {1} [built] + 66 hidden modules Child html-webpack-plugin for "index.html": [0] ./~/html-webpack-plugin/lib/loader.js!./src/index.html 193 bytes {0} [built] Child Hash: cac872fdf2e493c7e402 Time: 24164ms Asset Size Chunks Chunk Names 0.server.js 2.07 kB 0 [emitted] server.js 4.23 MB 1 [emitted] [big] main 0.server.js.map 1.07 kB 0 [emitted] server.js.map 5.18 MB 1 [emitted] main [4] ./~/@angular/core/@angular/core.es5.js 489 kB {1} [built] [145] ./src/api/app.ts 222 bytes {1} [built] [146] ./src/app/server-app.module.ts 2.11 kB {1} [built] [147] ./src/routes.ts 80 bytes {1} [built] [148] ./~/@nguniversal/express-engine/index.js 196 bytes {1} [built] [149] ./~/express/index.js 224 bytes {1} [built] [150] ./~/reflect-metadata/Reflect.js 48 kB {1} [built] [151] ./~/rxjs/Rx.js 9.65 kB {1} [built] [152] ./~/zone.js/dist/zone-node.js 71.1 kB {1} [built] [158] ./src/main.server.ts 1.22 kB {1} [built] [245] ./~/rxjs/add/operator/bufferCount.js 235 bytes {1} [built] [336] ./~/rxjs/add/operator/windowTime.js 229 bytes {1} [built] [337] ./~/rxjs/add/operator/windowToggle.js 241 bytes {1} [built] [338] ./~/rxjs/add/operator/windowWhen.js 229 bytes {1} [built] [339] ./~/rxjs/add/operator/withLatestFrom.js 253 bytes {1} [built] + 475 hidden modules WARNING in ./~/express/lib/view.js 80:29-41 Critical dependency: the request of a dependency is an expression > ng-universal-demo@1.0.0 server /localdir/FrozenPandaz__ng-universal-demo > nodemon dist/server.js [nodemon] 1.11.0 [nodemon] to restart at any time, enter `rs` [nodemon] watching: dist/*server.js src/index.html [nodemon] starting `node dist/server.js` Listening at http://localhost:8000
Now we connect to port 8000 of the Docker host, I have mapped the internal port 8000 to:
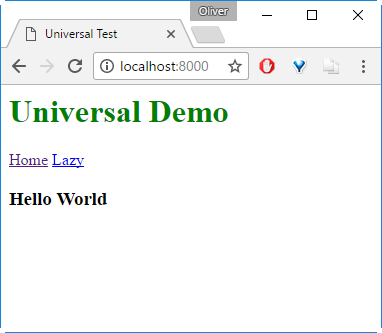
When looking at the source code, we can see the server-side rendered HTML Code:
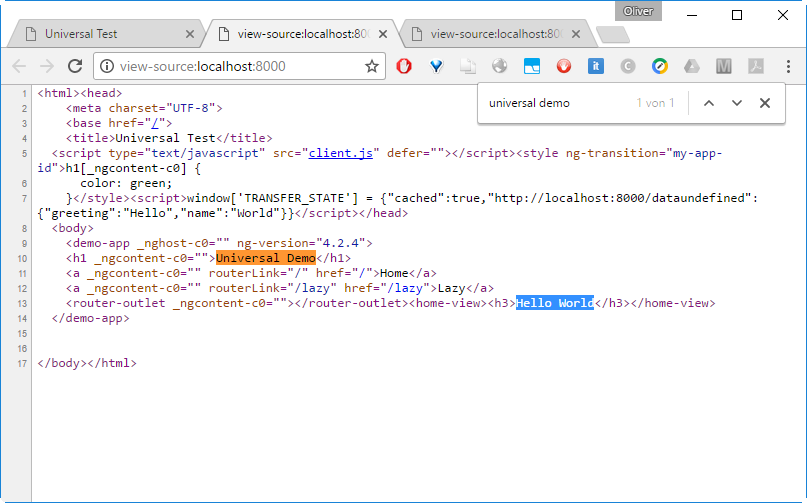
The text „Universal Demo“ and „Hello World“ are visible in the source.
This is exactly, what we wanted to see: a web page with the full HTML content, not just the „Loading…“ directive that you usually see in Angular Index files.
Phase 2: Create a functional new Link in the main Page
Step 2.1 Create a new Link on the Home Page
With following little change in blue, we will add a new link to the Hello World page:
src/app/app.component.ts
import { Component, OnInit } from '@angular/core'
import { TransferState } from '../modules/transfer-state/transfer-state';

@Component({
  selector: 'demo-app',
  template: `
    <h1>Universal Demo</h1>
    <a routerLink="/">Home</a>
    <a routerLink="/lazy">Lazy</a>
    <a routerLink="/blog">Blog</a>
    <router-outlet></router-outlet>
  `,
  styles: [
    `h1 {
      color: green;
    }`
  ]
})
export class AppComponent implements OnInit {
  constructor(private cache: TransferState) {}
  ngOnInit() {
    this.cache.set('cached', true);
  }
}
From the steps above, npm run watch is still running in the background.
It seems that npm run server needs to be stopped are restarted manually. Since we have started it in the foreground above, a <Ctrl>-C and re-issuing the command is sufficient:
(container)# <Ctrl>-C
(container)# npm run server
After that, the change should be seen immediately in the browser (try pressing F5 to refresh, if this is not the case):
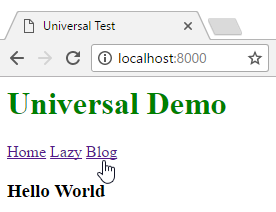
You will notice, though, that the Blog link is not yet functional. When you press F12, choose the „console“ tab in the Browser and reload the page, we will see, what is missing:
ERROR Error: Uncaught (in promise): Error: Cannot match any routes. URL Segment: 'blog'We still need to define the route.
Step 2.2: Create a Route from /blog to a Module
For creating a route, we need to add the /blog route to following file:
src/routes.ts
export const ROUTES: string[] = [
  '/',
  '/lazy',
  '/blog'
];
As we can see in the browser network debugging (F12), the error message does not change:
ERROR Error: Uncaught (in promise): Error: Cannot match any routes. URL Segment: 'blog'To turn this around, we need a second change: we need to add a link from ‚blog‘ to a module. For now, let us point the /blog link to the same module as the /lazy link:
src/app/app.module.ts
import { NgModule } from '@angular/core';
import { BrowserModule } from '@angular/platform-browser';
import { APP_BASE_HREF, CommonModule } from '@angular/common';
import { HttpModule } from '@angular/http';
import { RouterModule } from '@angular/router';
import { AppComponent } from './app.component';
import { HomeView } from './home/home-view.component';
import { TransferHttpModule } from '../modules/transfer-http/transfer-http.module';
@NgModule({
imports: [
CommonModule,
HttpModule,
TransferHttpModule,
RouterModule.forRoot([
{ path: '', component: HomeView, pathMatch: 'full'},
{ path: 'lazy', loadChildren: './+lazy/lazy.module#LazyModule'},
{ path: 'blog', loadChildren: './+lazy/lazy.module#LazyModule'}
])
],
declarations: [ AppComponent, HomeView ],
exports: [ AppComponent ]
})
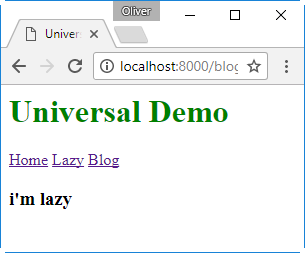
export class AppModule {}Now the /blog link is functional and is pointing to the lazy module, showing „i’m lazy“, when clicking on the Blog link.
Now let us create our own module that is pointing to „i’m a blog“
Step 2.3: Create your own Blog Module
Above, we have re-used an existing „LazyModule“. Now, let us create our own module by copying and changing LazyModule:
mkdir src/app/+blog
cp src/app/+lazy/lazy.module.ts src/app/+blog/blog.module.ts
We replace ‚lazy‘ by ‚blog‘ and ‚Lazy‘ by ‚Blog‘ in place:
sed -r -i "s/lazy/blog/g" src/app/+blog/blog.module.ts
sed -r -i "s/i'm blog/i'm a blog/g" src/app/+blog/blog.module.ts
sed -r -i "s/Lazy/Blog/g" src/app/+blog/blog.module.ts
After that, the content of blog.module.ts looks like follows:
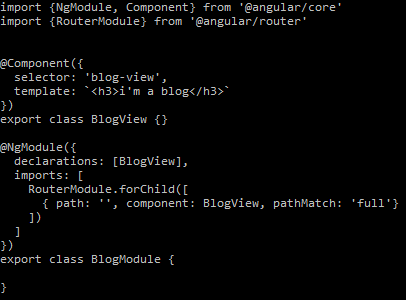
Now we need to change the route to point to the new BlogModule:
sed -r -i '/blog/s/lazy/blog/g; /blog/s/Lazy/Blog/' src/app/app.module.ts
after that, the file content looks like follows:
src/app/app.module.ts
import { NgModule } from '@angular/core';
import { BrowserModule } from '@angular/platform-browser';
import { APP_BASE_HREF, CommonModule } from '@angular/common';
import { HttpModule } from '@angular/http';
import { RouterModule } from '@angular/router';
import { AppComponent } from './app.component';
import { HomeView } from './home/home-view.component';
import { TransferHttpModule } from '../modules/transfer-http/transfer-http.module';


@NgModule({
  imports: [
    CommonModule,
    HttpModule,
    TransferHttpModule,
    RouterModule.forRoot([
      { path: '', component: HomeView, pathMatch: 'full'},
      { path: 'lazy', loadChildren: './+lazy/lazy.module#LazyModule'},
      { path: 'blog', loadChildren: './+blog/blog.module#BlogModule'}
    ])
  ],
  declarations: [ AppComponent, HomeView ],
  exports: [ AppComponent ]
})
export class AppModule {}
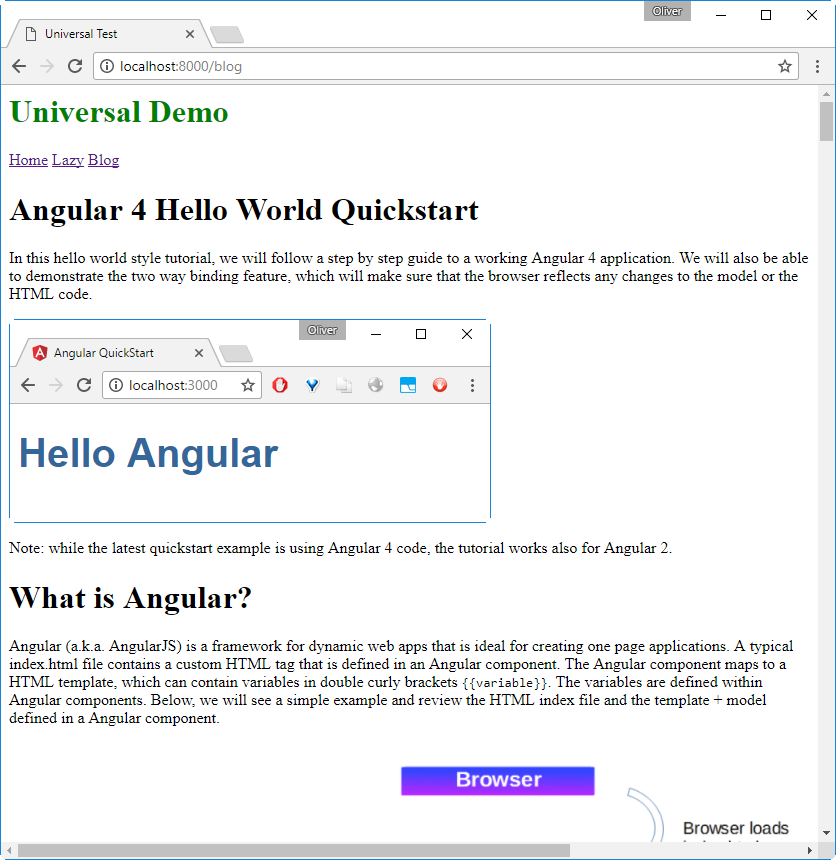
After restarting the server and reloading the Browser, the link to ‚Blog‘ leads to following output:
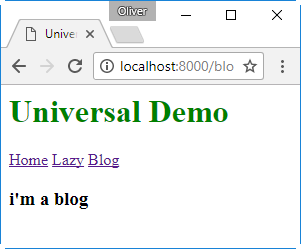
In the source view, we also can confirm that this is a server-rendered page:
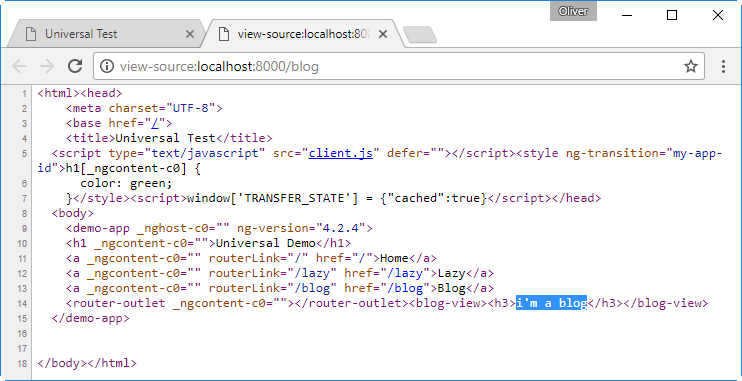
This is exactly, what we wanted to see: a web page with the full HTML content, not just the „Loading…“ directive that you usually see in Angular Index files. With that, we can see, that this a server rendered page.
Step 2.4 Add Includes to Browser, Server and Server AOT
To be honest, I am a newbie to Angular and I do not exactly know the function of following three includes. However, I have found them by searching recursively for occurrences of the term „lazy“. Those three includes seem to be needed, although the server side rendering seems to look fine without as well.
This one might be needed for client side rendering within webpack:
src/tsconfig.browser.json
{
  "extends": "../tsconfig.json",
  "angularCompilerOptions": {
    "entryModule": "./app/browser-app.module#BrowserAppModule"
  },
  "include": [
    "./main.browser.ts",
    "./app/+lazy/lazy.module.ts",
    "./app/+blog/blog.module.ts"
  ]
}
AOT stands for „Ahead of Time“ and often refers to the compile time. Since we are not compiling, but we are „transpiling“ in case of Angular, I guess, the next file will control the server-side pre-tranpiled pages:
src/tsconfig.server.aot.json
{
  "extends": "./tsconfig.server.json",
  "angularCompilerOptions": {
    "genDir": "ngfactory",
    "entryModule": "./app/server-app.module#ServerAppModule"
  },
  "include": [
    "main.server.aot.ts",
    "./app/+lazy/lazy.module.ts",
    "./app/+blog/blog.module.ts",
    "./app/server-app.module.ts"
  ]
}
The next one is a server configuration file for non AOT pages?
src/tsconfig.server.json
{
  "extends": "../tsconfig.json",
  "angularCompilerOptions": {
    "entryModule": "./app/server-app.module#ServerAppModule"
  },
  "include": [
    "main.server.ts",
    "./app/+lazy/lazy.module.ts",
    "./app/+blog/blog.module.ts"
  ]
}
Phase 3: Inserting a WordPress Blog POST via RESTful API
In this phase, we will insert a single WordPress Blog Post via a RESTful API of WordPress, as we had done in my previous blog post „Consuming a RESTful Web Service with Angular 4„. However, this time, the page will be served server-side rendered, which helps for a much better user experience (quicker load time). Especially, the performance is improved substantially, if the WordPress REST API is reachable via a low-bandwidth connection only.
Step 3.1: Change your Blog Module to perform HTTP Requests
In order to perform HTTP requests, we need to adapt the file src/app/+blog/blog.module.ts file, so it performs the same function as did the file src/app/app.component.ts in my previous blog post about Angular consuming HTTP:
- Like last time, we had to import Http, Response, Headers as well as map as well as Observable. We add Oninit as well, this time.
- I have replaced the inline template by a templateUrl file. This also helps me to display the content of my Blog Module correctly. However, this will lead to typescript errors as long as the template is not created. We will do this soon.
- Different from last time, we explicitly have defined private variables title and content. The reason we are not using data.title and data.content in the HTML template is, that the data is null as long as we are waiting for the HTML response and a title and content of null does not exist. When debugging the browser, errors are visible. With the private variable title and content, we do not create such errors.
- Like last time, we need to define a private variable (_http in our case)with type Http as argument of the constructor
- Different from last time, we have introduced an OnInit function, which is calling the getMyBlog() function, instead of calling this function in the constructor. However, both possibilities work fine.
- The getMyBlog() function looks similar to last time. The only difference is, that we set the title and content explicitly.
src/app/+blog/blog.module.ts
import {NgModule, Component, OnInit} from '@angular/core'
import {RouterModule} from '@angular/router'
import { Http, Response, Headers } from '@angular/http';
import 'rxjs/add/operator/map'
import { Observable } from 'rxjs/Observable';


@Component({
  selector: 'blog-view',
  templateUrl: './blog.module.html'
})

export class BlogView implements OnInit {
  data: any = null;
  title: any = null;
  content: any = null;
  public subs: Observable<string>;

  constructor(private _http: Http) {
  }

  ngOnInit(){
    this.getMyBlog();
  }

  private getMyBlog() {
    return this._http.get('https://public-api.wordpress.com/rest/v1.1/sites/vocon-it.com/posts/3078')
                .map((res: Response) => res.json())
                 .subscribe(data => {
                        this.data = data;
                        this.title = this.data.title;
                        this.content = this.data.content;
                        console.log(this.data);
                });
  }

}

@NgModule({
  declarations: [BlogView],
  imports: [
    RouterModule.forChild([
      { path: '', component: BlogView, pathMatch: 'full'}
    ])
  ]
})
export class BlogModule {

}
The function getMyBlog() is retrieving the data of a blog post from the WP.COM Rest API v1.1, similar to what we also have done on the previous blog post Consuming a RESTful Web Service with Angular 4. This time we are writing the title and content in the corresponding public variables, which can be used in the HTML template.
Step 3.2 Create Blog HTML Template
If your npm run watch command is still active, you will notice following error in the console, where the command is running:
    ERROR in ./src/app/+blog/blog.module.ts
    Module not found: Error: Can't resolve './blog.module.html' in '/ng-universal-demo/src/app/+blog'
     @ ./src/app/+blog/blog.module.ts 38:18-47
     @ ./src lazy
     @ ./~/@angular/core/@angular/core.es5.js
     @ ./src/app/browser-app.module.ts
     @ ./src/main.browser.ts
The error will disappear, if we create the following file:
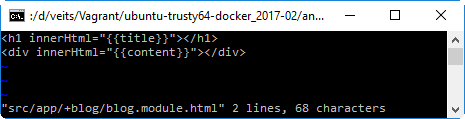
src/app/+blog/blog.module.html
The blog.module.ts file is pointing to a HTML templateUrl on ./blog.module.html with following content (as picture, since WordPress is confused about the HTML code, even if set in <pre>…</pre> tags):
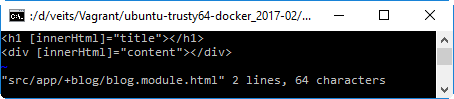
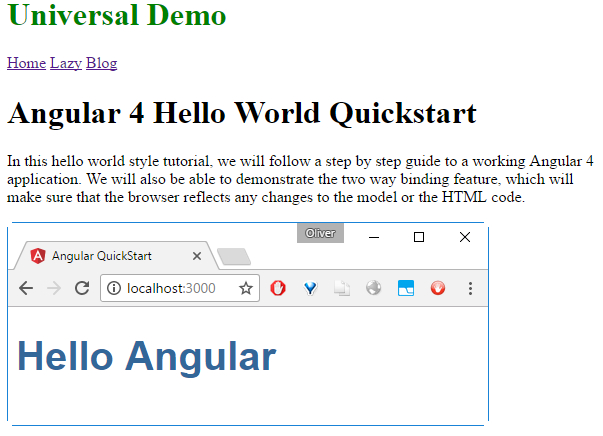
Now the error is disappeared. If we restart the npm run server and the Browser content (e.g. press F5), we will see following content:
And different from last time, we not only see „Loading…“ in the source of the page, but we will see the full HTML content:

To be honest, we see the content more often than we need: we see it as „innerHtml“, but we also see it explicitly as data within the tags. Large pages will have doubled size. Okay, seeing it twice is better than seeing it no time at all. Let us call it not perfect, but still …
Summary
In this blog post, we have performed following tasks:
- Phase 1: Run a Server Side Rendered Hello World Page
- Here we could show that the server provides the browser with the full HTML content
- Phase 2: Create a functional new Link in the main Page
- Those steps are about Link creation and routing to a module
- Phase 3: Inserting a WordPress Blog POST via RESTful API
- In those steps we have shown how to create a component that retrieves content from a REST API and how to display the information in a browser
We could see, that the user is presented with the page content much more quickly than was the case in a client rendered solution of my previous blog. Especially, if there is a low bandwidth connection between Angular server and REST service, the user perception is improved a lot by server side rendering: the content is displayed almost immediately as opposed of the several second loading time we had experienced in case of client side rendering.
Appendix: Why using innerHtml?
Let us first demonstrate, what happens, if we use following template: The HTML template is making use of the variables „title“ and „content“ we have defined in the blog.module.ts before. We need to make use of this innerHtml trick in order to display the HTML-based content correctly. If we would use „{{content}}“ instead, we will see escaped HTML.

This is not, what we want. If we change the template by following content:
or better (see this StackOverflow Q&A that states „Sanitized content can’t be bound using prop="{{sanitizedContent}}" because {{}} stringyfies the value before it is assigned which breaks sanitization.“; we do not yet sanitize here, but we might do so in the future):
With this, we will get, what we want:
Appendix: Webpack Problem
Error
Webpack has been initialised using a configuration object that does not match the API schema.
How to reproduce
docker run -it -p 8081:8000 -v $(pwd):/localdir oveits/angular_hello_world:centos bash
cd /localdir
git clone https://github.com/robwormald/ng-universal-demo
cd ng-universal-demo
npm i
$ npm start
> ng-universal-demo@1.0.0 start /localdir/ng-universal-demo
> npm run build && npm run server


> ng-universal-demo@1.0.0 build /localdir/ng-universal-demo
> webpack -p

Invalid configuration object. Webpack has been initialised using a configuration object that does not match the API schema.
 - configuration.output.path: The provided value "dist" is not an absolute path!
Workaround
Clone the fork https://github.com/FrozenPandaz/ng-universal-demo instead.
Further Reading
- Another Tutorial about Server Side Rendering With Angular (not tested from my side, but might be interesting for you)
- A Stackoverflow Answer pointing to another NG Seed with Universal (not tested from my side, but might be interesting for you)
- Git Repo used in this blog post (Angular 4): https://github.com/FrozenPandaz/ng-universal-demo
- Another Git Repo, which looks promising, but is Angular 2 code instead: https://github.com/angular/universal-starter