In this blog post, we will introduce the Jenkins Pipelines, an increasingly popular plugin that helps defining versatile Jenkins workflows as Groovy code.
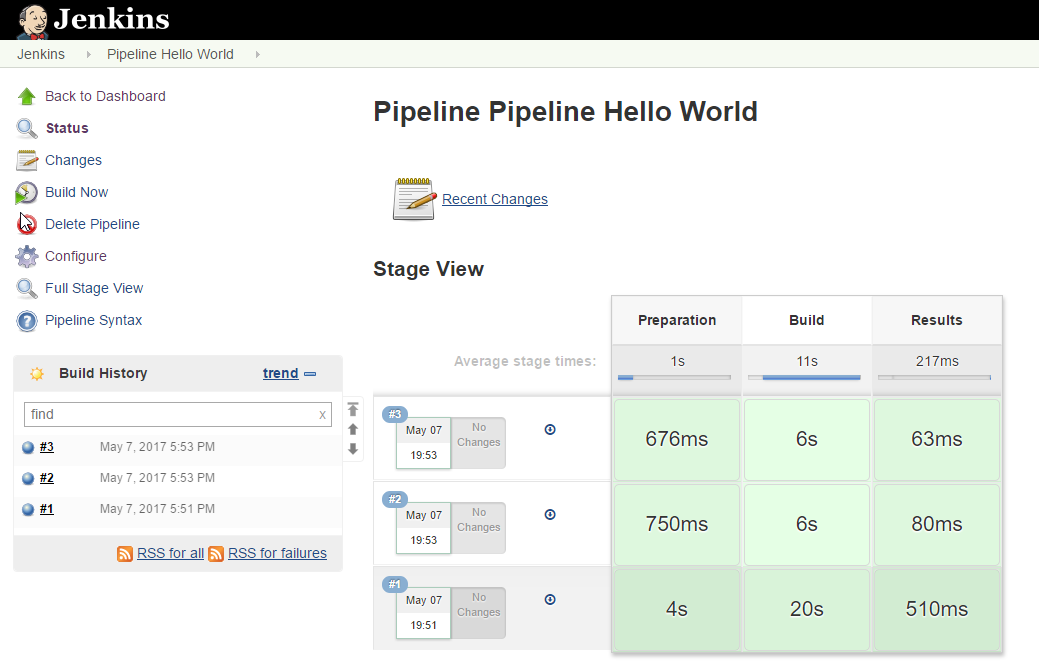
Traditionally, Jenkins is administered by a graphical Web interface. Now, the Pipeline plugin allows teams and DevOps to manage workflow definitions within source control, giving them the ability to clone, change, review and iterate upon the continuous delivery pipeline. Moreover, the plugin offers teams a nice interface to view the stages of each workflow, like follows:
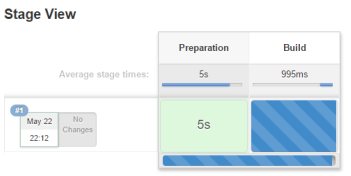
More advantages of Jenkins Pipelines are discussed in the section „Why is the Jenkins Pipeline plugin so popular?“ below.
Tl;dr
If you wish, you can plunge directly on the command line and Jenkins Web interface in this Interactive Hands-on Example powered by Katacoda: Jenkins Pipelines (free sign-up):

Have fun!
Why is the Jenkins Pipeline Plugin so popular?
The popularity of the Pipeline plugin can be seen in its usage chart:
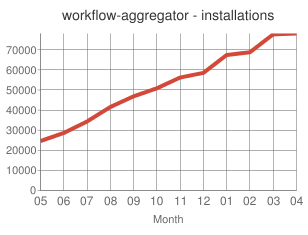
Why am I using the Pipeline plugin? For me, the number one reason is that I can put the workflow under source control. Another reason is: the workflows can be organized in stages, whose results can be observed in the nice graphical interface seen above. However, the Pipeline plugin has more advantages than that (as pointed out here):
- Code: Pipeline users can put workflows under source control (e.g. git), so they can add edit, review and
- Durable: a Task that is interrupted by a planned or unplanned restart of the server is handled gracefully by the Durable Task Plugin included in the Pipeline Plugin
- Interactive/Pausable: manual steps can be added to pipeline workflows
- Versatile: you can create complex workflows including workflow forks and joins
- Extensible: Pipeline users can create and add custom extension to the Pipeline domain specific language (DSL)
Enough theory for now. Time to get some hands-on experience.
Tools and Versions used
- Jenkins 2.46.2 on the official Jenkins Alpine Docker Image
- Jenkins Plugins
- Pipeline 2.5
- Git 1.27.0
- either
- Vagrant 1.8.6
- Virtualbox 5.0.20 r106931
- or
- Katacoda
Step Zero: Access or Install a Docker Host
If you have no Docker host available, you may consider to either
- start the Katacoda scenario of the Tl;dr section above (quick and without any technical challenges)
- or install a Docker host by using Vagrant and Virtualbox as described in Step1 of the blog post „Installation of Jenkins the Docker way„. While more work to to, the advantage of this option is that you can keep the Jenkins Home directory persistently on your local PC.
The commands we will use in this blog post are chosen in a way that will work in both environments.
Note: the Katacoda environment does not support the mapping of volumes to the Docker host via -v option. If you wish to keep the Jenkins Home directory for later use, you may consider to opt for option 2 and replace Step 1 and 2 by the steps found in the blog post Installation of Jenkins the Docker way. However, using Katacoda and the steps below is the quickest way to reach our goal to test the Jenkins Pipeline plugin.
Step 1: Start the Jenkins Container
First we start the container in detached mode with a tail to a log file we will use later. This allows us to prepare the Jenkins environment before we start the application:
(dockerhost)$ docker run -d -u root --rm --name jenkins \
    -p 8080:8080 -p 50000:50000 \
    --entrypoint bash \
    jenkins:2.46.2-alpine \
    -c "tail -F /jenkins.log
Step 2: Clone a prepared Jenkins Home Directory and run Jenkins
With the next command, we clone a Jenkins Home directory into the container, before we start the Jenkins application. The cloned Jenkins Home directory has been prepared to allow us using the Jenkins Web Interface without the need to log in:
(dockerhost)$ docker exec -d jenkins \
    bash -c 'git clone https://github.com/oveits/jenkins_home_alpine \
        && export JENKINS_HOME=$(pwd)/jenkins_home_alpine \
        && java -jar /usr/share/jenkins/jenkins.war 2>&1 1>/jenkins.log &
Now you should check, whether jenkins.war was started by issuing the command
(dockerhost)$ docker exec jenkins ps -ef
Katacoda has a good connection
Step 3: Install Pipeline and Git Plugins
In this step, we install the Pipeline and Git plugins like follows:
Manage Jenkins -> Manage Plugins -> Available -> Search Pipeline -> check Pipeline -> Search GitHub Plugin -> check -> Install without Reload
When ready, -> Go back to the top page
Or more elaborated:
- Within the Dashboard, select Manage Jenkins on the left.
- On the Configuration page, select Manage Plugins.
- Manage Plugins page will give you a tabbed interface. Click Available and wait three seconds to view all the Jenkins plugins that can be installed.
- Using the search box, search for Github plugin and choose the plugin via checkbox.
- While on this page, search for Pipeline and choose the plugin via checkbox.
- Click Install without Restart at the bottom.
- The plugins will now be downloaded and installed. Once complete, click the link Go back to the top page.
Now is the time to configure Maven and Git.
Step 4: Prepare Maven Usage
Maven must be prepared for first usage like follows:
Manage Jenkins -> Global Tool Configuration -> Maven -> Maven Installations -> Add Maven -> Name M3 -> Install automatically -> Apply
…or more elaborated:
- Once again, select Manage Jenkins.
- Select Global Tool Configuration.
- At the bottom, there is a button called Maven installations…. Click it.
- Choose the name M3.
- Click the Install automatically checkbox and keep the option Install from Apache with version 3.5.0.
- Click Apply at the bottom of the page.
Now Maven is ready for usage.
Step 5: Prepare Git Usage
Also Git needs to be prepared for first usage.
In short:
Manage Jenkins -> Global Tool Configuration -> Git -> Git installations -> keep Name „Default“ -> Install automatically -> Add Installer -> Run Shell Command -> no label -> Command: ‚which git || (apk update && apk upgrade && apk add –no-cache git)‘ -> Tool Home: /usr/bin/git -> Save
…or more elaborated:
- On the Manage Jenkins -> Global Tool Configuration page, find the section Git -> Git installations -> Git.
- Keep the name Default and check the Install automatically checkbox.
- From the Add Installer dropdown menue, choose Run Shell Command.
- Copy the command which git || (apk update && apk upgrade && apk add –no-cache git) into the Command box. This command is valid for the chosen alpine image only and must be adapted for other Linux distributions.
- In the Tool Home box, enter /usr/bin/git.
- Click Save at the bottom of the page.
Now Git is ready for usage.
Step 6: Replacement of Steps 1-5: Start a Pre-installed Jenkins Image
You can replace steps 1 to 5 by the current step. If you already have performed steps 1 to 5, directly to to step 7. Otherwise, follow the instructions how to start a pre-installed, pre-configured Jenkins image.
Step 6.1: Stop and remove any containers named „jenkins“, if required:
For the case you already have started a Docker container named „jenkins“, you need to stop and remove the container first:
docker stop jenkins; docker rm jenkins
Step 6.2: Download and start a pre-configured Jenkins container.
docker run -d --rm --name jenkins \
 -p 8081:8080 -p 50000:50000 \
 oveits/jenkins:2.46.2-alpine-nologin-with-maven-git-pipelines
If you get an error that a port is occupied already, change the port on the left-hand side of the ‚:‘ separator.
You can load the Jenkins‘ dashboard via the URL http://localhost:8081 (or different port, if chosen so).
Step 7: Create Pipeline Workflow
Let us now create our first Pipeline workflow job.
-> ![]()
-> 
-> 
-> ![]()
We scroll down to the Pipeline Script section and choose „try sample pipeline“ -> GitHub + Maven
-> 
-> ![]()
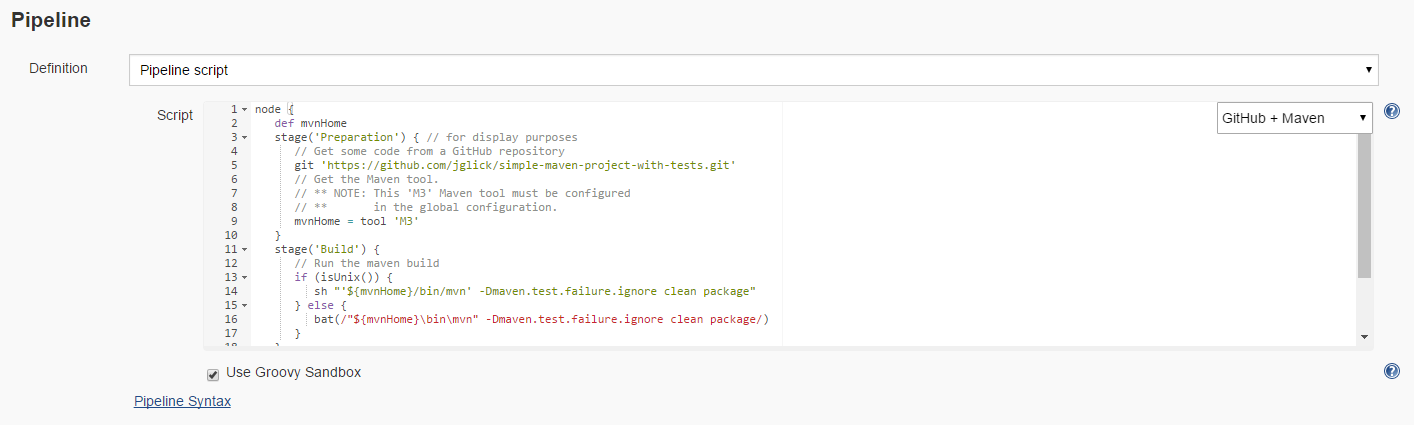
At this point we can review the script:
node {
   def mvnHome
   stage('Preparation') { // for display purposes
      // Get some code from a GitHub repository
      git 'https://github.com/jglick/simple-maven-project-with-tests.git'
      // Get the Maven tool.
      // ** NOTE: This 'M3' Maven tool must be configured
      // **       in the global configuration.
      mvnHome = tool 'M3'
   }
   stage('Build') {
      // Run the maven build
      if (isUnix()) {
         sh "'${mvnHome}/bin/mvn' -Dmaven.test.failure.ignore clean package"
      } else {
         bat(/"${mvnHome}\bin\mvn" -Dmaven.test.failure.ignore clean package/)
      }
   }
   stage('Results') {
      junit '**/target/surefire-reports/TEST-*.xml'
      archive 'target/*.jar'
   }
}
We can see that the script defines three stages ‚Preparation‘, ‚Build‘ and ‚Results‘:
- In the Preparation stage, a git repository is cloned.
- In the ‚Build‘ stage, Maven performs unit tests and will create a Java archive artifact (JAR).
- In the last stage, the JUnit test results are collected and reported.
Step 8: Run Pipeline Workflow
Now is the time to run our first pipeline workflow. For that, we click on:
-> ![]()
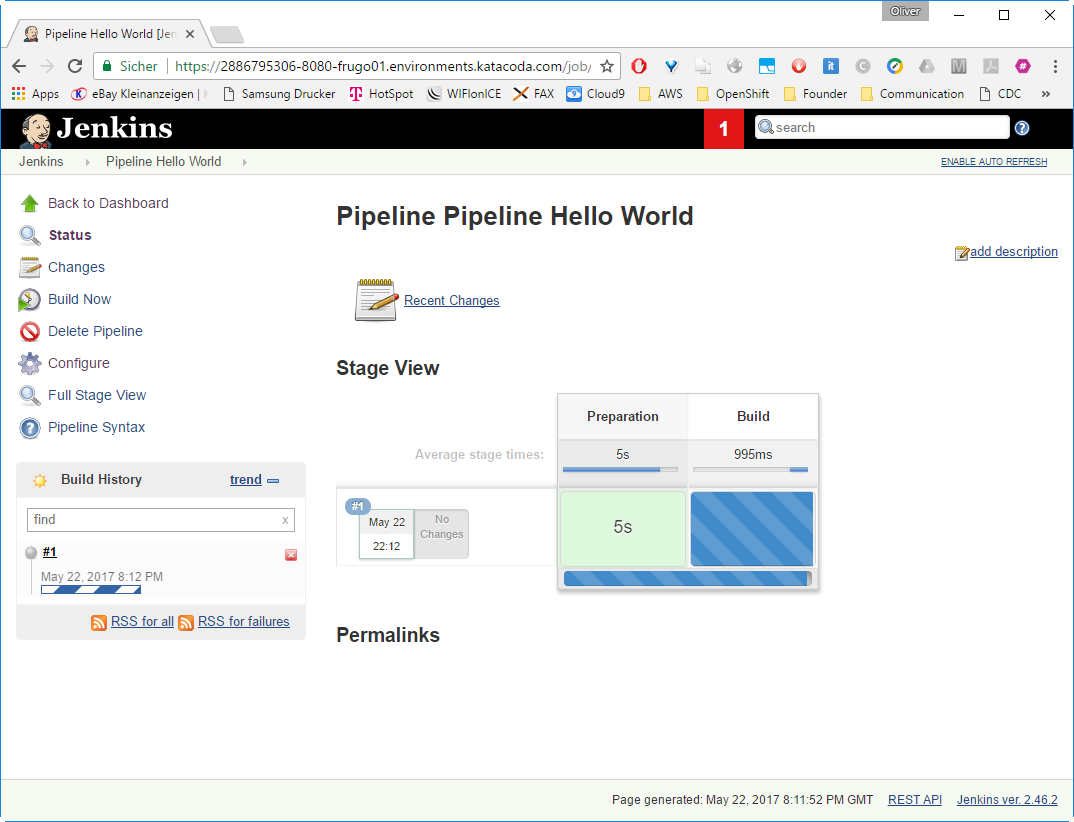
You can click on the Pipeline field, and you are offered to view the logs:
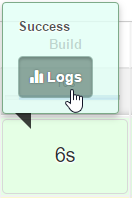
You will see, that there are some downloads running in the background, when running the build the first time:
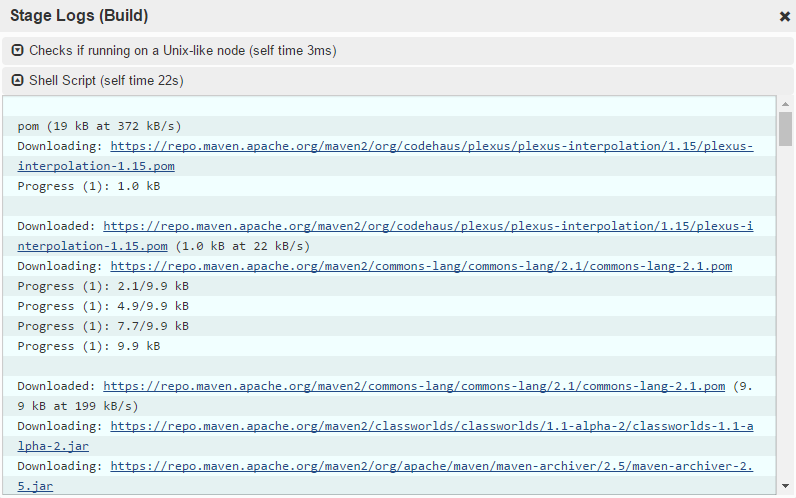
-> #1 -> Console
-> Press F5: A Test Result Trend will be shown:
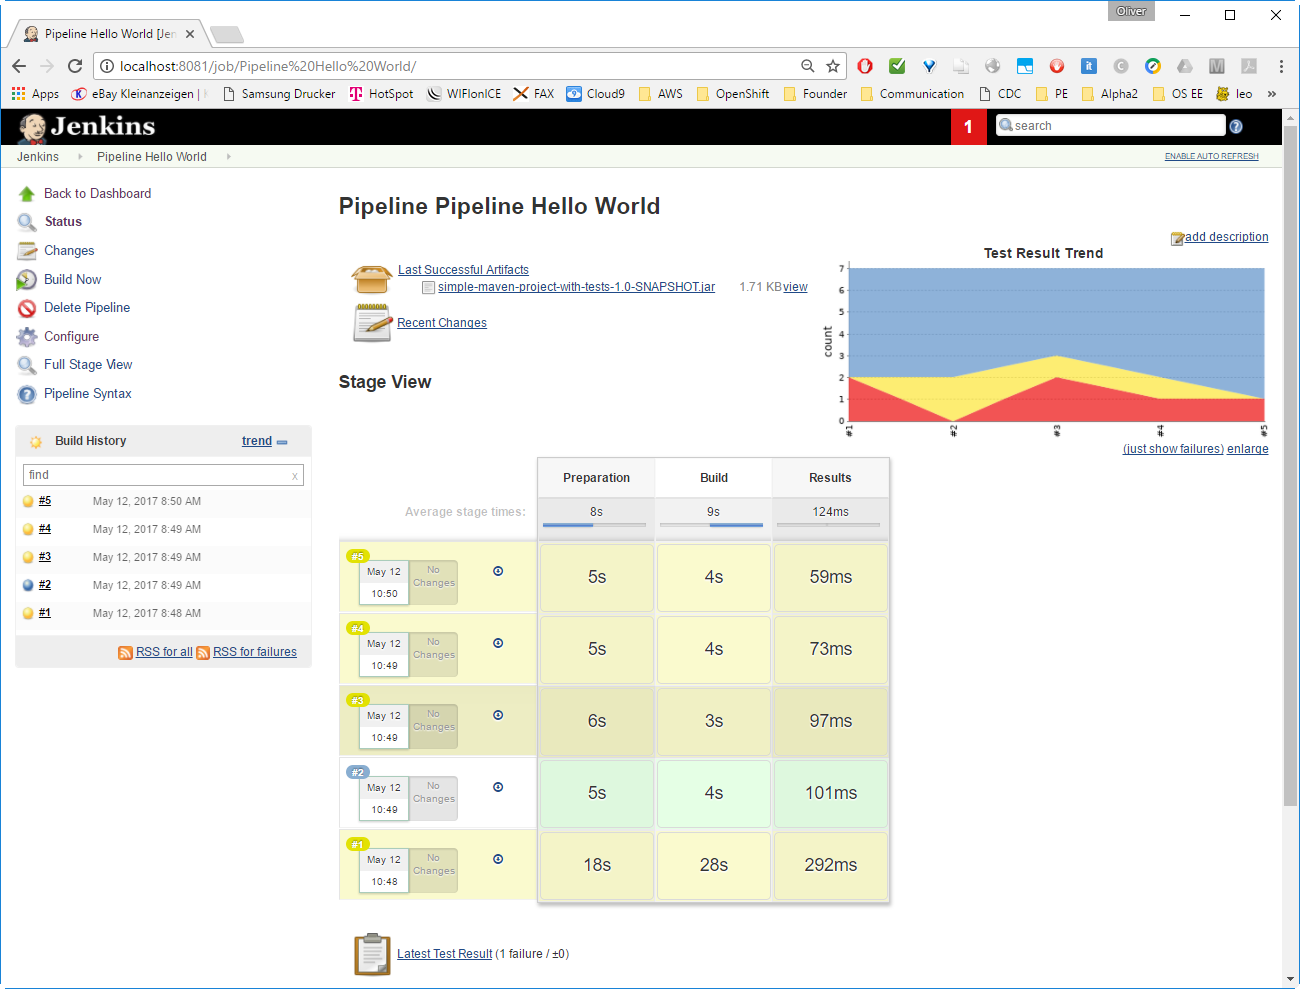
SUCCESS!
Summary
In this blog post, we have learned how to use Groovy code in order to define Jenkins workflows with so-called Jenkins Pipelines. Pipelines allow to define workflow stages. Within a simple Hello World example, we have downloaded, compiled and tested Java code. The JUnit stage has helped us to collect historic test reports.
Next Steps
- How to trigger Pipelines
- Other Groovy Pipeline Snippets can be found here https://github.com/jenkinsci/pipeline-examples/tree/master/pipeline-examples.
Appendix: Create the Docker Image used in Step 6 to skip Steps 1 to 5
Here we describe how the Docker image was created that allows us to skip steps 1-5:
docker run -d -u root --name jenkins \
 -p 8080:8080 -p 50000:50000 \
 --entrypoint bash \
 jenkins:2.46.2-alpine \
 -c "tail -F /jenkins.log"
docker exec -d jenkins \
 bash -c 'git clone https://github.com/oveits/jenkins_home_alpine \
 && export JENKINS_HOME=$(pwd)/jenkins_home_alpine \
 && java -jar /usr/share/jenkins/jenkins.war 2>&1 1>/jenkins.log &'
Perform the manual steps 1 to 5.
docker stop jenkins
docker commit jenkins newjenkinsimage
Create a new container with the correct entrypoint and CMD:
docker run -d --entrypoint "bash" -p 8080:8080 -p 50000:50000 --name jenkins2 newjenkinsimage -c "JENKINS_HOME=/jenkins_home_alpine java -jar /usr/share/jenkins/jenkins.war"
For commiting the changes, we stop the container, login to Docker Hub and commit + push the changed image:
docker stop jenkins2
docker login
Add your user credentials of Docker Hub here…
Then:
docker commit jenkins2 oveits/jenkins:2.46.2-alpine-nologin-with-maven-git-pipelines
docker push oveits/jenkins:2.46.2-alpine-nologin-with-maven-git-pipelines
Here you need to exchange oveits by your own Docker Hub user name.
Now the image can be used by commands like e.g.
docker run <options> <image> <CMD>