Today, we will learn how to use the Jenkins Job DSL Plugin to create new Jenkins jobs at a push of a button. We will show how we can use Groovy scripts for defining a „Hello World“ Jenkins freestyle project and create such a project by pushing the „Build now“ button.
Why creating Jenkins Jobs via Groovy Scripts?
You might say: „Jenkins has such a nice Web interface. Why should I bother about creation of Jenkins Jobs via Groovy Scripts?“
Right: the web interface of Jenkins is simple to use and will lead to quick results for single projects. However, consider a situation with more than 100 projects with more than 400 Jenkins pipelines (e.g. build + test + deploy + release pipelines each). Automating the Jenkins job lifecycle can be a great time-saver here. Automating the Jenkins job lifecycle is best done with the Seed plugin:

The Seed plugin relies on the capabilities of the Job DSL plugin discussed in the current blog post. In one of the next blog posts, we will have a closer look to the Seed plugin.
Tools and Versions used
- Vagrant 1.8.6
- Virtualbox 5.0.20
- Docker 1.12.1
- Jenkins 2.32.2
- Job DSL Plugin 1.58
Prerequisites:
- Free DRAM for the a Docker Host VM >~ 4 GB.
- Docker Host is available.
- Tested with 2 vCPU (1 vCPU might work as well).
Step 1: Connect to Jenkins
Step 1.1: Start Jenkins in interactive Terminal Mode
Make sure that port 8080 is unused on the Docker host. If you were following all steps in part 1 of the series, you might need to stop cadvisor:
(dockerhost)$ sudo docker stop cadvisor
I assume that jenkins_home is already created, all popular plugins are installed and an Admin user has been created as shown in part 1 of the blog series. We start the Jenkins container with the jenkins_home Docker host volume mapped to /var/jenkins_home:
(dockerhost)$ cd <path_to_jenkins_home> # in my case: cd /vagrant/jenkins_home/
(dockerhost:jenkins_home)$ sudo docker run -it --rm --name jenkins -p8080:8080 -p50000:50000 -v`pwd`:/var/jenkins_home jenkins
Running from: /usr/share/jenkins/jenkins.war
...
Jenkins initial setup is required. An admin user has been created and a password generated.
Please use the following password to proceed to installation:

50c150e35a774cexxxxxxxxxxxxxxx

This may also be found at: /var/jenkins_home/secrets/initialAdminPassword
...
--> setting agent port for jnlp
--> setting agent port for jnlp... done
Step 1.2: Open Jenkins in a Browser
Now we want to connect to the Jenkins portal. For that, open a browser and open the URL
<your_jenkins_host>:8080
In our case, Jenkins is running in a container and we have mapped the container-port 8080 to the local port 8080 of the Docker host. On the Docker host, we can open the URL.
localhost:8080
Note: In case of Vagrant with VirtualBox, per default, there is only a NAT-based interface and you need to create port-forwarding for any port you want to reach from outside (also the local machine you are working on is to be considered as outside). In this case, we need to add an entry in the port forwarding list of VirtualBox:
Note that this configuration is not permanent, unless you define the port mappings in the Vagrantfile as follows (see official Vagrant documentation):
config.vm.network "forwarded_port", guest: 8080, host: 8080

Step 1.3: Initialize Jenkins: Unlock Jenkins
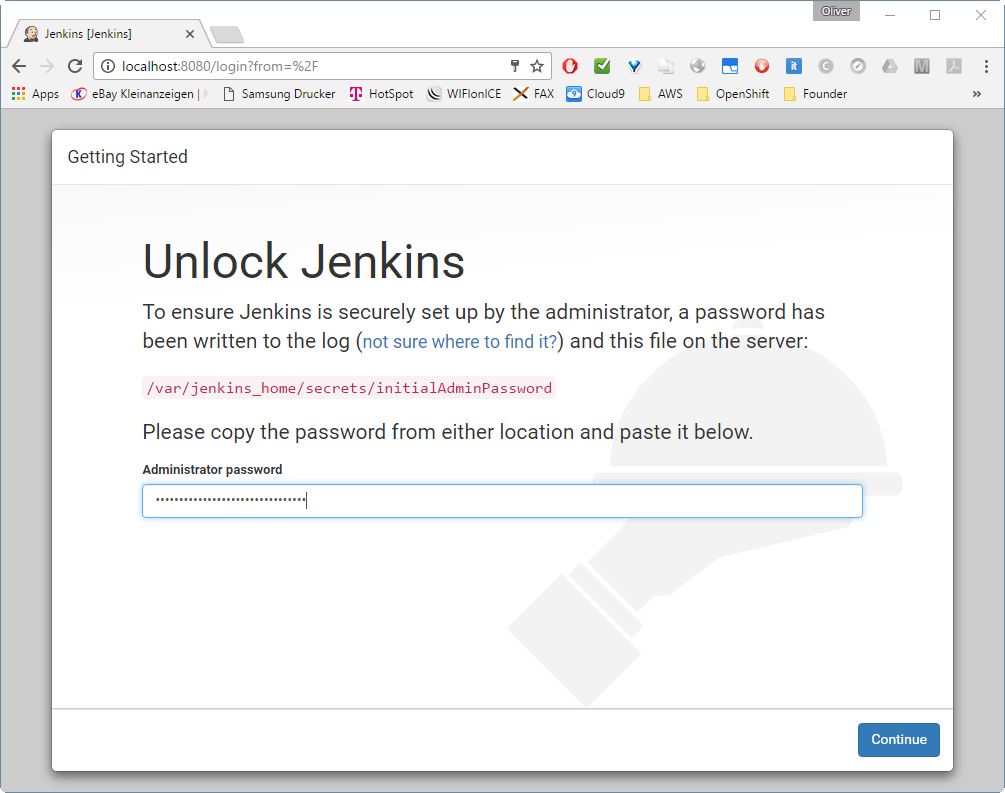
insert the one-time password found in the log during startup or on /var/jenkins_home/secrets/initialAdminPassword
-> Continue
Step 1.4: Initialize Jenkins: Install Plugins
-> 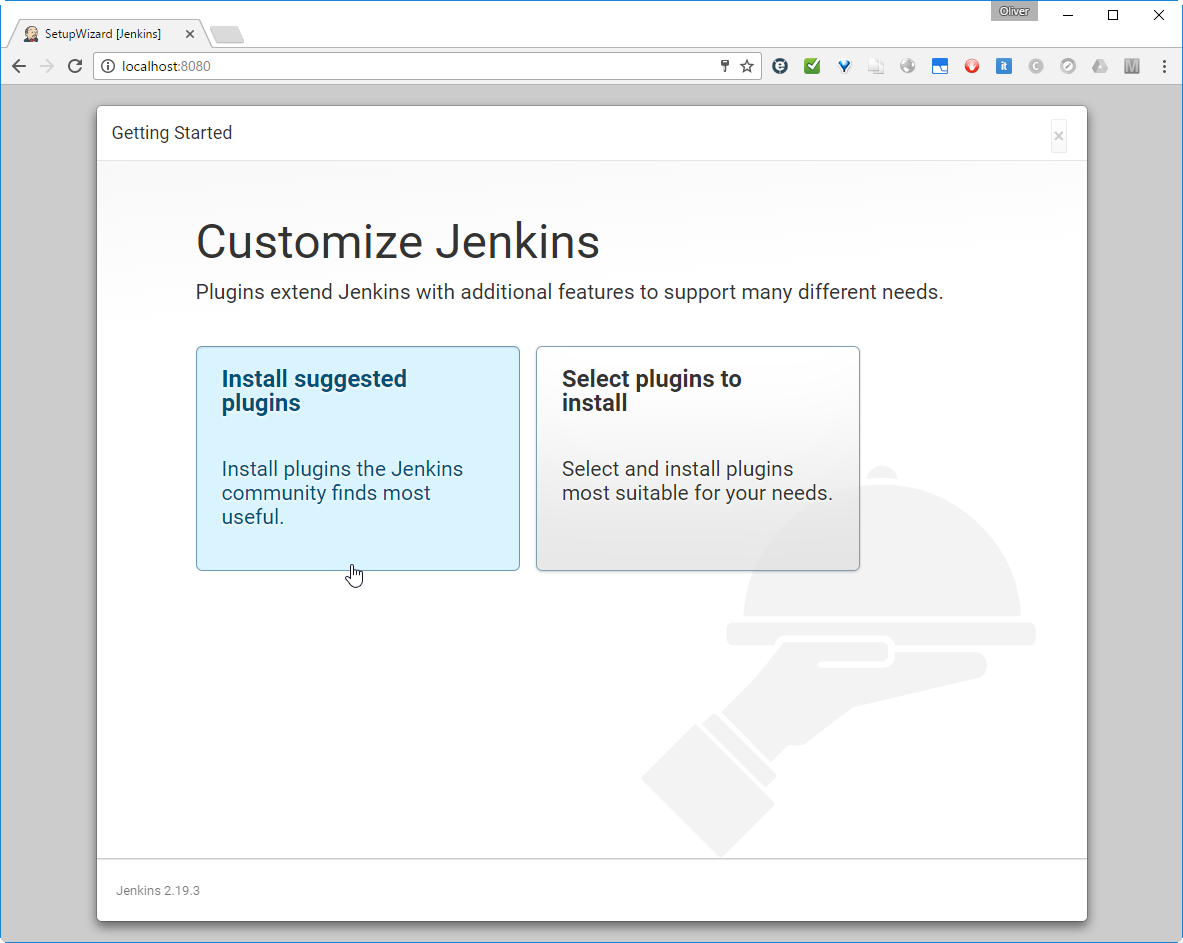
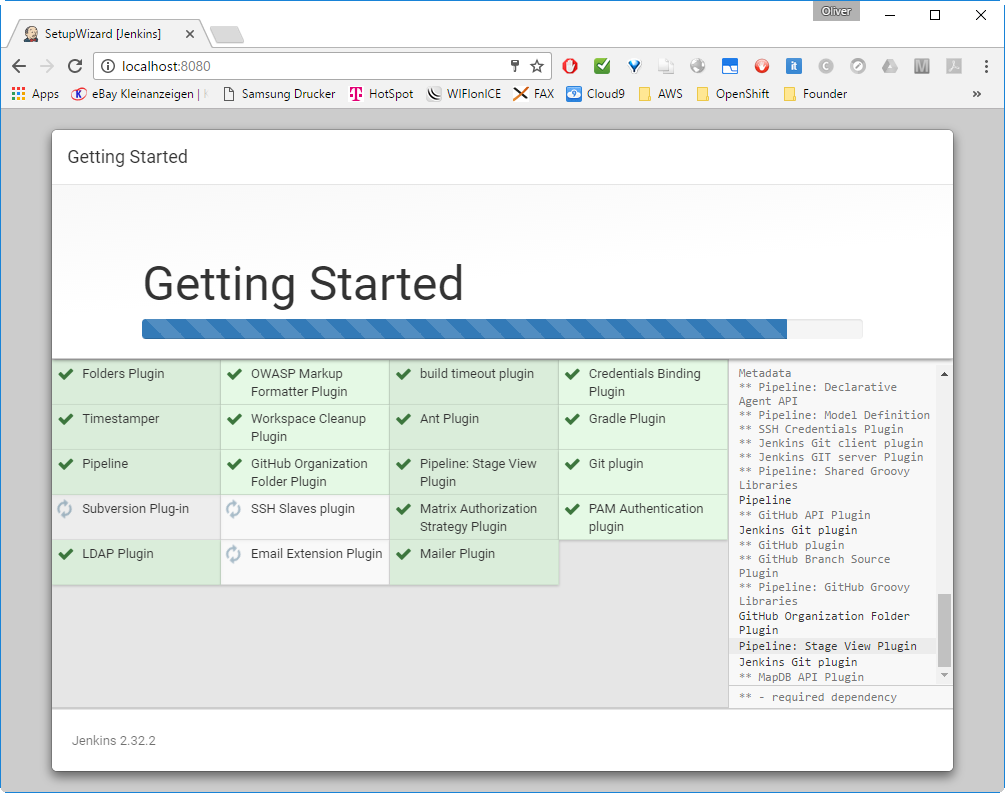
Wait for the installation process to complete.
Step 1.4: Initialize Jenkins: Create Admin User
-> 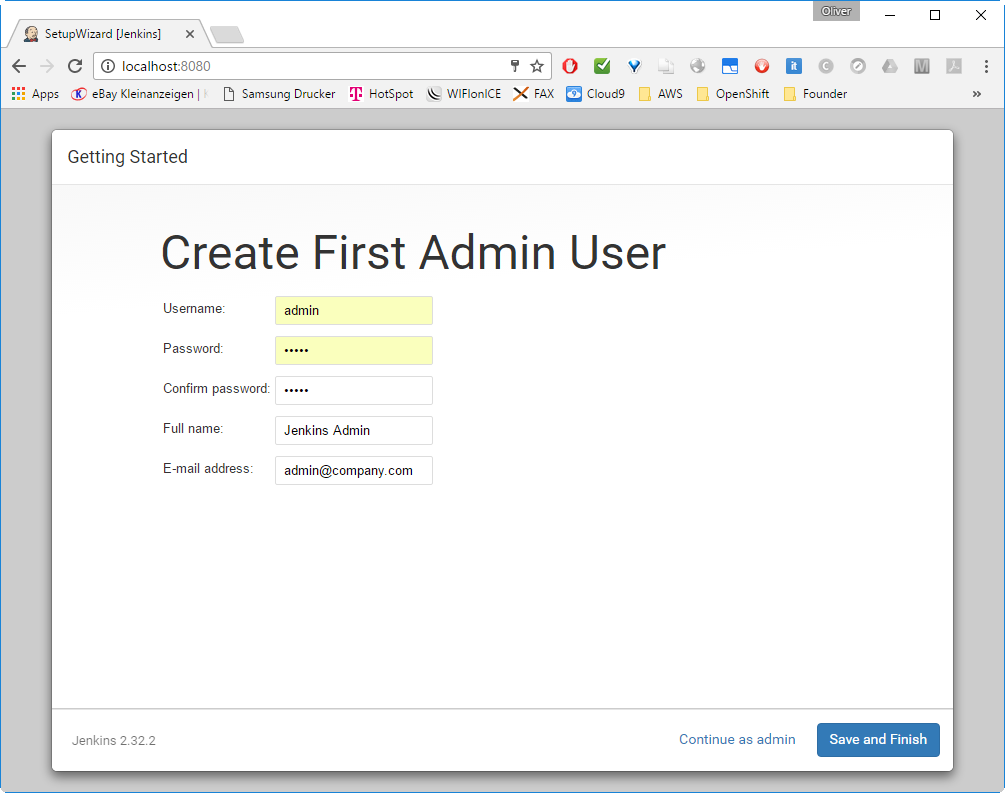
-> ![]() or „Continue as admin“
or „Continue as admin“
-> ![]()
Note: I recommend to log out and log in in order to test the login.
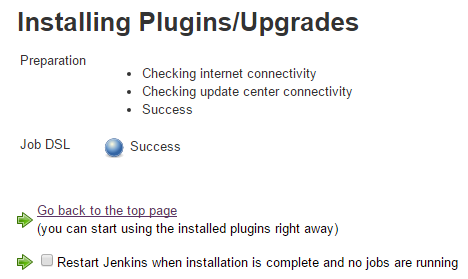
Step 2: Install the Job DSL Plugin
The Job DSL Plugin can be installed like any other Jenkins plugin:
-> ![]()
-> ![]()
-> ![]()
-> ![]() (with dash between job and dsl; wait for the filter to become active and do not press enter, otherwise you will get an error message)
(with dash between job and dsl; wait for the filter to become active and do not press enter, otherwise you will get an error message)
-> ![]()

Step 3: Create Job DSL Jenkins Project
We create a Job DSL Job like follows:
-> ![]()
-> ![]()
-> 
-> 
-> ![]()
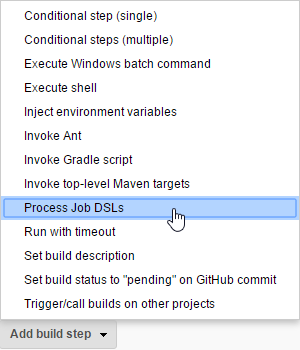
Step 4: Configure Job DSL Project
-> 
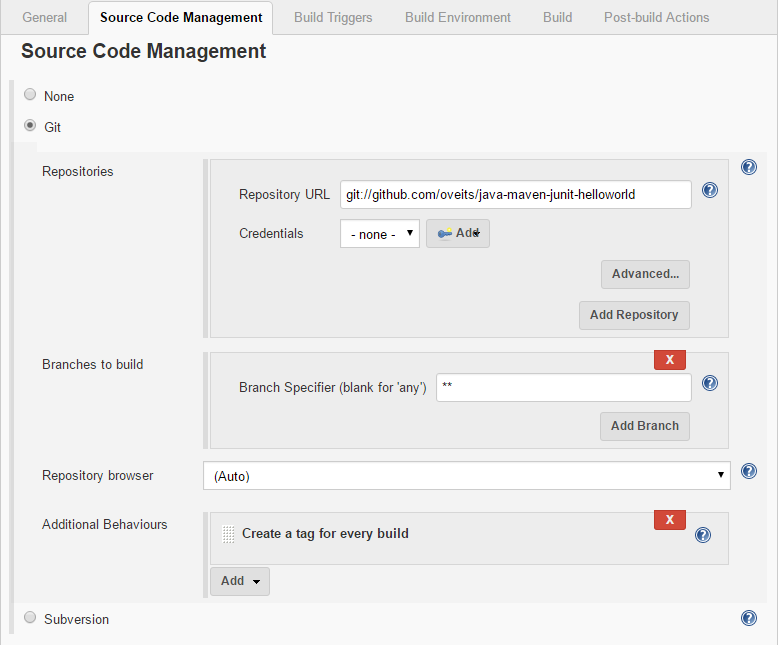
-> if you have got a Github account, fork this open source Java Hello World software (originally created by of LableOrg) that will allow you to see, what happens with your Jenkins job, if you check in changed code. Moreover the hello world software allows you to perform JUnit 4 tests, run PowerMockito Mock services, run JUnit 4 Integration tests and calculate the code coverage using the tool Cobertura.
-> ![]()
-> insert:
job('Job-DSL-Hello-World-Job') {
scm {
git('git://github.com/oveits/java-maven-junit-helloworld')
}
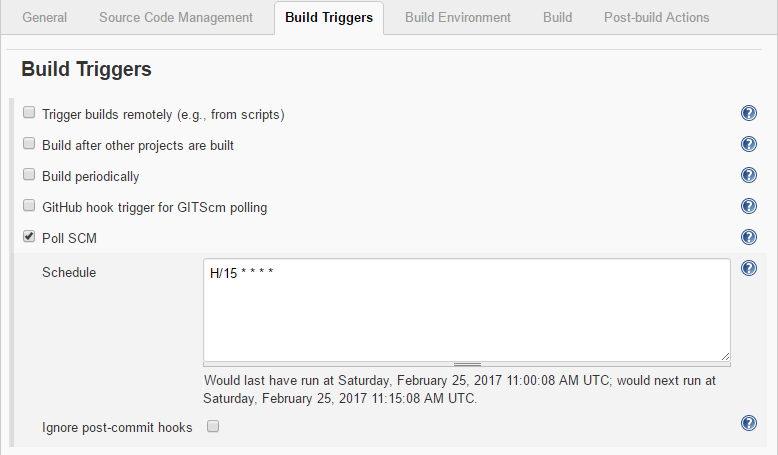
triggers {
scm('H/15 * * * *')
}
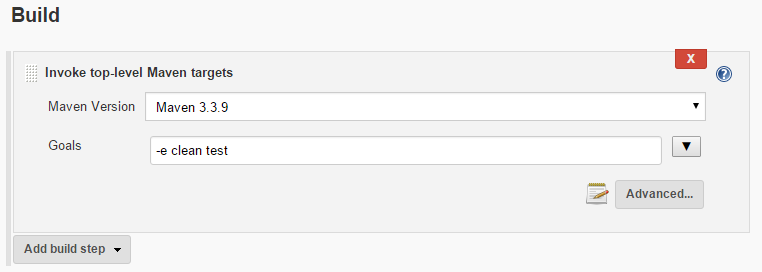
steps {
maven('-e clean test')
}
}
here, exchange the username oveits by your own Github username.
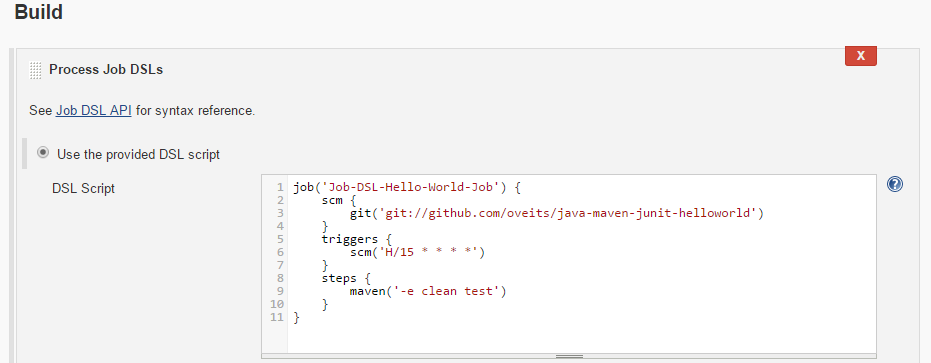
-> ![]()
Step 5: Prepare Maven Usage
Goto Jenkins -> Manage Jenkins -> Global Tool Configuration (available for Jenkins >2.0)
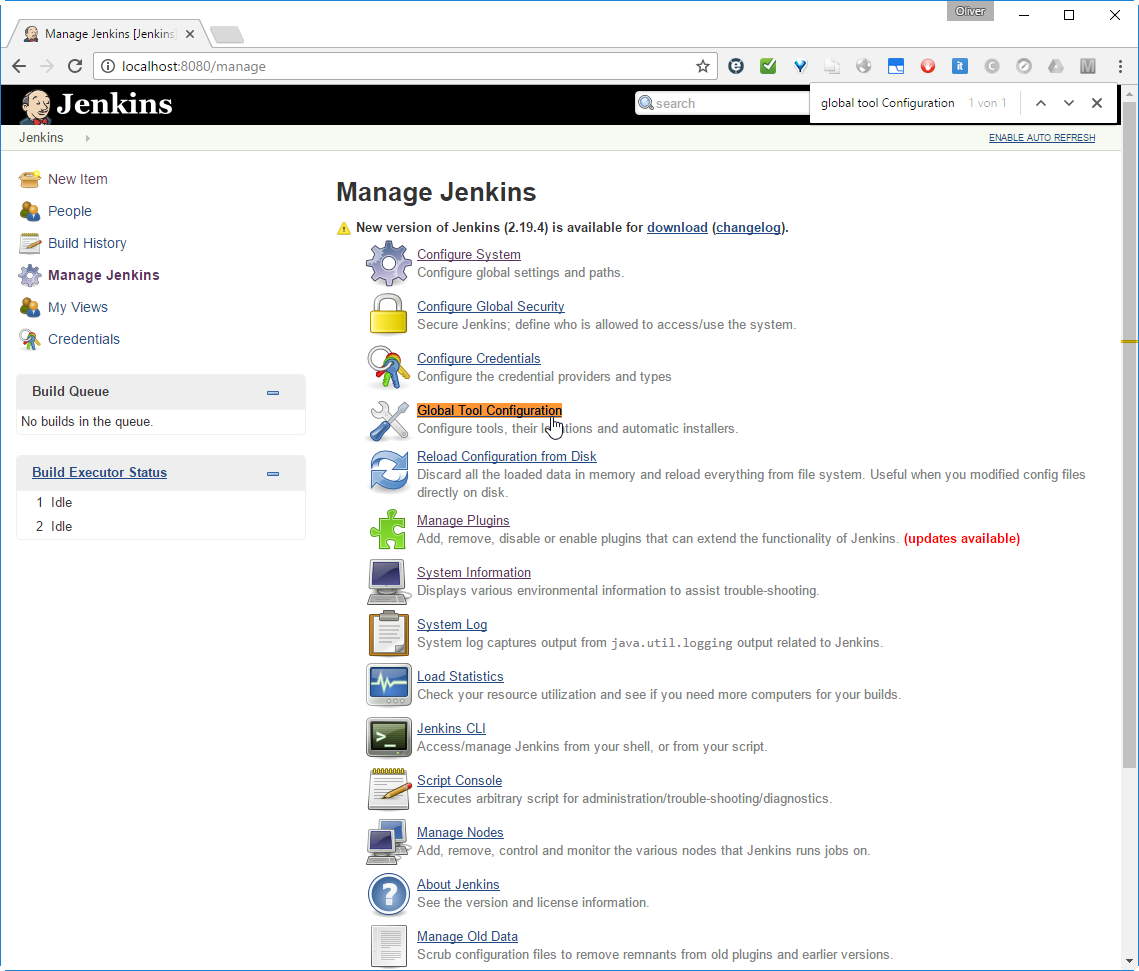
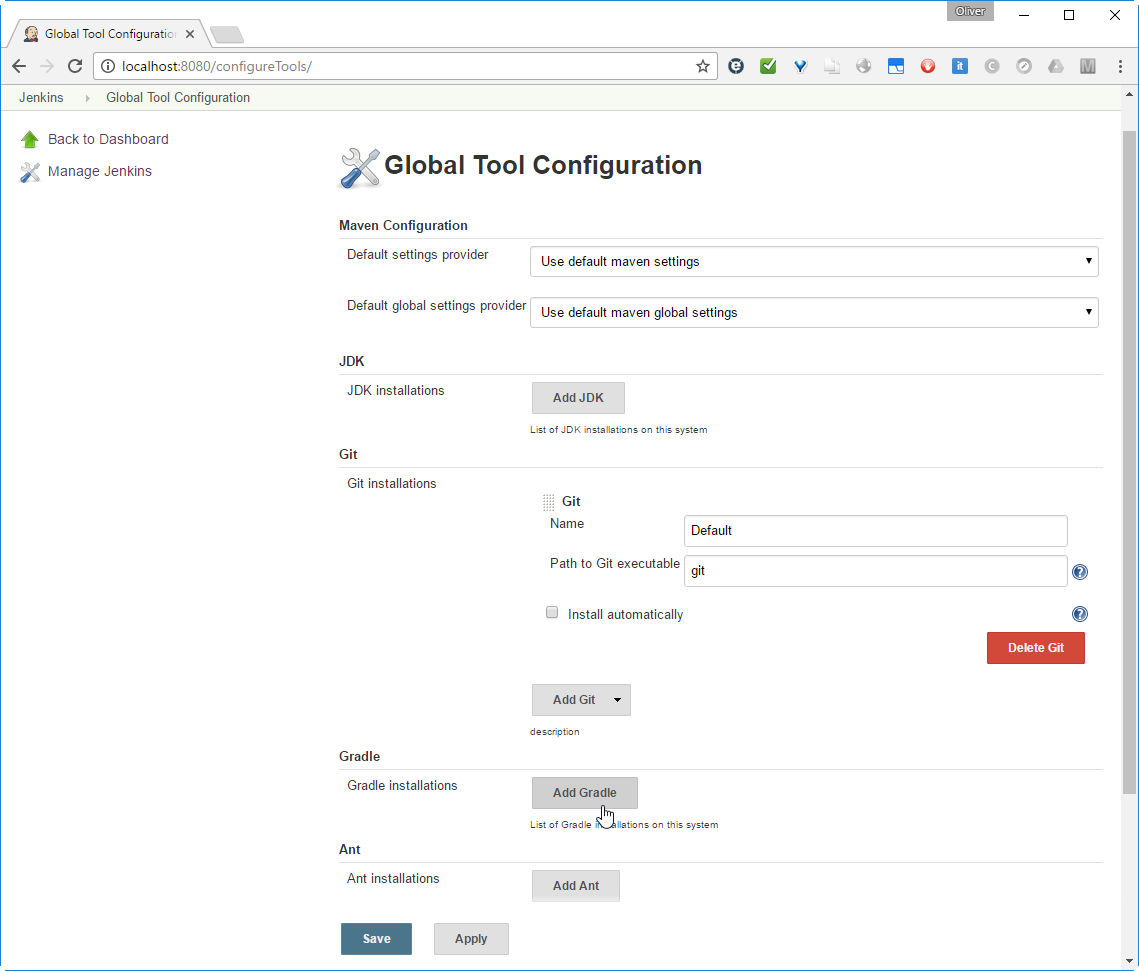
Scroll down to Maven -> ![]()
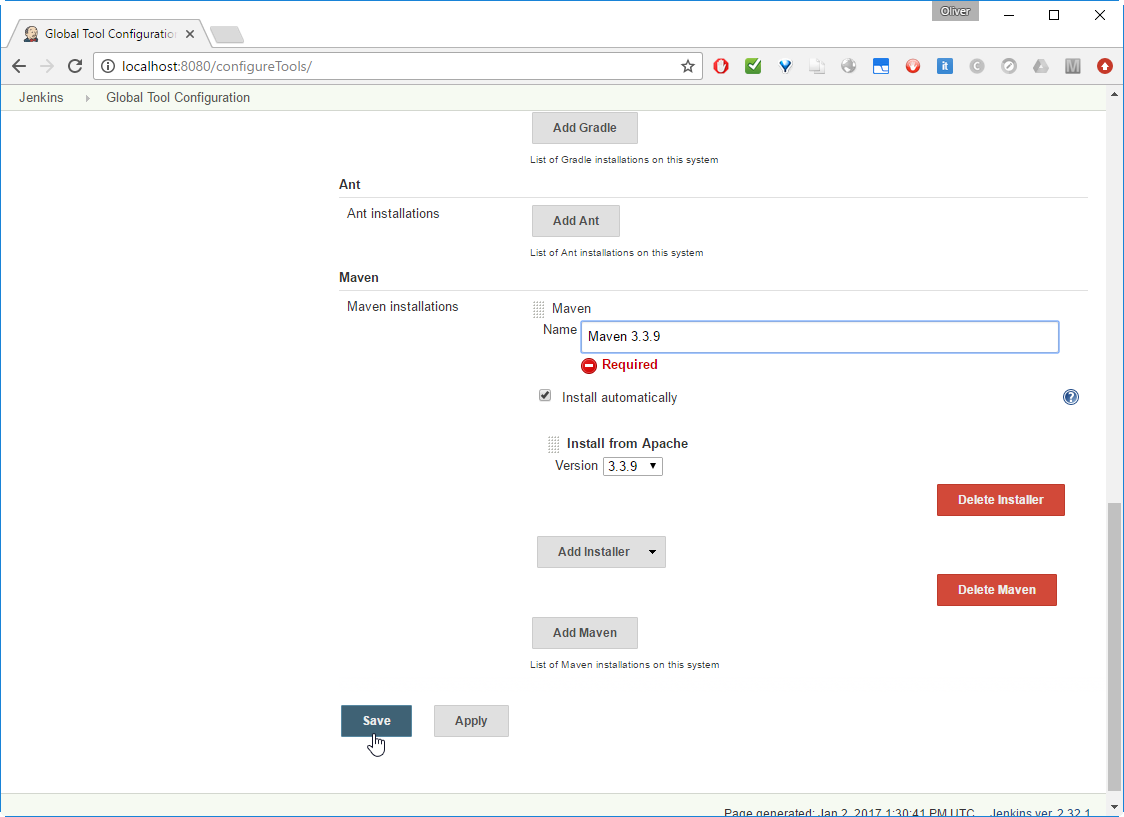
-> choose Version (3.3.9 in my case)
-> Add a name („Maven 3.3.9“ in my case)
-> ![]()
Since we have checked „Install automatically“ above, I expect that it will be installed automatically on first usage.
Step 6: Prepare Git Usage
As described in this StackOverflow Q&A, we need to add the Git username and email address, since Jenkins tries to tag and commit on the Git repo, which requires those configuration items to be set. For that, we perform:
-> ![]()
-> ![]()
-> 
-> scroll down to „Git plugin“
-> 
Step 7: Create Jenkins Job from Code
Step 7.1 Build Project
-> ![]()
Step 7.2 (optional): Check Console Output
-> ![]()
-> ![]()
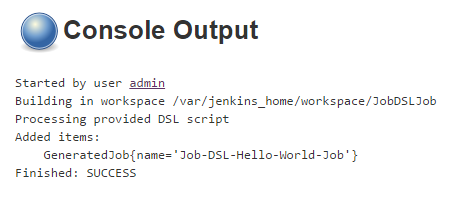
-> ![]()
Step 7.3: Review automatically built Project
-> ![]()
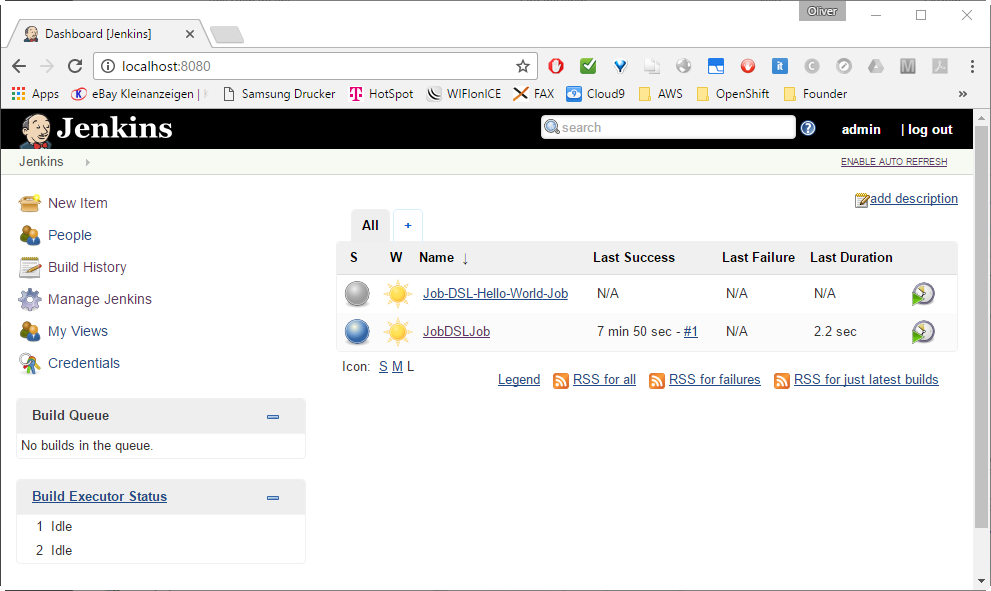
-> ![]()
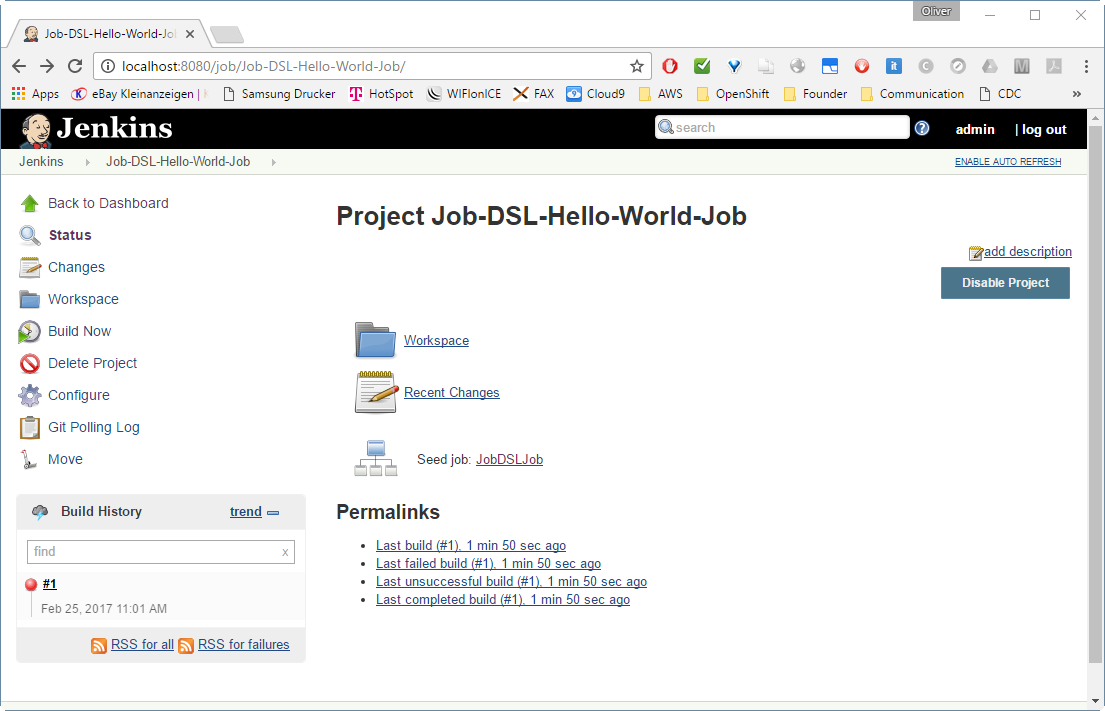
This is showing a build failure, since I had not performed Step 5 and 6 before. In your case, it should be showing a success (in blue). If you are experiencing problems here, check out the Appendices below.
-> ![]()
-> scroll down to Source Code Management
-> Scroll down to Build Triggers
-> Scroll down to Build
-> verify that „Maven 3.3.9“ is chosen as defined in Step 5
-> enter „-e clean test“ as Maven Goal
-> ![]()
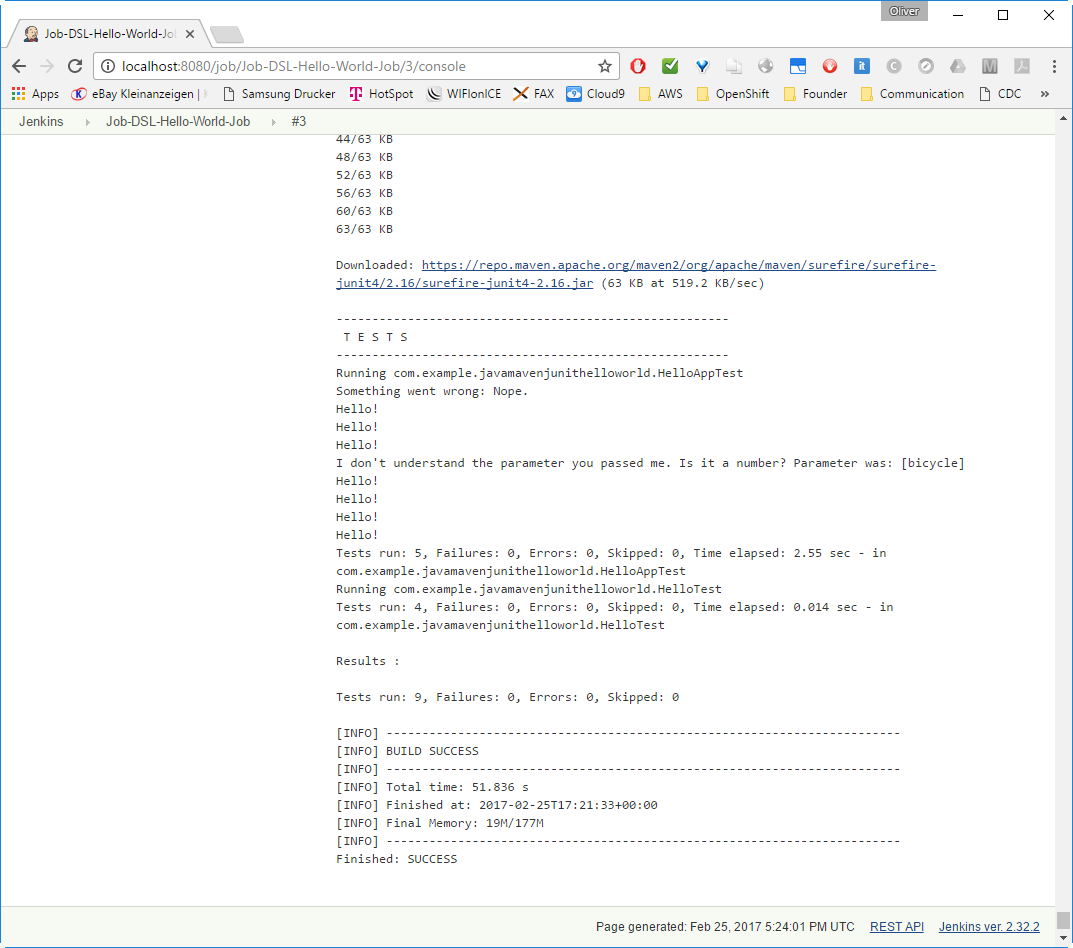
See, what happens by clicking on:
-> Build History
-> #nnn
-> ![]()
If everything went fine, we will see many downloads and a „BUILD SUCCESS“:
Appendix A: Solve Git Problem: „tell me who you are“
Symptoms: Git Error: status code 128
In a new installation of Jenkins, Git does not seem to work out of the box. You can see this by choosing the Jenkins project Job-DSL-Hello-World-Job on the dashboard, then click „build now“, if the build was not already automatically triggered. Then:
-> Build History
-> Last Build (link works only, if Jenkins is running on localhost:8080 and you have chosen the same job name)
-> ![]()
There, we will see:
Caused by: hudson.plugins.git.GitException: Command "git tag -a -f -m Jenkins Build #1 jenkins-Job-DSL-Hello-World-Job-1" returned status code 128:
stdout:
stderr:
*** Please tell me who you are.

Run

  git config --global user.email "you@example.com"
  git config --global user.name "Your Name"

to set your account's default identity.
Omit --global to set the identity only in this repository.

fatal: empty ident name (for <jenkins@61915398735e.(none)>) not allowed
Resolution:
Step 1: Enter Git Username and Email
As described in this StackOverflow Q&A: we can resolve this issue by either suppressing the git tagging, or (I think this is better) by adding your username and email address to git:
-> ![]()
-> ![]()
->
-> scroll down to „Git plugin“
->
Step 2: Re-run „Build Now“ on the Project
To test the new configuration, we go to
-> the Job-DSL-Hello-World-Job and press
-> ![]()
Now, we should see a BUILD SUCCESS like follows:
-> Build History
-> #nnn
-> ![]()
If everything went fine, we will a „BUILD SUCCESS“:
Appendix B: Maven Error: Cannot run program „mvn“
Symptoms:
When running a Maven Goal, the following error may appear on the Console log:
FATAL: command execution failed
java.io.IOException: Cannot run program "mvn" (in directory "/var/jenkins_home/workspace/Job-DSL-Hello-World-Job"): error=2, No such file or directory
	at java.lang.ProcessBuilder.start(ProcessBuilder.java:1048)
	at hudson.Proc$LocalProc.(Proc.java:245)
	at hudson.Proc$LocalProc.(Proc.java:214)
	at hudson.Launcher$LocalLauncher.launch(Launcher.java:846)
	at hudson.Launcher$ProcStarter.start(Launcher.java:384)
	at hudson.Launcher$ProcStarter.join(Launcher.java:395)
	at hudson.tasks.Maven.perform(Maven.java:367)
	at hudson.tasks.BuildStepMonitor$1.perform(BuildStepMonitor.java:20)
	at hudson.model.AbstractBuild$AbstractBuildExecution.perform(AbstractBuild.java:779)
	at hudson.model.Build$BuildExecution.build(Build.java:205)
	at hudson.model.Build$BuildExecution.doRun(Build.java:162)
	at hudson.model.AbstractBuild$AbstractBuildExecution.run(AbstractBuild.java:534)
	at hudson.model.Run.execute(Run.java:1728)
	at hudson.model.FreeStyleBuild.run(FreeStyleBuild.java:43)
	at hudson.model.ResourceController.execute(ResourceController.java:98)
	at hudson.model.Executor.run(Executor.java:404)
Caused by: java.io.IOException: error=2, No such file or directory
	at java.lang.UNIXProcess.forkAndExec(Native Method)
	at java.lang.UNIXProcess.(UNIXProcess.java:247)
	at java.lang.ProcessImpl.start(ProcessImpl.java:134)
	at java.lang.ProcessBuilder.start(ProcessBuilder.java:1029)
	... 15 more
Build step 'Invoke top-level Maven targets' marked build as failure
Finished: FAILURE
Resolution:
Perform Step 5
and
For Test, you can test a manual: choose the correct Maven version, when configuring a Maven build step like in Step 7:
and verify that ![]() does not throw the Maven error anymore.
does not throw the Maven error anymore.
For our case, we need to correct the Job DSL like follows:
In the Script, we had defined the step:
    steps {
        maven('-e clean test')
    }
However, we need to define the Maven Installation like follows:
    steps {
        maven {
            mavenInstallation("Maven 3.3.9")
            goals('-e clean test')
        }
    }
Here, the mavenInstallation needs to specify the exact same name, as the one we have chosen in Step 5 above.
After correction, we will receive the correct Maven goal
-> JobDSL -> ![]()
Now, we can check the Maven configuration:
-> ![]()
-> ![]()
-> ![]()
After scrolling down, we will see the correct Maven Version:
DONE
Appendix C: Updating Jenkins
Updating Jenkins (in my case: from 2.32.1 to 2.32.2) was as simple as following the steps below
Note: you might want to make a backup of your jenkins_home though. Just in case…
(dockerhost)$ cd <path_to_jenkins_home> # in my case: cd /vagrant/jenkins_home/
(dockerhost)$ docker pull jenkins # to update the jenkins image
(dockerhost)$ docker rm jenkins # to make shure the container named jenkins is removed
(dockerhost:jenkins_home)$ sudo docker run -d --rm --name jenkins -p8080:8080 -p50000:50000 -v`pwd`:/var/jenkins_home jenkins
However, after that, some data was unreadable:

I have clicked
-> Manage Jenkins
-> Manage
-> ![]()
to resolve the issue (hopefully…). At least, after that, the warning was gone.
Appendix D: Job DSL Syntax
The reference for the Job DSL syntax can be found on the Job DSL Plugin API pages. As an example, the syntax of Maven within a Freestyle project can be found on this page found via the path
> freeStyleJob > steps > maven:
maven {
- // Allows direct manipulation of the generated XML.
configure(Closure configureBlock)
- // Specifies the goals to execute including other command line options.
goals(String goals)
- // Skip injecting build variables as properties into the Maven process.
injectBuildVariables(boolean injectBuildVariables = true)
- // Set to use isolated local Maven repositories.
localRepository(javaposse.jobdsl.dsl.helpers.LocalRepositoryLocation location)
- // Specifies the Maven installation for executing this step.
mavenInstallation(String name)
- // Specifies the JVM options needed when launching Maven as an external process.
mavenOpts(String mavenOpts)
- // Adds properties for the Maven build.
properties(Map props)
- // Adds a property for the Maven build.
property(String key, String value)
- // Specifies the managed global Maven settings to be used.
providedGlobalSettings(String settingsIdOrName)
- // Specifies the managed Maven settings to be used.
providedSettings(String settingsIdOrName)
- // Specifies the path to the root POM.
rootPOM(String rootPOM)
}
A Maven example can be found on the same page:
job('example') {
    steps {
        maven('verify')
        maven('clean verify', 'module-a/pom.xml')
        maven {
            goals('clean')
            goals('verify')
            mavenOpts('-Xms256m')
            mavenOpts('-Xmx512m')
            localRepository(LocalRepositoryLocation.LOCAL_TO_WORKSPACE)
            properties(skipTests: true)
            mavenInstallation('Maven 3.1.1')
            providedSettings('central-mirror')
        }
    }
}
Summary
In this blog post, we have learned how to
- Start and initialize Jenkins via Docker
- Prepare the usage of Git and Maven
- Install the Job DSL Plugin
- Define a Jenkins Job via Groovy script
- Create a Jenkins Job by a push of the „Build now“ button
- Review and run the automatically created Jenkins job
We have seen that the usage of the Job DSL is no rocket science. The only topic, we had to take care, is, that Git and Maven need to be prepared for first usage on a Jenkins server.
More sophisticated Jenkins jobs can be created by following the documentation on the Job DSL Plugin API pages.
Now, we are ready to explore the Seed plugin, which relies on the Job DSL plugin and helps to fully automate the Jenkins job lifecycle. Our aim is, that one or more Jenkins job is automatically created, when a new project is created on the Git repository. If this is possible, we will see in one of my next blog posts.