In this blog post, we will start our first persistent kubernetes application. In our role as an administrator, we first will create a persistent volume. Then, in our role as a developer, we will create a persistent volume claim. Later, we will reference this claim in a POD, so once the claim is granted, the POD can make use of the volume.

In the end, we will verify that the data in the volume is retained, if the POD is removed. We will demonstrate that a new POD can access the same data as the previous POD.
References
- Kubernetes Documentation on persistent Volumes
- Katacoda persistent Volumes Hello World with an NFS Docker container
- Other Kubernetes Series posts in this blog:
Prerequisites
- We need a single Host Kubernetes „Cluster“ for smooth processing of the steps. The reason behind why multi-node clusters will not work consistently lies in the fact that we use the simple hostPath volume. You never know, which node the kubernetes scheduler will choose to start a POD. And therefore, you never know, which files the POD will find on the host.
- Note: so-called „local volumes“ ill also work on multi-node clusters. Local volumes are a new beta kubernetes feature.
Step 1: Create persistent Volume
We now check, whether or not your Kubernetes installation has a persistent volume:
# kubectl get pv
No resources found.
Since we have no persistent volumes yet, let us create some. For that, we create a volume file like follows:
cat > vol.yaml << EOF
apiVersion: v1
kind: PersistentVolume
metadata:
  name: vol
spec:
  capacity:
    storage: 500Gi
  accessModes:
    - ReadWriteOnce
    - ReadWriteMany
  persistentVolumeReclaimPolicy: Retain
  hostPath:
    path: /mnt/data/vol
EOF
Now let us use the above file to create a persistent volume:
DIRNAME="vol"
mkdir -p /mnt/data/$DIRNAME
chcon -Rt svirt_sandbox_file_t /mnt/data/$DIRNAME
chmod 777 /mnt/data/$DIRNAME

kubectl create -f vol.yaml
This should create an output like:
persistentvolume/vol created
We review the volume status with following commands
list volumes:
# kubectl get pv
NAME   CAPACITY   ACCESS MODES   RECLAIM POLICY   STATUS      CLAIM   STORAGECLASS   REASON   AGE
vol    500Gi      RWO,RWX        Retain           Available                                   92s
show details of volume named „vol“:
# kubectl get pv vol -o yaml
apiVersion: v1
kind: PersistentVolume
metadata:
  creationTimestamp: 2018-12-02T10:11:10Z
  finalizers:
  - kubernetes.io/pv-protection
  name: vol
  resourceVersion: "1197256"
  selfLink: /api/v1/persistentvolumes/vol
  uid: 97228fcc-f61a-11e8-a13e-9600001441cb
spec:
  accessModes:
  - ReadWriteOnce
  - ReadWriteMany
  capacity:
    storage: 500Gi
  hostPath:
    path: /mnt/data/vol
    type: ""
  persistentVolumeReclaimPolicy: Retain
status:
  phase: Available
deleted volumes with the commands as follows:
kubectl delete pv <volumename> # in our case: <volumename>=vol
Step 2: Create a persistent Volume Claim
In this step, we create a persistent volume claim. But what is a persistent volume claim in the first place? With a persistent volume claim, we issue a request to bind a matching persistent volume. The claim can be referenced by a POD, and with that, the volume is mounted to a path within the Docker container(s).
However, let us create the persistent volume claim for now:
cat > http-claim.yaml << EOF
kind: PersistentVolumeClaim
apiVersion: v1
metadata:
  name: http-claim
spec:
  accessModes:
    - ReadWriteOnce
  resources:
    requests:
      storage: 3Gi
EOF
Now let us apply the file:
# kubectl create -f http-claim.yaml
persistentvolumeclaim/http-claim created
We review the result with the following command (for details, add the option -o yaml)
# kubectl get pvc
NAME         STATUS   VOLUME   CAPACITY   ACCESS MODES   STORAGECLASS   AGE
http-claim   Bound    vol      500Gi      RWO,RWX                       29s
We already can see that the claim is fulfilled (bound) and that it is connected to the recently created volume named „vol„.
With the kubectl describe command, we can see that the volume is not yet mounted.
# kubectl describe pvc http-claim
Name:          http-claim
Namespace:     default
StorageClass:
Status:        Bound
Volume:        vol
Labels:        <none>
Annotations:   pv.kubernetes.io/bind-completed: yes
               pv.kubernetes.io/bound-by-controller: yes
Finalizers:    [kubernetes.io/pvc-protection]
Capacity:      500Gi
Access Modes:  RWO,RWX
Events:        <none>
Mounted By:    <none>
We will take care of this in the next step.
Step 3: Create a persistent Application
Now, let us create a simple NginX-based HTTP server that makes use of the persistent volume claim. We create a YAML file that references the claim http-claim and maps the volume to the internal path /usr/share/nginx/html, which is the default path for the resources in an NginX Docker container:
cat > http-pod.yaml << EOF
apiVersion: v1
kind: Pod
metadata:
  name: www
  labels:
    name: www
spec:
  containers:
  - name: www
    image: nginx:alpine
    ports:
      - containerPort: 80
        name: www
    volumeMounts:
      - name: www-persistent-storage
        mountPath: /usr/share/nginx/html
  volumes:
    - name: www-persistent-storage
      persistentVolumeClaim:
        claimName: http-claim
EOF
Now, we create the POD with the kubectl create command:
# kubectl create -f http-pod.yaml
pod/www created
Step 4: Add data to the Volume
We now add an index file to the volume, so the NginX Container will deliver the data on request:
echo "Hello persistent volume" > /mnt/data/vol/index.html
Step 5: Check that the Container has access to the Volume Data
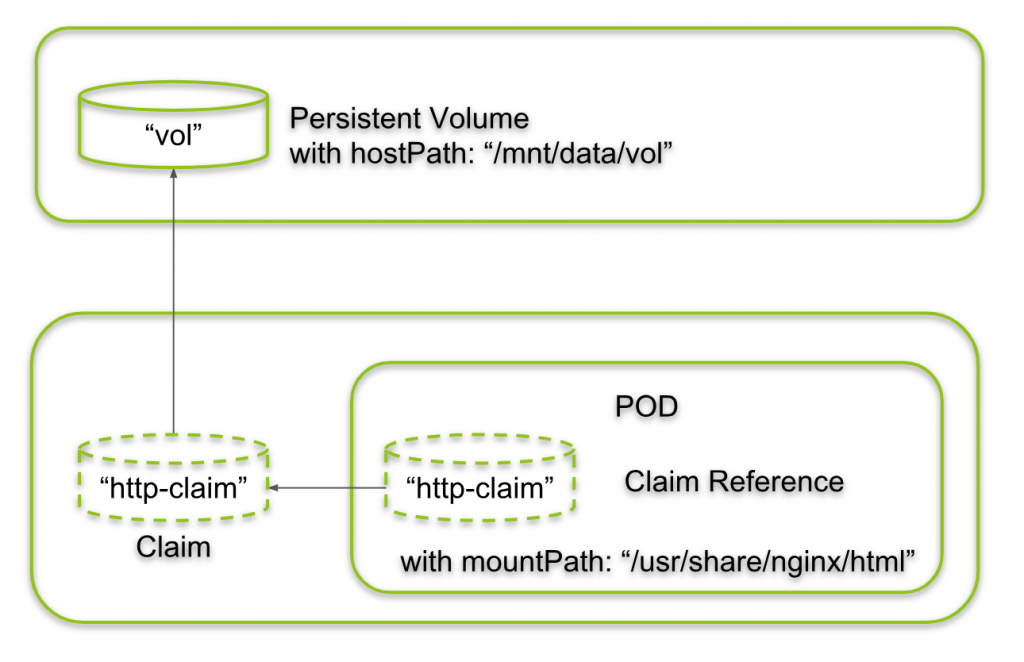
The situation is like follows: we have started an NginX POD/Container with a reference to claim named „http-claim“ and a mountPath „/usr/share/nginx/html“. The claim, in turn, is bound to a persistent volume named „vol“ with a hostPath „/mnt/data/vol“. All in all, the internal container path „/usr/share/nginx/html“ maps to the host path „/mnt/data/vol“.
We now just need to write data on the hostPath and should see it in the container. Let us do that now:
echo "Hello persistent volume" > /mnt/data/vol/index.html
Now let us retrieve the POD’s IP address:
# POD_IP=$(kubectl get pod www -o yaml | grep podIP | awk '{print $2}'); echo $POD_IP
10.44.0.1
This is the IP address the NginX container will listen to. Therefore, we can get the content of the index.html file on the volume with a simple curl command:
curl $POD_IP
It might work in your case, but in my case, I got:
# curl $POD_IP
<html>
<head><title>403 Forbidden</title></head>
<body>
<center><h1>403 Forbidden</h1></center>
<hr><center>nginx/1.15.7</center>
</body>
</html>
That is not, what I had expected. What happened? Okay, let me think:
- Am I sure that the POD runs on the same machine where I am logged in? No, I am not. I am sitting on the master of a two-node Kubernetes installation.
- How do I get information, on which node the POD is running? This is how:
# HOST_IP=$(kubectl get pod $POD_NAME -o yaml | grep hostIP | awk '{print $2}'); echo $HOST_IP
159.69.193.143
Therefore, I have to SSH into the machine with IP address 159.69.193.143 first:
(HOST_WHERE_POD_IS_RUNNING)# echo "Hello persistent volume" > /mnt/data/vol/index.htmlOn the original host, I perform following commands again:
# POD_IP=$(kubectl get pod www -o yaml | grep podIP | awk '{print $2}')
# curl $POD_IP
Hello persistent volume
This works as expected now!
Step 6: Change Data from within the POD
In the previous step, we have changed the data on the host, and we have proven that the POD is seeing the same data. Now let us change the data from within the POD and prove that the data has changed on the host. For that, we need to enter the POD via the following command:
(host)# kubectl exec -it $POD_NAME sh
(container)# echo "Hello world, here is the container" > /usr/share/nginx/html/index.html
(container)# exit
(host)# curl $POD_IP
Hello world, here is the container
Note: This command works also if the POD is located on another host.
On the host, where the POD is running, we can verify that the content of the volume has changed also for the world outside of the container:
# cat /mnt/data/vol/index.html
Hello world, here is the container
Yes, the container has changed the content of the file located on the host.
Step 7: Replace a persistent POD
Now we want to prove that the data is retained even if the POD is deleted and replaced by another POD. For that, let us delete the POD first:
kubectl delete pod $POD_NAME
Even after deleting the POD that had made use of the persistent volume, both, the PersistentVolume, as well as the PersistentVolumeClaim are still present:
# kubectl get pvc
NAME         STATUS   VOLUME   CAPACITY   ACCESS MODES   STORAGECLASS   AGE
http-claim   Bound    vol      500Gi      RWO,RWX                       33h
# kubectl get pv
NAME   CAPACITY   ACCESS MODES   RECLAIM POLICY   STATUS   CLAIM                STORAGECLASS   REASON   AGE
vol    500Gi      RWO,RWX        Retain           Bound    default/http-claim                           35h
Now, we can map the same persistent Volume into another POD. Let us create a simple CentOS POD:
cat <<EOF | kubectl create -f -
apiVersion: v1
kind: Pod
metadata:
  name: centos
  labels:
    name: centos
spec:
  containers:
  - name: centos
    image: centos
    command: ["/bin/sh"]
    args: ["-c", "while true; do cat /data/index.html; sleep 10; done"]
    volumeMounts:
      - name: www-persistent-storage
        mountPath: /data
  volumes:
    - name: www-persistent-storage
      persistentVolumeClaim:
        claimName: http-claim
EOF
In the container above, we continuously write the data in the persistent storage to the STDOUT within a while loop (in blue). Therefore, let us access the STDOUT of within the container by usage of the kubectl logs command:
# kubectl logs centos
Hello world, here is the container
Hello world, here is the container
Hello world, here is the container
Hello world, here is the container
Hello world, here is the container
With that, we have proven that the volume content is persistent and a second POD, a CentOS POD has access to the content.
In my case, I have worked with a two node Kubernetes cluster. I was a little bit lucky that the kubernetes scheduler has started the second POD on the same node as the first POD. Generally, the second POD can show up on any available node, and therefore it may see a different content on the hostPath. This is, why we had asked for a single node cluster as a prerequisite.
For multi-node clusters, check out networked volumes like NFS, GlusterFS or a new beta feature called local volumes that introduces affinity rules that make sure that a re-starting POD is started on the same node as before.
Summary
In this blog post, we have shown how Kubernetes PODs can map to persistent Volume claims, which in turn map to volumes. In our simple case, we have tested with hostPath volumes which work well only in single-node clusters. Alternatives that work with multi-node clusters can be found in the official kubernetes documentation. Some of them are NFS (see e.g. a nice hello world on Katacoda) or a new beta feature called „local volumes“ that work with affinity rules to tell the scheduler that restarting PODs should be started on the same node as before.