In this blog post, we will have a close look at Kubernetes labels and node selectors. Labels and node selectors are used to control, which PODs are scheduled on which set of nodes.
We will go into the details on what happens to PODs with node selectors that do not match any node. Moreover, we will investigate, what happens to the already running PODs if a label is removed from a node.
tldr;
Impatient readers may be interested in the Summary section below.
References
Step 0: Preparations
Step 0.1: Access the Kubernetes Playground
As always, we start by accessing the Katacode Kubernetes Playground. We press the launch.sh command and type the following command, so we can use auto-completion together with the predefined alias k for kubectl:
source <(kubectl completion bash) # optional, because katacoda has done that for us already

alias k=kubectl # optional, because katacoda has done that for us already
complete -F __start_kubectl k
As an example, k g<tab> will be completed to k get. Also nice: k get pod <tab> will reveal the name of the POD(s).
Note: the last command found in the official kubernetes documentation can also be replaced by the command we had used in the previous blog posts:
source <(kubectl completion bash | sed 's/kubectl/k/g')
Step 0.2: Schedule PODs also on the Master
The Katacoda k8s playground provides us with a single master and a worker node. However, we want to study the effect of labels, taints, and tolerations. For that, we need at least two worker nodes. To achieve that without adding a real node, we make sure that PODs can be deployed on the master as well. Therefore, we need to remove the NoSchedule taint of the master:
# check that both nodes are available:
kubectl get nodes
NAME     STATUS   ROLES    AGE   VERSION
master   Ready    master   31m   v1.14.0
node01   Ready       31m   v1.14.0

# check the taints before removal:
kubectl describe nodes | egrep "Name:|Taints:"
Name:               master
Taints:             node-role.kubernetes.io/master:NoSchedule
Name:               node01
Taints:             <none>

# remove taint:
kubectl taint node master node-role.kubernetes.io/master-
node/master untainted

# check the taints after removal:
kubectl describe nodes | egrep "Name:|Taints:"
Name:               master
Taints:             <none>
Name:               node01
Taints:             <none>
Task 1: Run PODs on dedicated Nodes
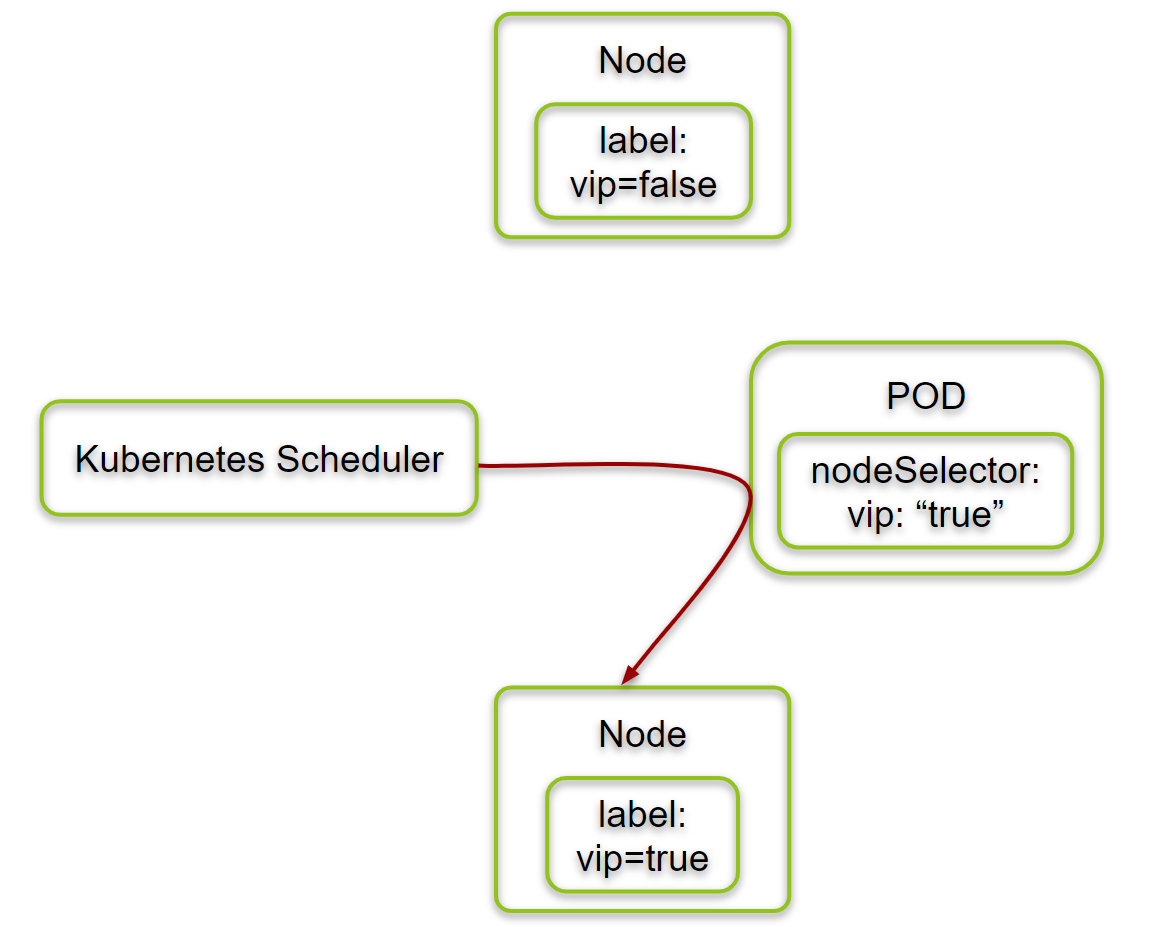
In this phase, we show how we can use the POD’s nodeSelector to control, on which Kubernetes node the POD is running on.
Step 1.1: Check Labels of Nodes
As a first step, we display the labels that are assigned to the nodes:
kubectl get nodes --show-labels
NAME     STATUS   ROLES    AGE   VERSION   LABELS
master   Ready    master   32m   v1.14.0   beta.kubernetes.io/arch=amd64,beta.kubernetes.io/os=linux,kubernetes.io/arch=amd64,kubernetes.io/hostname=master,kubernetes.io/os=linux,node-role.kubernetes.io/master=
node01   Ready    <none>   32m   v1.14.0   beta.kubernetes.io/arch=amd64,beta.kubernetes.io/os=linux,kubernetes.io/arch=amd64,kubernetes.io/hostname=node01,kubernetes.io/os=linux
Very seldomly, we have seen node01 is missing. If this is the case, you need to restart the Katakoda session.
Step 1.2: Add Labels
kubectl label nodes master vip=true --overwrite
kubectl label nodes node01 vip=false --overwrite
Note: the
overwriteoption is only needed if the vip label is defined already. However, the option does not hurt otherwise.
Step 1.3: Verify Labels
kubectl get nodes --show-labels
NAME     STATUS   ROLES    AGE   VERSION   LABELS
master   Ready    master   32m   v1.14.0   ...,vip=true
node01   Ready    <none>   32m   v1.14.0   ...,vip=false
Step 1.4: Run PODs with a Node Selector
Now let us create four PODs with the nodeSelector vip: "true" in the POD spec:
cat <<EOF | kubectl create -f -
---
apiVersion: v1
kind: Pod
metadata:
  name: vip1
spec:
  containers:
  - name: sleep
    image: busybox
    args:
    - sleep
    - "1000000"
  nodeSelector:
    vip: "true"

---
apiVersion: v1
kind: Pod
metadata:
  name: vip2
spec:
  containers:
  - name: sleep
    image: busybox
    args:
    - sleep
    - "1000000"
  nodeSelector:
    vip: "true"

---
apiVersion: v1
kind: Pod
metadata:
  name: vip3
spec:
  containers:
  - name: sleep
    image: busybox
    args:
    - sleep
    - "1000000"
  nodeSelector:
    vip: "true"

---
apiVersion: v1
kind: Pod
metadata:
  name: vip4
spec:
  containers:
  - name: sleep
    image: busybox
    args:
    - sleep
    - "1000000"
  nodeSelector:
    vip: "true"

EOF

# output:
pod/vip1 created
pod/vip2 created
pod/vip3 created
pod/vip4 created
We now check the location of the PODs with the kubectl get pod command with the –o=wide option:
kubectl get pod -o=wide
NAME   READY   STATUS    RESTARTS   AGE     IP          NODE     NOMINATED NODE   READINESS GATES
vip1   1/1     Running   0          6m25s   10.32.0.3   master   <none>           <none>
vip2   1/1     Running   0          6m25s   10.32.0.5   master   <none>           <none>
vip3   1/1     Running   0          6m25s   10.32.0.2   master   <none>           <none>
vip4   1/1     Running   0          6m25s   10.32.0.4   master   <none>           <none>
That means that all four PODs with nodeSelector vip: "true" have been started on the machine with label vip=true.
Optionally, we now can clean the PODs from the cluster again:
kubectl delete pod vip1 vip2 vip3 vip4

# output:
pod "vip1" deleted
pod "vip2" deleted
pod "vip3" deleted
pod "vip4" deleted
Summary of Task 1
In this task, we have shown that nodeSelector vip: "true" can be used to control the location of the scheduled PODs. All PODs with this nodeSelector can run only on nodes, which are labeled with vip=true.
Task 2: Run PODs on any Node
In this phase, we investigate, how the PODs are distributed among the nodes when no nodeSelector is set on the PODs. We expect a more or less even distribution of the PODs among the nodes.
Step 2.0: Check Nodes and un-taint the Master
We have done this already on Task 1, but if you happen to run task 2 independently from task 1, you need to repeat the following command:
# optional
source <(kubectl completion bash)
source <(kubectl completion bash | sed 's/kubectl/k/g')
kubectl get nodes

# required
kubectl taint node master node-role.kubernetes.io/master-
Step 2.1: Run PODs with no Node Selector
We now create four PODs with no nodeSelector vip: "true" in the POD spec:
cat <<EOF | kubectl create -f -
---
apiVersion: v1
kind: Pod
metadata:
  name: no-vip-01             # <-------- changed
spec:
  containers:
  - name: sleep
    image: busybox
    args:
    - sleep
    - "1000000"
#  nodeSelector:              # <-------- commented out
#    vip: "true"

---
apiVersion: v1
kind: Pod
metadata:
  name: no-vip-02             # <-------- changed
spec:
  containers:
  - name: sleep
    image: busybox
    args:
    - sleep
    - "1000000"
#  nodeSelector:              # <-------- commented out
#    vip: "true"

---
apiVersion: v1
kind: Pod
metadata:
  name: no-vip-03             # <-------- changed
spec:
  containers:
  - name: sleep
    image: busybox
    args:
    - sleep
    - "1000000"
#  nodeSelector:              # <-------- commented out
#    vip: "true"

---
apiVersion: v1
kind: Pod
metadata:
  name: no-vip-04             # <-------- changed
spec:
  containers:
  - name: sleep
    image: busybox
    args:
    - sleep
    - "1000000"
#  nodeSelector:              # <-------- commented out
#    vip: "true"

EOF

# output:
pod/no-vip-01 created
pod/no-vip-02 created
pod/no-vip-03 created
pod/no-vip-04 created
We now check the location of the PODs:
kubectl get pod -o wide
NAME        READY   STATUS    RESTARTS   AGE   IP          NODE     NOMINATED NODE   READINESS GATES
no-vip-01   1/1     Running   0          22s   10.40.0.2   node01   <none>           <none>
no-vip-02   1/1     Running   0          22s   10.40.0.3   node01   <none>           <none>
no-vip-03   1/1     Running   0          22s   10.40.0.1   node01   <none>           <none>
no-vip-04   1/1     Running   0          22s   10.40.0.4   node01   <none>           <none>
This was not expected, but we can see, that all four PODs are started on node01.
However, we can prove that only a certain number of PODs is started on node01 before PODs are also started on the master. We do that with the following script. You can just cut&past it to the master:
aster (marked in blue):
createNonVipPod() {
cat <<EOF | kubectl create -f -
---
apiVersion: v1
kind: Pod
metadata:
  name: no-vip-$1
spec:
  containers:
  - name: sleep
    image: busybox
    args:
    - sleep
    - "1000000"
EOF
}

for i in $(seq -f '%02g' 5 29); do
  createNonVipPod $i
done
We expect the following output:
master $ createNonVipPod() {
> cat <<EOF | kubectl create -f -
> ---
> apiVersion: v1
> kind: Pod
> metadata:
>   name: no-vip-$1
> spec:
>   containers:
>   - name: sleep
>     image: busybox
>     args:
>     - sleep
>     - "1000000"
> EOF
> }
master $
master $ for i in $(seq -f '%02g' 5 29); do
>   createNonVipPod $i
> done
pod/no-vip-05 created
pod/no-vip-06 created
pod/no-vip-07 created
pod/no-vip-08 created
pod/no-vip-09 created
pod/no-vip-10 created
pod/no-vip-11 created
pod/no-vip-12 created
pod/no-vip-13 created
pod/no-vip-14 created
pod/no-vip-15 created
pod/no-vip-16 created
pod/no-vip-17 created
pod/no-vip-18 created
pod/no-vip-19 created
pod/no-vip-20 created
pod/no-vip-21 created
pod/no-vip-22 created
pod/no-vip-23 created
pod/no-vip-24 created
pod/no-vip-25 created
pod/no-vip-26 created
pod/no-vip-27 created
pod/no-vip-28 created
pod/no-vip-29 created
If we now check the location of the PODs, we can see, that some of the PODs are scheduled on the master as well. In the example below, the scheduler has chosen to schedule the 12th POD on the master:
kubectl get pods -o wide

# output:
NAME        READY   STATUS    RESTARTS   AGE     IP           NODE     NOMINATED NODE   READINESS GATES
no-vip-01   1/1     Running   0          2m56s   10.40.0.2    node01   <none>           <none>
no-vip-02   1/1     Running   0          2m56s   10.40.0.3    node01   <none>           <none>
no-vip-03   1/1     Running   0          2m56s   10.40.0.1    node01   <none>           <none>
no-vip-04   1/1     Running   0          2m56s   10.40.0.4    node01   <none>           <none>
no-vip-05   1/1     Running   0          65s     10.40.0.5    node01   <none>           <none>
no-vip-06   1/1     Running   0          65s     10.40.0.6    node01   <none>           <none>
no-vip-07   1/1     Running   0          64s     10.40.0.7    node01   <none>           <none>
no-vip-08   1/1     Running   0          64s     10.40.0.8    node01   <none>           <none>
no-vip-09   1/1     Running   0          64s     10.40.0.9    node01   <none>           <none>
no-vip-10   1/1     Running   0          64s     10.40.0.10   node01   <none>           <none>
no-vip-11   1/1     Running   0          64s     10.40.0.11   node01   <none>           <none>
no-vip-12   1/1     Running   0          63s     10.32.0.2    master   <none>           <none>
no-vip-13   1/1     Running   0          63s     10.40.0.12   node01   <none>           <none>
no-vip-14   1/1     Running   0          63s     10.40.0.13   node01   <none>           <none>
no-vip-15   1/1     Running   0          63s     10.40.0.14   node01   <none>           <none>
no-vip-16   1/1     Running   0          62s     10.32.0.3    master   <none>           <none>
no-vip-17   1/1     Running   0          62s     10.40.0.15   node01   <none>           <none>
no-vip-18   1/1     Running   0          62s     10.32.0.4    master   <none>           <none>
no-vip-19   1/1     Running   0          62s     10.40.0.16   node01   <none>           <none>
no-vip-20   1/1     Running   0          61s     10.40.0.17   node01   <none>           <none>
no-vip-21   1/1     Running   0          61s     10.40.0.18   node01   <none>           <none>
no-vip-22   1/1     Running   0          61s     10.32.0.5    master   <none>           <none>
no-vip-23   1/1     Running   0          60s     10.40.0.19   node01   <none>           <none>
no-vip-24   1/1     Running   0          60s     10.32.0.6    master   <none>           <none>
no-vip-25   1/1     Running   0          60s     10.40.0.20   node01   <none>           <none>
no-vip-26   1/1     Running   0          60s     10.32.0.7    master   <none>           <none>
no-vip-27   1/1     Running   0          59s     10.32.0.8    master   <none>           <none>
no-vip-28   1/1     Running   0          59s     10.40.0.21   node01   <none>           <none>
no-vip-29   1/1     Running   0          58s     10.40.0.22   node01   <none>           <none>
Summary of Task 2
In this task, we have shown that PODs are scheduled on both nodes, if there is no nodeSelector defined for the PODs, and no taint restricts the scheduling of the PODs.
Task 3: Run PODs with unmatching Node Selector
We now want to explore, what happens, if we try to start PODs with a nodeSelector that does not match any node.
Step 3.0: Check Nodes and un-taint the Master
We have done this already on Task 1 and 2, but if you happen to run the current task independently from the other tasks, you need to repeat the following command:
# optional
source <(kubectl completion bash)
source <(kubectl completion bash | sed 's/kubectl/k/g')
kubectl get nodes

# required
kubectl taint node master node-role.kubernetes.io/master-
Step 3.1: Run PODs with not (yet) matching Node Selector
Now let us create four PODs with the nodeSelector vip: "not-matching" in the POD spec:
cat <<EOF | kubectl create -f -
---
apiVersion: v1
kind: Pod
metadata:
  name: vip1
spec:
  containers:
  - name: sleep
    image: busybox
    args:
    - sleep
    - "1000000"
  nodeSelector:
    vip: "maybe"
---
apiVersion: v1
kind: Pod
metadata:
  name: vip2
spec:
  containers:
  - name: sleep
    image: busybox
    args:
    - sleep
    - "1000000"
  nodeSelector:
    vip: "maybe"
---
apiVersion: v1
kind: Pod
metadata:
  name: vip3
spec:
  containers:
  - name: sleep
    image: busybox
    args:
    - sleep
    - "1000000"
  nodeSelector:
    vip: "maybe"
---
apiVersion: v1
kind: Pod
metadata:
  name: vip4
spec:
  containers:
  - name: sleep
    image: busybox
    args:
    - sleep
    - "1000000"
  nodeSelector:
    vip: "maybe"
EOF

# output:
pod/vip1 created
pod/vip2 created
pod/vip3 created
pod/vip4 created
We now check the location of the PODs with the kubectl get pod command with the –o=wide option:
kubectl get pod -o wide
NAME   READY   STATUS    RESTARTS   AGE   IP       NODE     NOMINATED NODE   READINESS GATES
vip1   0/1     Pending   0          84s   <none>   <none>   <none>           <none>
vip2   0/1     Pending   0          84s   <none>   <none>   <none>           <none>
vip3   0/1     Pending   0          84s   <none>   <none>   <none>           <none>
vip4   0/1     Pending   0          84s   <none>   <none>   <none>           <none>
We can see that the PODs are in pending status since the scheduler has not yet found any matching node. Let us look more closely:
kubectl describe pod vip1

# output:
...<omitted lines>...
Node-Selectors:  vip=maybe
Tolerations:     node.kubernetes.io/not-ready:NoExecute for 300s
                 node.kubernetes.io/unreachable:NoExecute for 300s
Events:
  Type     Reason            Age                  From               Message
  ----     ------            ----                 ----               -------
  Warning  FailedScheduling  79s (x4 over 3m55s)  default-scheduler  0/2 nodes are available: 2 node(s) didn't match node selector.
At the end of the output, you can see a message from the default scheduler that both nodes did not match the node selector.
Step 3.2: Label the Master to match the Node Selector of the PODs
Now let us observe, what happens, if a node with a matching label is created, while the PODs are in pending status:
kubectl label nodes master vip=maybe --overwrite
node/master labeled
If you are quick enough, you might see that the PODs are scheduled on the master immediately: the PODs enter the ContainerCreating status immediately:
kubectl get pod -o wide
NAME   READY   STATUS              RESTARTS   AGE   IP       NODE     NOMINATED NODE   READINESS GATES
vip1   0/1     ContainerCreating   0          10m   <none>   master   <none>           <none>
vip2   0/1     ContainerCreating   0          10m   <none>   master   <none>           <none>
vip3   0/1     ContainerCreating   0          10m   <none>   master   <none>           <none>
vip4   0/1     ContainerCreating   0          10m   <none>   master   <none>           <none>
After a few seconds, the PODs enter the Running status:
kubectl get pod -o wide
NAME   READY   STATUS    RESTARTS   AGE   IP          NODE     NOMINATED NODE   READINESS GATES
vip1   1/1     Running   0          15m   10.32.0.2   master   <none>           <none>
vip2   1/1     Running   0          15m   10.32.0.5   master   <none>           <none>
vip3   1/1     Running   0          15m   10.32.0.3   master   <none>           <none>
vip4   1/1     Running   0          15m   10.32.0.4   master   <none>           <none>
Step 3.3: Remove the Label from the Master
Let us now explore, what happens with the PODs, if a matching label is removed from the master again:
kubectl label nodes master vip-
node/master labeled

kubectl get pod -o wide
NAME   READY   STATUS    RESTARTS   AGE   IP          NODE     NOMINATED NODE   READINESS GATES
vip1   1/1     Running   0          19m   10.32.0.2   master   <none>           <none>
vip2   1/1     Running   0          19m   10.32.0.5   master   <none>           <none>
vip3   1/1     Running   0          19m   10.32.0.3   master   <none>           <none>
vip4   1/1     Running   0          19m   10.32.0.4   master   <none>           <none>
We can see that the nodeSelector is applied during Scheduling only: running PODs are kept running on the node, even if the removal of a label from the node will lead to a situation that the nodeSelector of the POD does not match for this node anymore.
The PODs are kept, even if some event is crashing the docker containers. Let us demonstrate that for POD vip1:
docker ps | grep vip1 | awk '{print $1}' | xargs docker kill
e42b2785ca6f
00c7c48ea1f9
The POD is restarted successfully on the master node, even though the nodeSelector does not match:
kubectl get pod -o wide
NAME   READY   STATUS    RESTARTS   AGE   IP          NODE     NOMINATED NODE   READINESS GATES
vip1   1/1     Running   2          35m   10.32.0.5   master   <none>           <none>
vip2   1/1     Running   1          35m   10.32.0.2   master   <none>           <none>
vip3   1/1     Running   1          35m   10.32.0.3   master   <none>           <none>
vip4   1/1     Running   1          35m   10.32.0.4   master   <none>           <none>
Only, if the POD is deleted and re-created, scheduling of the POD will not find a matching node:
kubectl delete pod vip1
We now re-create the POD:
cat <<EOF | kubectl create -f -
---
apiVersion: v1
kind: Pod
metadata:
  name: vip1
spec:
  containers:
  - name: sleep
    image: busybox
    args:
    - sleep
    - "1000000"
  nodeSelector:
    vip: "maybe"

EOF

# output:
pod/vip1 created
In this case, the POD is kept Pending, as expected:
kubectl get pod -o wide
NAME   READY   STATUS    RESTARTS   AGE     IP          NODE     NOMINATED NODE   READINESS GATES
vip1   0/1     Pending   0          13s     <none>      <none>   <none>           <none>
vip2   1/1     Running   0          4m46s   10.40.0.4   master   <none>           <none>
vip3   1/1     Running   0          4m46s   10.40.0.3   master   <none>           <none>
vip4   1/1     Running   0          4m46s   10.40.0.1   master   <none>           <none>
Summary of Task 3
In task 3 we have seen that PODs are kept running on nodes, even if a label is removed from the node and the nodeSelector does not match anymore. Even if a container of the POD crashes or is killed, the container is restarted and the POD is still running on the node. Only, if the POD is deleted and re-created, it will enter the Pending status.
Summary
In this blog post, we have shown how to control, on which node a POD is running. For that, we have created PODs with a nodeSelector that matches only a single node.
We have shown, that a POD with a nodeSelector that does not match any node is kept Pending. As soon as a node shows up that has a matching label, the PODs are scheduled to run on the node.
We also have shown what happens to PODs, if labels are removed from a node. If the POD’s nodeSelector does not match the node’s labels anymore, the POD is kept running on the node, even if a container of the POD crashes.

Thanks for sharing. I read many of your blog posts, cool, your blog is very good.
Achieving a SY0-601 exam questions, specifically the SY0-601 exam, is a significant milestone for any IT professional looking to advance their career in cybersecurity. This comprehensive guide will delve into the most critical aspects of preparing for the CompTIA SY0-601 exam, with a particular focus on dumps questions and answers. We aim to provide an exhaustive resource that will help you confidently tackle the exam and secure your certification.
Your article helped me a lot, is there any more related content? Thanks!