In the previous ten blog posts about the Certified Kubernetes Administrator labs, we have learned a lot about the internals of Kubernetes. However, we have still not yet deployed an application that is reachable from the Internet. This will change today: with Kubernetes Services.
References
Step 0: Access the Kubernetes Playground
As always, we start by accessing the Katacode Kubernetes Playground. We press the launch.sh command and type the following command, so we can use auto-completion together with the predefined alias k for kubectl:
alias k=kubectl
source <(kubectl completion bash | sed 's/kubectl/k/g')
As an example, k g<tab> will be completed to k get. Also nice: k get pod <tab> will reveal the name of the POD(s).
Step 1: Create and scale a Deployment
Before we can expose an application to the Internet, we need to create an application. A convenient way to do so is to create a deployment. This time the creation of deployments is not in our focus, so we are creating and scaling the deployment via CLI (n real-world scenarios, you will be acting upon YAML files instead):
kubectl create deployment nginx --image=nginxdemos/hello
# output: deployment.apps/nginx created

kubectl scale deploy nginx --replicas=2
# output: deployment.extensions/nginx scaled
After a short time, the two PODs should be up and running:
kubectl get pods
NAME                    READY   STATUS    RESTARTS   AGE
nginx-dcf8cc94c-dqfs6   1/1     Running   0          14m
nginx-dcf8cc94c-kmkcz   1/1     Running   0          14m
Step 2: Expose a Service
We always recommend using YAML files instead of one-shot CLI commands. Let us create a service via CLI nevertheless. We will come back to YAML files later.
kubectl expose deploy nginx
error: couldn't find port via --port flag or introspection
See 'kubectl expose -h' for help and examples

kubectl expose deploy nginx --port 8080
service/nginx exposed
We can see, that for exposing the service, the container port the application is listening to needs to be specified.
Note: here, we have chosen the wrong port 8080 instead of 80 by purpose, for demonstrating something interesting later. Those of us, wo has played around with the Dockerfile EXPOSE directive might not be surprised by the outcome. Others might be.
Step 3: Review Service
The expose command has created a Kubernetes service, as can be seen here:
kubectl get svc
NAME         TYPE        CLUSTER-IP       EXTERNAL-IP   PORT(S)    AGE
kubernetes   ClusterIP   10.96.0.1        <none>        443/TCP    44m  #<-------- API
nginx        ClusterIP   10.109.160.117   <none>        8080/TCP   18m  #<-------- our service
Step 4: Review Endpoints
The service has created endpoint like follows:
kubectl get ep
NAME         ENDPOINTS                       AGE
kubernetes   172.17.0.12:6443                34m        #<-------- API
nginx        10.44.0.1:8080,10.44.0.2:8080   8m15s      #<-------- our service
Here, the 10 dot IP-Addresses are POD IP addresses, which are reachable from within the Kubernetes cluster.
Step 5: Access Endpoint
We now can access the NginX service.
Accessing the specified endpoints will fail, though:
curl 10.44.0.1:8080
curl: (7) Failed to connect to 10.44.0.1 port 8080: Connection refused
This is, because the NginX image is running on port 80, and not on port8080 we have specified above.
The application can still be reached, though, if we use the correct port:
curl 10.44.0.1:80
<!DOCTYPE html>
<html>
<head>
<title>Hello World</title>
...
Note: the endpoint can be reached, even if there is no service defined. Just try it out and delete the service with following commands (please adapt your POD IP address, though):
kubectl delete svc nginx                 #<--- delete service
curl 10.44.0.1
kubectl expose deploy nginx --port 8080  #<--- create the service again
The NginX service will still answer.
Step 6: Access the Service from inside the Cluster
In the previous step, we have directly connected to one of the two PODs. For that, a service is not needed at all. Let us now explore one of the features of the service: load balancing.
Try to access the Service configured with a wrong exposed port
Let us look at the service again and make a note of the ClusterIP:
kubectl get svc
NAME         TYPE        CLUSTER-IP       EXTERNAL-IP   PORT(S)    AGE
kubernetes   ClusterIP   10.96.0.1        <none>        443/TCP    44m  #<-------- API
nginx        ClusterIP   10.107.158.33   <none>        8080/TCP   18m  #<-------- our service, but wrong port?
In our case, the ClusterIP is 10.107.158.33. We can access the service from inside the cluster by accessing port 8080 of that IP address. However, if we try to access the ClusterIP with port 8080, there will be a timeout:
curl 10.107.158.33:8080
# outputL curl: (7) Failed to connect to 10.107.158.33 port 8080: Connection refused

curl 10.107.158.33:80
<system hangs for a long time here>
Access the Service configured with the correct port
Let us correct the port and try again:
kubectl delete svc nginx
# output: service "nginx" deleted

kubectl expose deploy nginx --port 80
# output: service/nginx exposed

kubectl get svc
NAME         TYPE        CLUSTER-IP       EXTERNAL-IP   PORT(S)   AGE
kubernetes   ClusterIP   10.96.0.1        <none>        443/TCP   26m
nginx        ClusterIP   10.104.170.234   <none>        80/TCP    5s

curl 10.104.170.234:80
# output:
<!DOCTYPE html>
<html>
<head>
<title>Hello World</title>
...
We have chosen a variant of the NginX image that displays the container ID and POD. If we repeat the curl command several times, we will see different Docker containers answering the request (answers indented)
curl -s 10.104.170.234:80 | grep Server <p><span>Server address:</span> <span>10.32.0.3:80</span></p> <p><span>Server name:</span> <span>nginx-dcf8cc94c-5xgmd</span></p> curl -s 10.104.170.234:80 | grep Server <p><span>Server address:</span> <span>10.32.0.2:80</span></p> <p><span>Server name:</span> <span>nginx-dcf8cc94c-whvnw</span></p> curl -s 10.104.170.234:80 | grep Server <p><span>Server address:</span> <span>10.32.0.2:80</span></p> <p><span>Server name:</span> <span>nginx-dcf8cc94c-whvnw</span></p> curl -s 10.104.170.234:80 | grep Server <p><span>Server address:</span> <span>10.32.0.3:80</span></p> <p><span>Server name:</span> <span>nginx-dcf8cc94c-5xgmd</span></p> curl -s 10.104.170.234:80 | grep Server <p><span>Server address:</span> <span>10.32.0.3:80</span></p> <p><span>Server name:</span> <span>nginx-dcf8cc94c-5xgmd</span></p> curl -s 10.104.170.234:80 | grep Server <p><span>Server address:</span> <span>10.32.0.2:80</span></p> <p><span>Server name:</span> <span>nginx-dcf8cc94c-whvnw</span></p>
Therefore, we can see the Kubernetes Server load balancer in action.
Step 7: Access the Service from outside the Cluster via NodePort
As we can deduce from the ClusterIP address (it is a private IP address starting with 10 in our case), the ClusterIP cannot be reached from the Internet. The easiest way to access the server from the Internet is to use a NodePort Service type instead of the default ClusterIP.
Step 7.1: Convert Service to Type NodePort
We edit the service and change the type:
k edit svc nginx
...
  type: NodePort   #<---- changed from ClusterIP to NodePort
Now we will see, that the type has changed, and a high 30000+ port is added:
k get svc
NAME         TYPE        CLUSTER-IP       EXTERNAL-IP   PORT(S)        AGE
kubernetes   ClusterIP   10.96.0.1        <none>        443/TCP        50m
nginx        NodePort    10.104.170.234   <none>        80:31857/TCP   23m
Step 7.2: Access the NodePort
The NodePort is a port that has been opened on all physical IP addressed of all nodes of the cluster. If one of the node’s IP address is reachable from the Internet, it can be reached from there. This is not so imple to simulate on Katacoda, so let us check the localhost on both, master and node:
master $ curl 127.0.0.1:31857

<!DOCTYPE html>
<html>
<head>
<title>Hello World</title>
...

node $ curl 127.0.0.1:31857

<!DOCTYPE html>
<html>
<head>
<title>Hello World</title>
...
Note: localhost instead of 127.0.0.1 does not work, since localhost is interpreted as the IPv6-type localhost and not IPv4-type localhost. However, our Kubernetes is not configured to support IPv6.
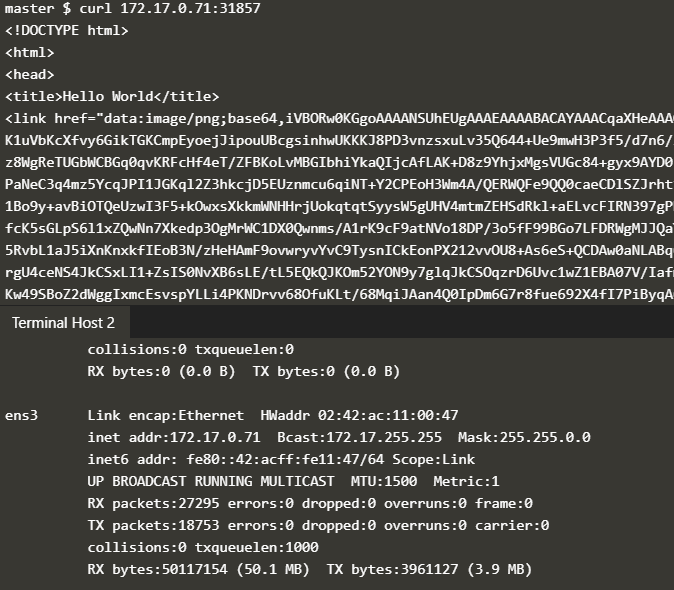
The ensX Interfaces on the Katacoda machines seem to come closest to a physical IP address. In the following screenshot, we see that the master can access the service on the node’s port 31857 of its ens3 Interface (and vice versa):
Note: a hello world scenario with NodePort accessed from the real Internet can be found here.
Note that in many scenarios, reverse proxies and/or external load balancers are needed to access the service. This will be handled in the next blog post.
Previous:
Next:
Kubernetes Ingress (Link to be provided. Meanwhile, check the main document instead)