This article will shed some light on how to create and use Kubernetes Persistent Volumes. We will learn how to create Kubernetes Persistent Volumes, change access modes, and add an abstraction layer called „Kubernetes Persistent Volume Claims“. We will understand Kubernetes storage objects and we will learn how applications access the storage.
Step 0: Preparation
Step 0.1: Access the Kubernetes Playground
As always, we start by accessing the Katacoda Kubernetes Playground.
Step 0.2 (optional): Configure auto-completion
The Katacoda Kubernetes Playground has defined the alias and auto-completion already. Only in case you are running your tests in another environment, we recommend to issue the following two commands:
alias k=kubectl
source <(kubectl completion bash)
However, even in case of the Katacoda Kubernetes Playground, auto-completion does not work for the alias k for yet. Therefore, we need to type the following command:
source <(kubectl completion bash | sed 's/kubectl/k/g')
Once this is done, k g<tab> will be auto-completed to k get and k get pod <tab> will reveal the name(s) of the available POD(s).
1. Container Volumes
Understand Kubernetes persistent volumes and know how to create them.
Helpful Links:
Step 1.1: Run NFS Server
In this step, we run an NFS server in a Docker container on node01. This way, we are fully independent of external resources.
# run on the master:
docker run -d --name nfs --privileged -p 111:111/udp -p 2049:2049/tcp -v $(pwd):/nfsshare -e SHARED_DIRECTORY=/nfsshare itsthenetwork/nfs-server-alpine:latest
Note: sometimes, you will see a message like
docker: Error response from daemon: driver failed programming external connectivity on endpoint nfs (9ef9351ff8cce7dbb60023a08fe41108bccd905533ab6f338e6101a40915f53b):  (iptables failed: iptables --wait -t filter -A DOCKER ! -i docker0 -o docker0 -p tcp -d 172.18.0.2 --dport 2049 -j ACCEPT: iptables: No chain/target/match by that name.
 (exit status 1)).
We have sent a note to Katacoda support about this. A workaround that often helps is to press „Continue“ and „Restart Scenario“ and to try again. If this does not work, you might want to start an NFS server using Kubernetes as shown here.
k apply -f https://gist.github.com/matthewpalmer/0f213028473546b14fd75b7ebf801115/raw/2c557c70696ca4406db53c955471de1d2d808e9a/nfs-server.yamlWe have not tested this yet, though. It will have an effect on the YAML of the next step, since the NFS server will not run on the master.
Step 1.2: Create POD with mounted NFS Volume
With the following code, we create a POD that will mount the NFS volume we have provisioned in a docker container on the master:
export MASTER_IP=$(k get nodes -o wide | grep master | awk '{print $6}')
cat <<'EOF' | envsubst | kubectl apply -f -
# Create a pod that reads and writes to the
# NFS server via an NFS volume.

kind: Pod
apiVersion: v1
metadata:
  name: pod-using-nfs
spec:
  # Add the server as an NFS volume for the pod
  volumes:
    - name: nfs-volume
      nfs:
        # URL for the NFS server
        server: $MASTER_IP
        path: /

  # In this container, we'll mount the NFS volume
  # and write the date to a file inside it.
  containers:
    - name: app
      image: alpine

      # Mount the NFS volume in the container
      volumeMounts:
        - name: nfs-volume
          mountPath: /var/nfs

      # Write to a file inside our NFS
      command: ["/bin/sh"]
      args: ["-c", "while true; do echo pod-using-nfs: $(date) >> /var/nfs/dates.txt; sleep 5; done"]
EOF
Now the master’s exported folder contains a file names dates.txt:
touch dates.txt && tail -f dates.txt

# output after 2 to 3 minutes:
pod-using-nfs: Thu Oct 17 18:24:32 UTC 2019
pod-using-nfs: Thu Oct 17 18:24:37 UTC 2019
pod-using-nfs: Thu Oct 17 18:24:42 UTC 2019
...
Stop the stream by pressing <CTRL> C.
Step 1.3 (optional) Locate the POD
See, on which node the POD is running on. Since the master is tainted, this should be node01:
k get pod -o wide

# output:
NAME            READY   STATUS    RESTARTS   AGE   IP          NODE     NOMINATED NODE   READINESS GATES
pod-using-nfs   1/1     Running   0          25m   10.44.0.1   node01   <none>           <none>
As expected, the POD is running on node01, since this is the only node that is not tainted.
Step 1.4 Run POD on another Node
We will now demonstrate that NFS volume is available from PODs on any node, we run a similar POD on the master. For that, we un-taint the master first:
k taint node master node-role.kubernetes.io/master-
node/master untainted
Then we run the POD and we specify that it should run on the master:
export MASTER_IP=$(k get nodes -o wide | grep master | awk '{print $6}')
cat <<'EOF' | envsubst | kubectl apply -f -
# Create a pod that reads and writes to the
# NFS server via an NFS volume.

kind: Pod
apiVersion: v1
metadata:
  name: pod-using-nfs-running-on-master
spec:
  # Add the server as an NFS volume for the pod
  volumes:
    - name: nfs-volume
      nfs:
        # URL for the NFS server
        server: $MASTER_IP
        path: /

  # In this container, we'll mount the NFS volume
  # and write the the name of the container to a file inside it.
  # we also make sure that the POD is running on another node as the other POD
  nodeSelector:
    kubernetes.io/hostname: "master"
  containers:
    - name: app
      image: alpine

      # Mount the NFS volume in the container
      volumeMounts:
        - name: nfs-volume
          mountPath: /var/nfs

      # Write to a file inside our NFS
      command: ["/bin/sh"]
      args: ["-c", "while true; do echo pod-using-nfs-running-on-master: $(date) >> /var/nfs/dates.txt; sleep 5; done"]
EOF
Now we can see, that both PODs are writing to the same file:
tail -f dates.txt

# output:
pod-using-nfs: Thu Oct 17 18:26:32 UTC 2019
pod-using-nfs: Thu Oct 17 18:26:37 UTC 2019
pod-using-nfs: Thu Oct 17 18:26:42 UTC 2019
pod-using-nfs-running-on-master: Thu Oct 17 18:26:50 UTC 2019
pod-using-nfs: Thu Oct 17 18:26:52 UTC 2019
pod-using-nfs-running-on-master: Thu Oct 17 18:26:55 UTC 2019
pod-using-nfs: Thu Oct 17 18:26:57 UTC 2019
pod-using-nfs-running-on-master: Thu Oct 17 18:27:00 UTC 2019
pod-using-nfs: Thu Oct 17 18:27:02 UTC 2019
The first POD running on node01 is writing the date to the file, while the second POD running on the master writes lines beginning with „pod-using-nfs-running-on-master“ on the same file.
We stop the stream with <CTRL> C again.
2. Kubernetes Persistent Volumes
2.1 Introduction to Persistent Volumes
Above, we have connected the NFS storage to the POD. For that, the POD needs to know about the internals of the storage, e.g. IP address and path of the volume:
# snippet of step 1.2:
...
  volumes:
    - name: nfs-volume
      nfs:
        # URL for the NFS server
        server: $MASTER_IP
        path: /
...
I.e., if the kubernetes administrator later decides to replace the NFS server, all existing PODs/Deployments/… need to be changed, Moreover, in many organizations, the Kubernetes Cluster administration is done by different persons and/or departments than the ones that control the contents of the Kubernetes POD/Deployment/… YAML files.
Does Kubernetes provide a way to circumvent those organizational problems? Yes, it does: it provides us with PersistentVolumes and PersistentVolumeClaims.
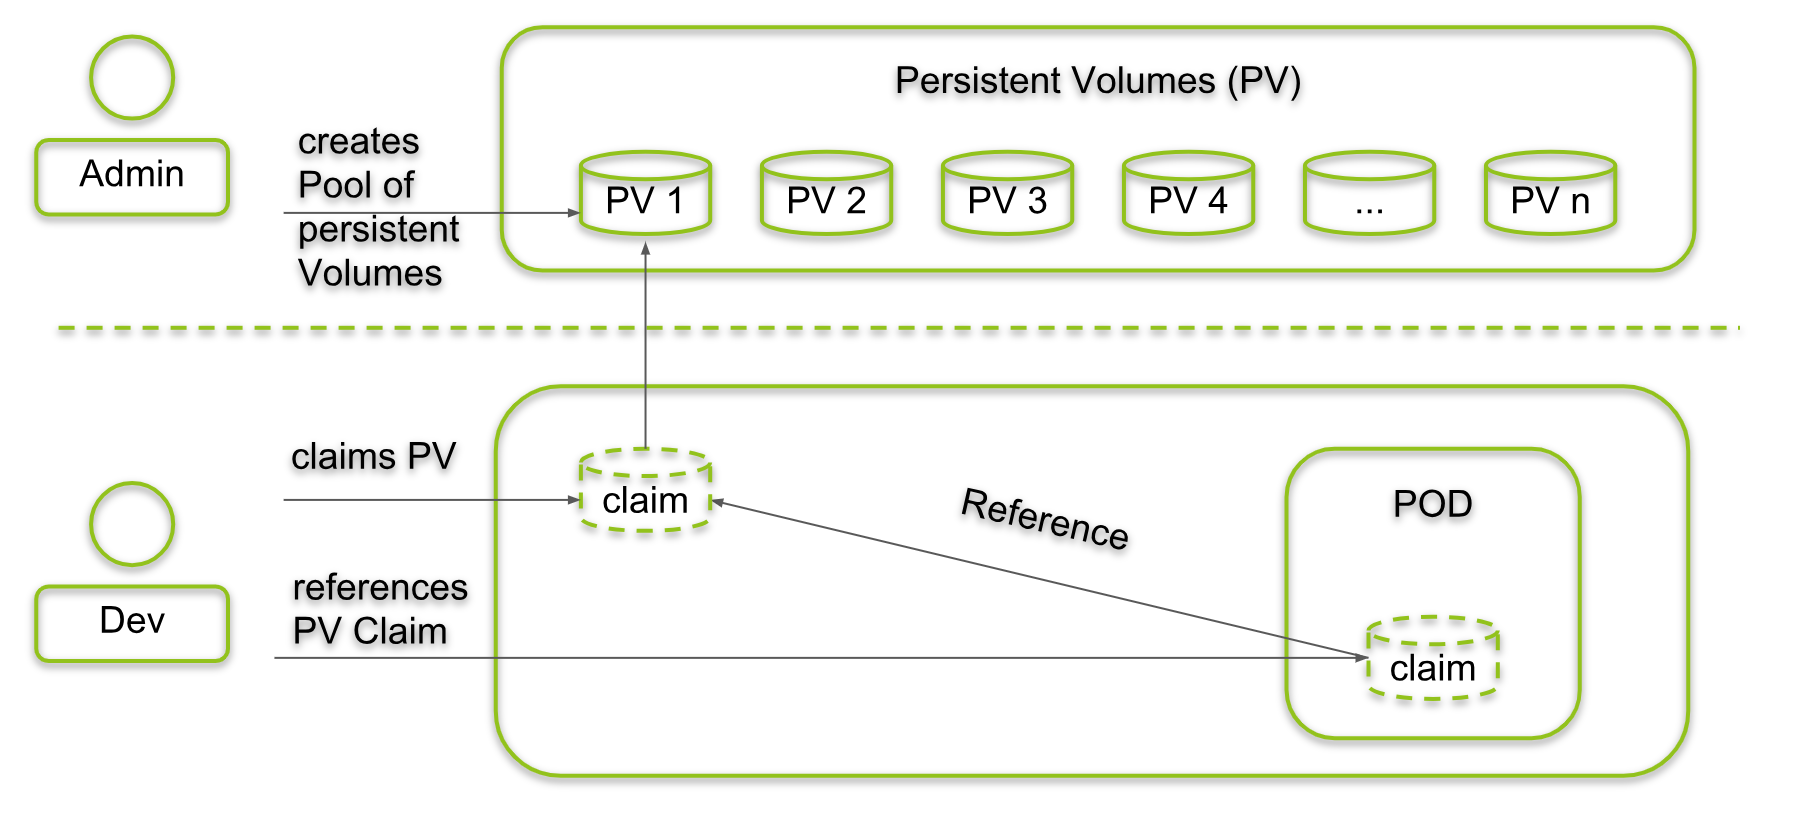
The developer will refer to a persistent volume claim that points to a persistent volume provided by the administrator. All technology internals are defined in persistent volumes. The developer does not need to care about them.
Step 2.2: Create Persistent Volume
In this chapter, we will create a Kubernetes persistent volume. All NFS-internals of the POD will be moved to the Persistent Volume:
MASTER_IP=$(k get nodes -o wide | grep master | awk '{print $6}')
cat <<EOF | kubectl apply -f -
---
apiVersion: v1
kind: PersistentVolume
metadata:
  name: nfs-persistent-volume
spec:
  capacity:
    storage: 1Gi
  volumeMode: Filesystem
  accessModes:
    - ReadWriteMany
    - ReadOnlyMany
  persistentVolumeReclaimPolicy: Retain
  nfs:
    path: /
    server: $MASTER_IP
EOF
Step 2.3: View the Status of the PersistentVolume
Let us view the PersistentVolume:
k get pv
NAME                    CAPACITY   ACCESS MODES   RECLAIM POLICY   STATUS      CLAIM   STORAGECLASS   REASON   AGE
nfs-persistent-volume   1Gi        RWX            Retain           Available                                   64s
We see, that it is still available to containers. However, before we attach a POD container to it, let us review the access modes first.
Step 2.4. Review Access Modes
Understand access modes for volumes.
Helpful Links:
There are three possible access modes:
- ReadWriteOnce (RWO) – a single container can read from, and write to the volume,
- ReadOnlyMany (ROX) – multiple containers can read from the volume,
- ReadWriteMany (RWX) – multiple containers can read from, and write to the volume
NFS supports all of those modes, and we have specified that the PersistentVolume can be mounted either in RWO mode or in RWX mode. It is up to the PersistentVolumeClaim, we will create soon, to choose among those options.
Note: Even though we have specified more than one possible access mode of the PersistentVolume, the PersistentVolume supports only one at a time. I.e., as long as a container has mounted the volume as ROX, no other container will be able to write to the volume.
Step 2.5. Review Reclaim Policies
In the PersistentVolume above, we also have defined the reclaim policy:
...
persistentVolumeReclaimPolicy: Retain
...
The possible reclaim policies are:
- Retain – volumes are kept until the administrator reclaims or deletes them
- Recycle – after volumes are not mounted anymore, they are swept clean (
rm -rf /thevolume/*) (supported only by NFS and HostPath, currently) - Delete – the associated cloud storage assets are deleted (supported only by AWS EBS, Azure Disk, GCE PD, or Cinder, currently)
In step 2.2, we had chosen „Retain“ as our reclaim policy.
3. Persistent Volume Claims
Understand persistent volume claims primitive.
Helpful Links
PODs cannot mount PersistentVolumes directly. Instead, they need to specify a Persistent Volume Claim, which binds to a PersistentVolume. Therefore, let us create such a Persistent Volume Claim:
Step 3.1 Create a Persistent Volume Claim
cat <<EOF | kubectl apply -f -
---
apiVersion: v1
kind: PersistentVolumeClaim
metadata:
  name: myclaim
spec:
  accessModes:
    - ReadWriteMany
  volumeMode: Filesystem
  resources:
    requests:
      storage: 1Gi
  storageClassName: ""
EOF
Even though the Claim is not used by any POD yet, the claim immediately binds to the PersistentVolume:
k get pvc -o wide
NAME      STATUS   VOLUME                  CAPACITY   ACCESS MODES   STORAGECLASS   AGE
myclaim   Bound    nfs-persistent-volume   1Gi        ROX,RWX                       8s


k get pv -o wide
NAME                    CAPACITY   ACCESS MODES   RECLAIM POLICY   STATUS   CLAIM             STORAGECLASS   REASON   AGE
nfs-persistent-volume   1Gi        ROX,RWX        Retain           Bound    default/myclaim                           4m1s
Step 3.2: Create a POD with Persistent Volume Claim
We now will re-write the POD definition of step 1.2 in a way to use a Persistent Volume Claim instead of specifying the volume technology and parameters directly:
cat <<'EOF' | kubectl apply -f -
# Create a pod that reads and writes to the
# NFS server via an NFS volume.

kind: Pod
apiVersion: v1
metadata:
  name: pod-using-pvc
spec:
  # Add the server as an NFS volume for the pod
#  volumes:
#    - name: nfs-volume
#      nfs:       <------------------ replaced by persistentVolumeClaim below
#        # URL for the NFS server
#        server: $MASTER_IP
#        path: /
  volumes:
    - name: pvc-volume
      persistentVolumeClaim: # <------ replaces nfs section
        claimName: myclaim
  # In this container, we'll mount the NFS volume
  # and write the date to a file inside it.
  containers:
    - name: app
      image: alpine

      # Mount the NFS volume in the container
      volumeMounts:
        - name: pvc-volume
          mountPath: /var/pvc

      # Write to a file inside our NFS
      command: ["/bin/sh"]
      args: ["-c", "while true; do echo pod-using-pvc: $(date) >> /var/pvc/dates.txt; sleep 5; done"]
EOF
As before, the POD container writes dates to the file:
tail -f dates.txt

# output:
tail -f dates.txt
pod-using-pvc: Thu Oct 17 18:19:25 UTC 2019
...
pod-using-pvc: Thu Oct 17 18:19:30 UTC 2019
...
pod-using-pvc: Thu Oct 17 18:19:35 UTC 2019
...
Step 3.3: Create a POD with the same PVC
Now, let us check, whether a Persistent Volume Claim can be used by more than one POD:
cat <<'EOF' | kubectl apply -f -
# Create a pod that reads and writes to the
# NFS server via an NFS volume.

kind: Pod
apiVersion: v1
metadata:
  name: pod-2-using-pvc
spec:
  # Add the server as an NFS volume for the pod
  volumes:
    - name: pvc-volume
      persistentVolumeClaim:
        claimName: myclaim
  # In this container, we'll mount the NFS volume
  # and write the date to a file inside it.
  containers:
    - name: app
      image: alpine

      # Mount the NFS volume in the container
      volumeMounts:
        - name: pvc-volume
          mountPath: /var/pvc

      # Write to a file inside our NFS
      command: ["/bin/sh"]
      args: ["-c", "while true; do echo pod-2-using-pvc: $(date) >> /var/pvc/dates.txt; sleep 5; done"]
EOF
We can see that two PODs can share the same Persistent Volume Claim. All PODs write to our single file:
tail -f dates.txt

# output:
pod-using-nfs-running-on-master: Thu Oct 17 19:14:10 UTC 2019
pod-using-nfs: Thu Oct 17 19:14:10 UTC 2019
pod-2-using-pvc: Thu Oct 17 19:14:12 UTC 2019
pod-using-pvc: Thu Oct 17 19:14:12 UTC 2019
pod-using-nfs-running-on-master: Thu Oct 17 19:14:15 UTC 2019
pod-using-nfs: Thu Oct 17 19:14:15 UTC 2019
pod-2-using-pvc: Thu Oct 17 19:14:17 UTC 2019
pod-using-pvc: Thu Oct 17 19:14:17 UTC 2019
pod-using-nfs-running-on-master: Thu Oct 17 19:14:20 UTC 2019
pod-using-nfs: Thu Oct 17 19:14:20 UTC 2019
pod-2-using-pvc: Thu Oct 17 19:14:22 UTC 2019
4. Storage Objects
Understand Storage Objects
Helpful Links:
Step 4.1 The „Storage Object in Use Protection“
According to the documentation, the deletion of an active Persistent Volume Claim will be postponed until it is not used anymore. This protects us to lose data, which is still actively be used.
Step 4.1.1 Delete actively used Persistent Volume Claim
According to the documentation, the deletion of an active Persistent Volume Claim will be postponed until it is not used anymore. Let us try so now:
k delete pvc myclaim
persistentvolumeclaim "myclaim" deleted
(here the console hangs. Let us stop this with <CTRL> C)
The Persistent Volume Claim is marked as „Terminating“:
k get pvc
NAME      STATUS        VOLUME                  CAPACITY   ACCESS MODES   STORAGECLASS   AGE
myclaim   Terminating   nfs-persistent-volume   1Gi        ROX,RWX                       19m
Step 4.1.2: Delete the PODs
Now let us delete all PODs using the „myclaim“ Persistent Volume Claim:
kubectl delete pods pod-2-using-pvc pod-using-pvc
pod "pod-2-using-pvc" deleted
pod "pod-using-pvc" deleted
Now the terminating persistent volume claim will be removed:
k get pvc
No resources found.
Step 4.1.3: View the Status of the Persistent Volume
The Persistent Volume the Persistent Volume Claim has pointed to is still present:
k get pv
NAME                    CAPACITY   ACCESS MODES   RECLAIM POLICY   STATUS     CLAIM             STORAGECLASS   REASON   AGE
nfs-persistent-volume   1Gi        ROX,RWX        Retain           Released   default/myclaim                           24m
It is marked as „Released„, though. This is because we had chosen the „retain“ reclaim policy for the Persistent Volume:
MASTER_IP=$(k get nodes -o wide | grep master | awk '{print $6}')
cat <<EOF | kubectl apply -f -
---
apiVersion: v1
kind: PersistentVolume
metadata:
  name: nfs-persistent-volume
spec:
  capacity:
    storage: 1Gi
  volumeMode: Filesystem
  accessModes:
    - ReadWriteMany
    - ReadOnlyMany
  persistentVolumeReclaimPolicy: Retain #<------ reclaim policy
  nfs:
    path: /
    server: $MASTER_IP
EOF
In this case, persistent volumes need to be manually handled. If the data thereon is still to be used, a new Persistent Volume Claim can be created.
Step 4.2 Dynamic Volume Provisioning
Helpful Links:
In this chapter, we will learn, how dynamic volume provisioning can make the life of Kubernetes admins easier.
Step 4.2.1: Launch the Portworx Kubernetes Playground
This time, we will start another Kubernetes Playground:
https://www.katacoda.com/portworx/scenarios/px-k8s-vol-basic
The reason why we cannot use the usual Kubernetes Playground is, that it does not provide us with a volume provisioner.
We first check that all four nodes of this playground are ready:
k get nodes
NAME      STATUS    ROLES     AGE       VERSION
master    Ready     master    2h        v1.11.0
node01    Ready     <none>    2h        v1.11.0
node02    Ready     <none>    2h        v1.11.0
node03    Ready     <none>    2h        v1.11.0
We then check that all three Portworx PODs are up and running:
kubectl get pods -n kube-system -l name=portworx -o wide
NAME             READY     STATUS    RESTARTS   AGE       IP            NODE
portworx-46pxd   1/1       Running   1          2h        172.17.0.20   node03
portworx-jh8tc   1/1       Running   0          2h        172.17.0.14   node02
portworx-k8w2d   1/1       Running   0          2h        172.17.0.12   node01
Step 4.2.2: Create StorageClass
StorageClass Objects with provisioner help with auto-creating Persistent Volumes on cloud infrastructure like AWS, GCE, Azure or DigitalOcean. Let us create such a StorageClass object. However, since the Katacoda environment has no access to cloud storage, we make use of the Portworx provisioner provided by the Katacoda Portworx playground:
cat <<EOF | k apply -f -
---
apiVersion: storage.k8s.io/v1
kind: StorageClass
metadata:
  name: my-storage-class
provisioner: kubernetes.io/portworx-volume
parameters:
  repl: "3"
  priority_io: "high"
EOF
Note: On GCE, a StorageClass object YAML would look like follows:
apiVersion: storage.k8s.io/v1
kind: StorageClass
metadata:
  name: ssd
provisioner: kubernetes.io/gce-pd
parameters:
  type: pd-ssd
We can review the result as follows:
k get sc
NAME                PROVISIONER                     AGE
my-storage-class    kubernetes.io/portworx-volume   6s
Step 4.2.3: Create Kubernetes Persistent Volume Claim
We can check, that no persistent volume and no persistent volume claim is created yet in namespace „default“:
k get pv
No resources found.

k get pvc
No resources found.
Now let us create a persistent volume claim:
cat <<EOF | k apply -f -
---
apiVersion: v1
kind: PersistentVolumeClaim
metadata:
  name: my-volume-claim
spec:
  storageClassName: my-storage-class
  resources:
    requests:
      storage: 100Mi
  accessModes:
  - ReadWriteOnce
EOF
Step 4.2.4: Check Kubernetes Persistent Volume
If you wait some seconds, the persistent volume claim, as well as a persistent volume, is available:
k get pvc
NAME              STATUS    VOLUME                                     CAPACITY   ACCESS MODES   STORAGECLASS       AGE
my-volume-claim   Bound     pvc-e5491be6-f68b-11e9-89a8-0242ac110012   1Gi        RWO            my-storage-class   14s

k get pv
NAME                                       CAPACITY   ACCESS MODES   RECLAIM POLICY   STATUS    CLAIM                     STORAGECLASS       REASON AGE
pvc-e5491be6-f68b-11e9-89a8-0242ac110012   1Gi        RWO            Delete           Bound     default/my-volume-claim   my-storage-class 10s
The administrator did not have to pre-create the Persistent Volume. It has been created automatically on the fly.
5. Applications with Storage
Know how to configure applications with persistent storage.
In this chapter, we will create an application deployment with persistent storage similar to how you would do it in a real-world scenario. Therefore, this chapter is more like „everything in a nutshell“.
Step 5.0: Access a Kubernetes Playground with Volume Provisioner
Like above, we access the Portworx Kubernetes Playground on
https://www.katacoda.com/portworx/scenarios/px-k8s-vol-basic
Step 5.1: Create a StorageClass Object
cat <<EOF | k apply -f -
---
apiVersion: storage.k8s.io/v1
kind: StorageClass
metadata:
  name: my-storage-class
provisioner: kubernetes.io/portworx-volume
parameters:
  repl: "3"
  priority_io: "high"
EOF
View the object:
k get sc
NAME                PROVISIONER                     AGE
my-storage-class    kubernetes.io/portworx-volume   5s
Step 5.2: Create a Kubernetes Persistent Volume Claim
Now let us create a persistent volume claim:
cat <<EOF | k apply -f -
---
apiVersion: v1
kind: PersistentVolumeClaim
metadata:
  name: my-volume-claim
spec:
  storageClassName: my-storage-class
  resources:
    requests:
      storage: 100Mi
  accessModes:
  - ReadWriteOnce
EOF
If you wait some seconds, the persistent volume claim, as well as a persistent volume, will be created:
k get pvc
NAME              STATUS    VOLUME                                     CAPACITY   ACCESS MODES   STORAGECLASS       AGE
my-volume-claim   Bound     pvc-e5491be6-f68b-11e9-89a8-0242ac110012   1Gi        RWO            my-storage-class   14s

k get pv
NAME                                       CAPACITY   ACCESS MODES   RECLAIM POLICY   STATUS    CLAIM                     STORAGECLASS       REASON AGE
pvc-e5491be6-f68b-11e9-89a8-0242ac110012   1Gi        RWO            Delete           Bound     default/my-volume-claim   my-storage-class 10s
Step 5.3: Create a Deployment
Now we create a Deployment making use of the persistent volume:
cat <<EOF | k apply -f -
---
apiVersion: apps/v1
kind: Deployment
metadata:
  name: my-persistent-deployment
spec:
  replicas: 1
  selector:
    matchLabels:
      app: my-persistent-deployment
  template:
    metadata:
      name: my-persistent-deployment
      labels:
        app: my-persistent-deployment
    spec:
      containers:
      - env:
        - name: app
          value: "1"
        image: ubuntu
        name: app
        volumeMounts:
        - mountPath: /persistent-data
          name: my-volume-data
        command: ["/bin/sh"]
        args: ["-c", "sleep 3600"]
      volumes:
      - name: my-volume-data
        persistentVolumeClaim:
          claimName: my-volume-claim

EOF
Let us view the details of the deployment:
k get deploy
NAME                       DESIRED   CURRENT   UP-TO-DATE   AVAILABLE   AGE
my-persistent-deployment   1         1         1            1           3m
Step 5.4: Connect to POD and create Data on Volume
Create a file on the volume by connecting to the POD and touching the file within the volume:
POD=$(k get pod | grep my-persistent-deployment | awk '{print $1}')
k exec -it $POD -- touch /persistent-data/myfile
As a comparison to permanent data, we also create some data outside of the persistent volume:
k exec -it $POD -- mkdir /ephemeral-data
k exec -it $POD -- touch /ephemeral-data/mysecondfile
Step 5.5: View Data
We now can view the created file, again by connecting to the POD:
k exec -it $POD -- ls /persistent-data
# output: myfile

k exec -it $POD -- ls /ephemeral-data
# output: mysecondfile
As long as the POD is running, there both files are visible to the POD.
Step 5.6: Delete POD and Check again
Now we will delete the POD.
k delete pod $POD
# output: pod "my-persistent-deployment-5f66774cbb-z6vww" deleted # name will differ in your case...
The deployment will make sure a new POD is started. Wait for the AVAILABLE number to be 1 again:
k get deploy
NAME                       DESIRED   CURRENT   UP-TO-DATE   AVAILABLE   AGE
my-persistent-deployment   1         1         1            1           6m
Now let us check the data again:
POD=$(k get pod | grep my-persistent-deployment | awk '{print $1}')

k exec -it $POD -- ls /persistent-data
# output: myfile
Now let us check the ephemeral data:
POD=$(k get pod | grep my-persistent-deployment | awk '{print $1}')

k exec -it $POD -- ls /ephemeral-data
# output: command terminated with exit code 2
As expected, the command has exited with a non-zero exit code. This is because the directory, we want to access does not exist. It was available in the now-deleted POD only.
On the other hand, the data on the Kubernetes Persistent Volume is still available:
POD=$(k get pod | grep my-persistent-deployment | awk '{print $1}')

k exec -it $POD -- ls /persistent-data
# output: myfile
Okay, this is not a surprise. Not losing any data is, what the Kubernetes Persistent Volumes is all about…