In this step by step tutorial, we will go through the process of creating a two-level automatic Table of Contents by adding Angular Typescript/javascript code.
We will perform following steps:
- We will discuss alternative solutions.
- We will start an Angular Docker Container.
- We will download a demo application with server-side rendering and WordPress REST API integration.
- Finally, we will enrich the Web page with a two-level table of contents using javascript methods.
In this blog post, we will we will concentrate on HTML and javascript, i.e. we will not care about styles of the table of contents. Moreover, the links to the headlines will be added later in part 2 of this little series.
Goal
The target of this exercise is to scan the content of a page for occurrences of headlines of level 1 and 2 (i.e. h1 and h2 elements)…
<h1>What is Angular?</h1>
<h1>Angular Hello World via Quickstart</h1>
<h2>Step 1: Start CentOS Container</h2>
… and to generate an unordered list of the headlines, e.g.
- What is Angular?
- Angular Hello World via Quickstart
- Step 1: Start CentOS Container
- …
In HTML, this is a unordered nested list like follows:
<ul>
    <li>
        What is Angular?
    </li>
    <li>
        Angular Hello World via Quickstart
        <ul>
            <li>
                Step 1: Start CentOS Container
            </li>
            <li>
                ...
            </li>
        </ul>
    </li>
</ul>
We will scan the document using the querySelectorAll("h1, h2") and we will create the unordered list with javascript functions like appendChild(document.createElement("ul")) and.appendChild(document.createElement("li"))
Step 0: Make a Decision: Integrating an existing Solution or Starting from Scratch?
I have been looking for a table of contents generator for angular. I have found following material:
- StackOverflow: directive code to create a TOC
- angular-toc, a git project to create a TOC, (see here a link to the corresponding library)
- A zip file containing TOC generating code
I guess any of those possibilities are fit to do, what we need, but since I am new to Angular, I have decided to create a TOC from scratch. Firstly, I will get more familiar with the Angular code, and secondly, I will have full control on the result. If you are familiar on how to integrate existing modules or directives, the links above might be a good alternative for you.
Step 1: Start the Base Project in a Docker Container
You are still reading? That means you have decided to create the table of contents from scratch without the help of any of the offered table of contents modules. Okay, let us start.
I have chosen to apply the needed changes to my Universal Base Project I have created in my previous blog post Angular 4: Boosting Performance through Server Side Rendering. For that we start an Angular Docker image and download the Universal Code from GIT:
(dockerhost)$ mkdir toc; cd toc
(dockerhost)$ docker run -it -p 8001:8000 -v $(pwd):/localdir oveits/angular_hello_world:centos bash
(container)# git clone https://github.com/oveits/ng-universal-demo
(container)# cd ng-universal-demo
My version of the ng-universal-demo has added a blog page that is automatically created from the contents of a WordPress blog post by downloading the information from WordPress‘ REST API.
Let us install the dependencies and start the server. The npm run watch command will make sure that the transpilation from typescript to javascript is automatically re-done, as soon as a file change is detected:
(container)# npm i
(container)# npm run watch &
(container)# npm run server
Note: if you need help with setting up a Docker host on a Windows system, you may want to check out Step 0 of this blog post (search for the term “Install a Docker Host”). There, we describe how to run an Ubuntu based Docker host inside a Virtualbox VM.
Step 2: Generate a private getToc Function
In this step, we create a private function that will return a table of contents from the string content in the argument. For that, we create a private function getToc within the BologView class we had created in my previous blog post:
src/app/+blog/blog.module.ts
export class BlogView implements OnInit {
  ...
  private getToc(content: any) {
     // add code here ...
  }
  ...
}
Step 2.1: Generate a DIV element
I have learned that Angular is using typescript and typescript is a super-set of javascript. So, why not starting with normal typescript code? I have tried following valid (I hope!) javascript code.
var div = document.createElement("div");
Even though it seemed to work, I have seen following error messages in my Universal project:
ERROR TypeError: this.html.charCodeAt is not a function
...
ERROR ReferenceError: document is not defined
Even though the TOC I had created with this command was visible in the browser, it did not show up in the HTML source. Therefore, I guess, the code is valid in the Browser, but it is not valid on the server, so server-side rendering does not take place. Therefore, I have replaced the line by:
![]() (as a screenshot, because WordPress gets confused by the embedded HTML content).
(as a screenshot, because WordPress gets confused by the embedded HTML content).
Note: that with angular.element, we see more serious errors than with document.createElement, as you will see below. Before long, we will revert back to the original code with document.createElement, in order to avoid major problems with server side rendering.
Step 2.2: Read in the Content to the DIV
In my case, the content has been read from a REST API as a string with HTML code inside:
content = "In this hello world style tutorial, we will follow a step by step guide..."
It is easy to read in the HTML code into the div:
div.innerHTML = content;
Step 2.3: Read the Headlines from the Content
Now, we would like to read all headlines level 1 and 2 from it. This can be done with the querySelectorAll function:
var myArrayOfNodes = [].slice.call(div.querySelectorAll("h1, h2"));I have cast it in an array of DOM nodes for easier manipulation.
Step 2.4: Create the Table of Contents
Now we create the table of contents:
var toc = document.createElement("ul");Step 2.5: For each Headline, create a List Item in the correct Level
There might more elegant solutions to solve this, but we can make sure that we are at the top level of list items by defining a target pointer that is reset to the top level if a level 1 headline is detected. If a level 2 headline is detected, and we are still at the top level, we will create a nested unordered list (UL) within the current list item (LI). Here, we repeat the commands of Step 2.1 to 2.4 in order to get the full picture:
private getToc(content: any) {
 // create div

 // read content into div:
 div.innerHTML = content;

 // create an array of headlines:
initialize table of contents (toc) and select all level 1 and 2 headers, reading them into an array:
 var myArrayOfNodes = [].slice.call(div.querySelectorAll("h1, h2"));

 //
 var toc = document.createElement("ul");
 var pointer = toc;
 var myArrayOfNodes = [].slice.call(div.querySelectorAll("h1, h2"));

 // loop through the array of headlines
 myArrayOfNodes.forEach(
     function(value, key, listObj) {
     console.log(value.tagName + ": " + value.innerHTML);

     // if we have detected a top level headline:
     if ( "H1" == value.tagName ) {
         // reset the pointer to top level:
         pointer = toc;
     }

     // if we are at top level and we have detected a headline level 2
     if ( "H2" == value.tagName && pointer == toc ) {
         // create a nested unordered list
         pointer = pointer.appendChild(document.createElement("ul"));
     }

     // for each headline, create a list item with the corresponding HTML content:
     var li = target.appendChild(document.createElement("li"));
     li.innerHTML = value.innerHTML;
     }

     // for debugging:
     console.log(toc.innerHTML);
 }

 return(
     toc.innerHTML
 );
}
// read content into div:
div.innerHTML = content;
// create an array of headlines:
initialize table of contents (toc) and select all level 1 and 2 headers, reading them into an array:
var myArrayOfNodes = [].slice.call(div.querySelectorAll("h1, h2"));
//
var toc = document.createElement("ul");
var pointer = toc;
var myArrayOfNodes = [].slice.call(div.querySelectorAll("h1, h2"));
// loop through the array of headlines
myArrayOfNodes.forEach(
function(value, key, listObj) {
console.log(value.tagName + ": " + value.innerHTML);
// if we have detected a top level headline:
if ( "H1" == value.tagName ) {
// reset the pointer to top level:
pointer = toc;
}
// if we are at top level and we have detected a headline level 2
if ( "H2" == value.tagName && pointer == toc ) {
// create a nested unordered list
pointer = pointer.appendChild(document.createElement("ul"));
}
// for each headline, create a list item with the corresponding HTML content:
var li = target.appendChild(document.createElement("li"));
li.innerHTML = value.innerHTML;
}
// for debugging:
console.log(toc.innerHTML);
}
return(
toc.innerHTML
);
}Note that we will replace the line
var div = document.createElement("div");soon, since it behaves better with server side rendering. See below.
Finally, we return the unordered nested list as a string by using the innerHTML function. We also could return the toc as DOM, but I have decided to return the innerHTML since this is the same format we get the title and the content from WordPress‘ REST API.
Step 3: Assign the Table of Contents to a Class Variable
Now, since we have defined a function that can create a table of contents from any HTML content, we need to make use of it. Remember from the last blog, that we had read the title and content from a blog into public class variables. We now add a variable named „toc“ and assign the result of getToc(content) to it. The changes are marked in blue.
export class BlogView implements OnInit {
 title: any = null;
 content: any = null;
 toc: any = null;

 constructor(private http: Http) {
 }

 ngOnInit(){
    this.getMyBlog();
 }

 private getMyBlog() {
     return this.http.get('https://public-api.wordpress.com/rest/v1.1/sites/vocon-it.com/posts/3078')
         .map((res: Response) => res.json())
         .subscribe(data => {
             this.title = data.title;
             this.content = data.content;
             this.toc = this.getToc(data.content);
         console.log(data);
     });
 }
The only new line (in blue) it the one, where we write the table of contents into a public variable named toc.
Step 4: Place the Table of Contents in the HTML Template
Last but not least, we want to make the table of contents visible by adding it to the HTML template.
src/app/+blog/blog.module.html
![]()
Here, we have added the second line. We now can see, why we have returned the table of contents as String: this way we are able to handle the toc variable as if it was just another element returned from the WordPress REST API, all of which are HTML content in string format.
Step 5: Check the Results
Finally, it is time to open a Browser, point it to localhost:8001 (since we have chosen port 8001 in step 1 above) and check the results:
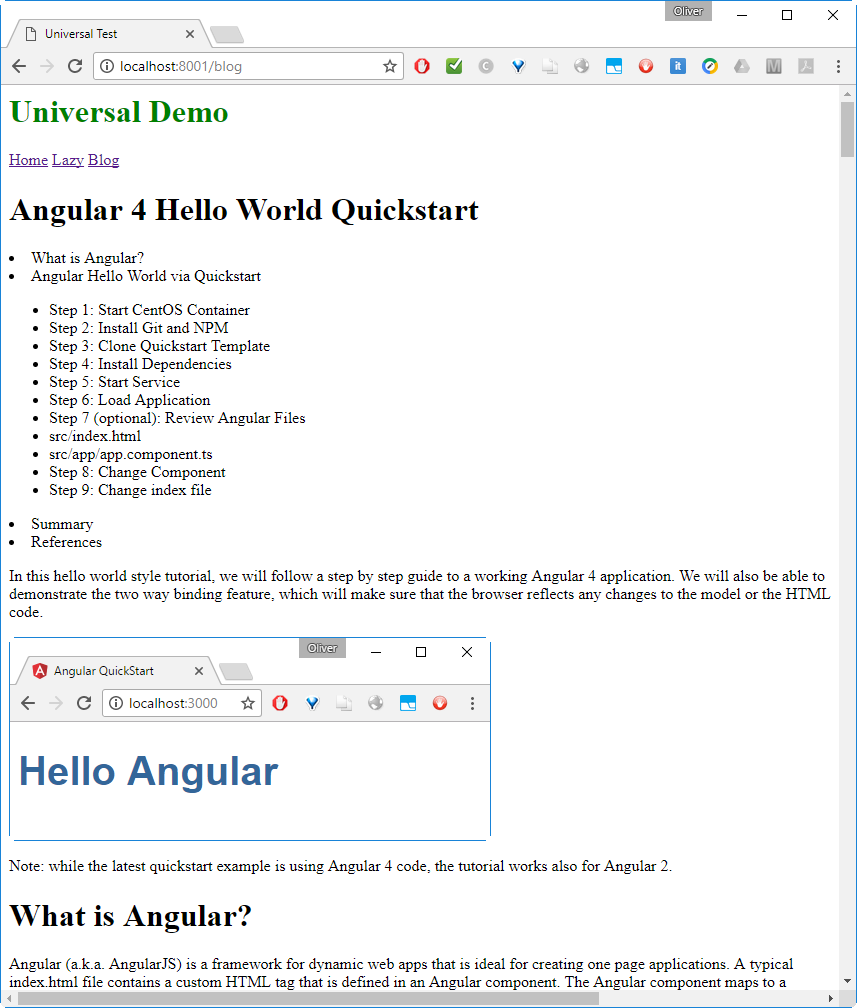
We can see that the unordered list shows up between title and content the way expected.
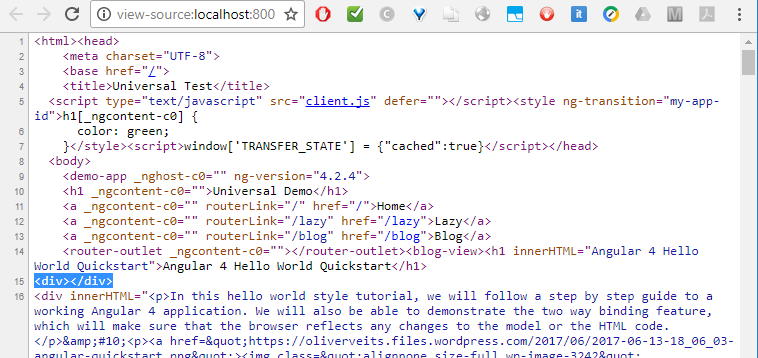
But does it play well with server-side rendering? Let us check:

No, it does not. The whole HTML content is missing.
🙁
I could partially remedy the problem by changing back the line
![]()
which is causing an error „window is not defined“
by
var div = document.createElement("div");which is causing the error „ERROR TypeError: this.html.charCodeAt is not a function“.
However, the latter error is better in the sense that title and content are shown as HTML source code again:
The table of contents still does not show up as HTML source code, but title and content are back. However, the table of contents is visible in the browser, which is more important than showing it in the source code:
And this is as good as we can get for today. We will accept the …
Caveat
Table of contents is not shown in the HTML source code.
Workaround: in getToc, analyze the input HTML content string without converting it to a DOM object and create the output table of contents using string functions only. However, this approach is error-prone and tedious, so I have decided to live with the error messages and the fact that the table of contents does not show up as source HTML code.
Summary
Based on an example with server-side rendering and content retrieved via the WordPress REST API, we have performed following steps:
- We have shown how to create a private getToc function that will create a table of contents from the web page.
- We have shown how to analyze the document.
- We have created a nested two-level table of contents from the list of headlines of the document.
The generic javascript functions we have used do not play well with node.js that is used in case of server-side rendering. However, the table of contents shows up in the browser so the solution will be fit for pure client-side rendering. Moreover, we have suggested a workaround that even will work in a situation with server-side rendering: create the table of contents as an explicit string containing HTML code.
Note: The resulting code can be cloned via
git clone https://github.com/oveits/ng-universal-demo; cd ng-universal-demo
git checkout 8b3948a8 # to be sure to be at the same status of the repo as described in the blog