This Angular ngrx/store tutorial will guide you through the steps of creating a hello world program using ngrx/store. After a brief motivation paragraph, we will learn how to use actions and reducers to manipulate stored states. A few unit tests will help to understand what is happening under the hood. Finally, we will briefly introduce some tools that help debug the state.
Tested with Angular 13.2.
TLDR;
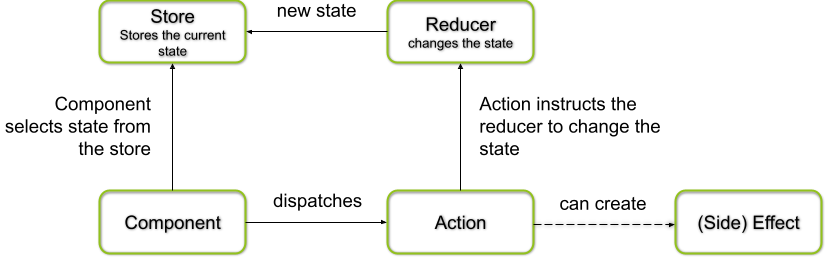
Ngrx/store helps to keep data views to be consistent at all times by saving a slice of relevant data in the browser.
A component can read (select) the state from the store. It also can dispatch an action for changing the state with the help of a reducer function.
Functionality:
- Read state from the store:
this.heroes = this.store.select("heroes") - Actions: are entities with at string type telling, what their purpose is
class AddHero implements Action { type: string = 'ADD_HERO' constructor(public heroToBeAdded: Hero) { } } class RemoveHero implements Action { type: string = 'REMOVE_HERO' constructor(public indexOfHeroToBeRemoved: number) { } } - Change state in store:
- add a hero:
this.store.dispatch(new AddHero(...)) - remove a hero:
this.store.dispatch(new RemoveHero(...))
- add a hero:
- Reducer: is a function that takes the state and an action and calculates the new state from it:
export function heroReducer (state : Hero[] = [], action: Action): Hero[] {
  switch(action.type) {
    case ADD_HERO:
      return [...state, (action as AddHero).heroToBeAdded]
    case REMOVE_HERO:
      const newState = [...state]
      newState.splice((action as RemoveHero).indexOfHeroToBeRemoved,1)
      return newState
    case INIT:
      // return [] or:
      return [{name: "My Initial Hero", description: "This is my Initial Hero"}]
    default:
      throw Error(`The action type "${action.type}" is not implemented`)
  }
}
References
- The corresponding GIT Repository can be found on https://github.com/vocon-it/ngrx-store-hello-world
Why use ngrx/store? The Facebook Bug
Facebook had to learn the hard way how difficult it is to provide customers with something as simple as a
- a list of message titles
- the content of the selected message, and
- and the number of unread messages
consistently displayed on a single page.
Once the customer clicks on an unread message title, the message is displayed at the message content pane. The user expects the number of unread messages to immediately decrease by one. However, in most cases, this was not the case. The reason was that the number of unread messages was not calculated locally. Instead, the number was retrieved from a backend service located in the data center, which can cause a delay.
A sustainable solution was only achieved when Facebook moved the aggregation of customer data from the data centers to the browser. This required that the data relevant to the user (the „state“) was loaded into a data store in the browser. The ngrx/store was born.
Once the user data was available in the browser, it was much easier to provide the user with a consistent view of his data: the delay between user-induced data change and the display of the correct aggregation of this data is minimized. The browser can calculate the aggregated data without the need to wait for a server response.
Now let us create a simple example.
Step 0 (optional): Start Angular Desktop in the Cloud
If you need a development environment, you can connect to our Developer’s Cloud Desktop. Simply click on the image below and launch the environment by clicking on the WebStorm Cloud Desktop button (bring your own license or get a free 30-day trial from JetBrains):

Alternatively, you also can choose VS Code as your editor.
You can increase the resolution by clicking on the Display icon in the desktop:
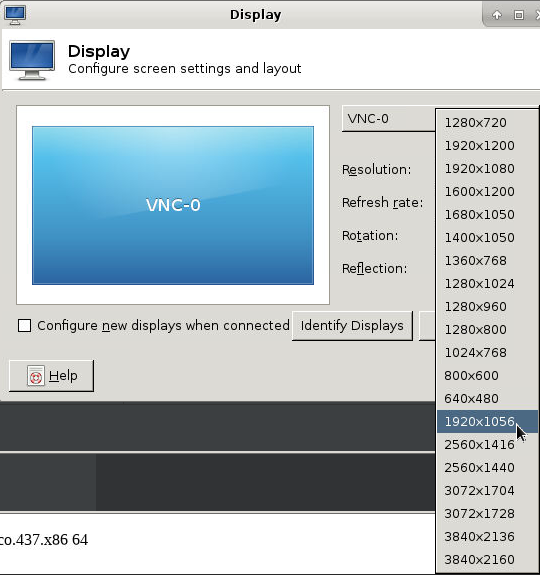
If you are running your development environment on a Full HD screen, we recommend 1920×1056 and running your browser in full-screen mode. This will avoid the need for scrollbars.
Step 1: (Re-) Install Angular
A relatively old version of angular is installed in the Developer’s Cloud Desktop, currently. The easiest way to upgrade it is to re-install it. For that, open a terminal and issue the following two commands:
npm remove -g @angular/cli
npm install -g @angular/cli
We can check the version with the ng version command:

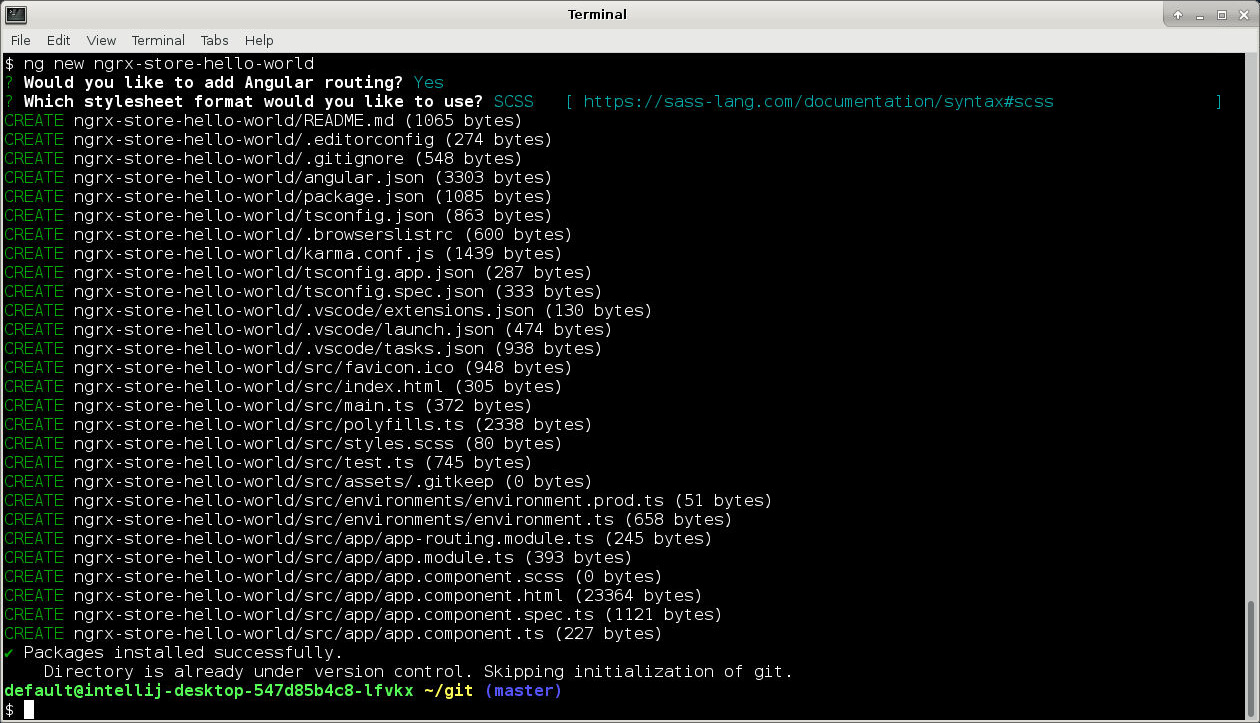
Step 2: Create a Hello World Project
Let us now create a new hello world project
ng new ngrx-store-hello-world
You are asked some questions. In my case, I have chosen Angular routing: Yes and stylesheet format: SCSS. However, in this Hello World program, we will not manipulate CSS anyway.
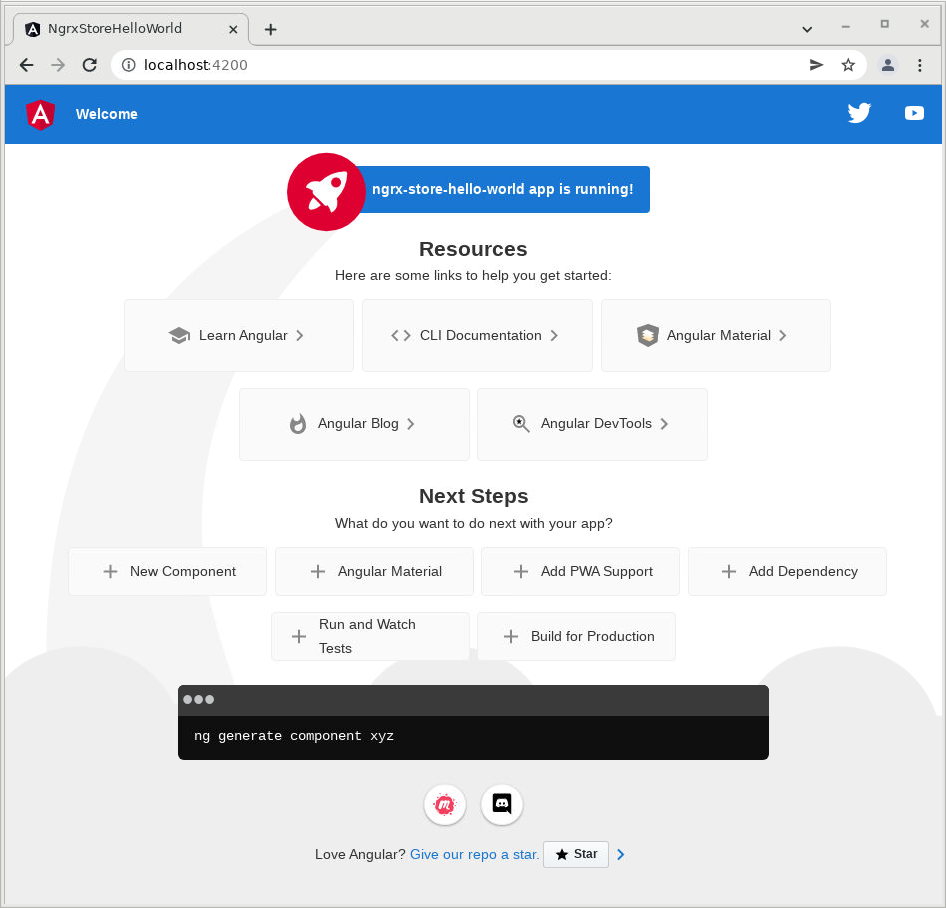
Let us enter the newly-created directory and start the server:
cd ngrx-store-hello-world
ng serve
We now can connect to the server by opening http://localhost:4200 in a browser on the developer’s cloud desktop:
Step 3: Create a Model
For a better organization of our models, we create a models folder inside the src/app folder:
mkdir src/app/heroes/models
We can generate a stub with the ng generate command:
(cd src/app/heroes/models; ng generate interface hero)
This will generate a file named hero.ts. We add the two blue lines to the interface:
export interface Hero {
  name: string;
  description: string;
}
A note to the Developer’s Cloud Desktop users: if you wish, you now can start working with WebStorm or Visual Studio Code. Both programs are installed on the cloud desktop.
Just find the icons on the desktop and double-click them:

Step 4: Install Angular ngrx/store
Now let us install NGRX Store and save it to package.json:
npm i @ngrx/store --save
Step 5: Create Actions for adding and removing a Hero
Actions are objects used by NGRX/Store to manipulate the stored state. Let us now create two kinds of actions: one kind for adding a hero, and another kind for removing a hero. We start by generating a class:
mkdir -p src/app/heroes/actions
(cd src/app/heroes/actions; ng generate class hero-action)
Now we replace the contents of the hero-actions.ts file by:
// hero-actions.ts
import {Action} from "@ngrx/store";
import {Hero} from "../models/hero";

export const ADD_HERO = 'ADD_HERO';

export class AddHero implements Action {
  type: string = ADD_HERO

  constructor(public heroToBeAdded: Hero) {
  }
}

export const REMOVE_HERO = 'REMOVE_HERO';

export class RemoveHero implements Action {
  type: string = REMOVE_HERO

  constructor(public indexOfHeroToBeRemoved: number) {
  }
}
Here, we have replaced the HeroActions Class by two Classes AddHero and RemoveHero that implement NGRX Actions. The type string of each Action tells us, what the action is doing.
In our case, the AddHero Action expects a Hero as a constructor payload, while the RemoveHero Action expects an index number.
Since the class HeroActions does not exist anymore, we also need to adapt the corresponding spec file:
// hero-actions.spec.ts
import {AddHero, RemoveHero} from './hero-action';

describe('Action', () => {
  it('should create an AddHero Action', () => {
    expect(new AddHero({name: 'TheHolyTester', description: 'This is the Holy Tester'}) ).toBeTruthy();
  });
  it('should create a RemoveHero Action', () => {
    expect(new RemoveHero(1) ).toBeTruthy();
  });
});
Step 6: Create a Reducer for Adding a Hero
A reducer changes the current state by applying an action. E.g. an action of type ADD_HERO will add a hero to the current state.
// in pseudo code:
newState = reducer(oldState, action)
The reducer takes the current state and the action and creates a new current state from it.
Now let us create a simple reducer that is able to add a hero:
mkdir -p src/app/heroes/reducers; touch src/app/heroes/reducers/hero-reducer.ts
Inside the newly created folder, we create a file hero-reducer.ts:
// hero-reducer.ts
import { Hero } from "../models/hero";
import { AddHero } from "../actions/hero-action";

export function heroReducer (state: Hero[] = [], action: AddHero) {
   return [...state, AddHero.payload]
}
The state initializes with an empty list of Heroes. If an action AddHero is called, the function will return a new state with the new hero added to the list.
Step 7: Adapt the Reducer for Removing a Hero
We expect that the AddHero adds a hero and that the RemoveHero action removes a hero from the state. Therefore we add a switch statement, check for the action type, and perform the corresponding actions:
import {Hero} from "../models/hero";
import {ADD_HERO, AddHero, REMOVE_HERO, RemoveHero} from "../actions/hero-action";

export function heroReducer (state: Hero[] = [], action: AddHero|RemoveHero) {
  switch(action.type) {
    case ADD_HERO:
      return [...state, (action as AddHero).addedHero]  // add a hero
    case REMOVE_HERO:
      const newState = [...state]
      newState.splice((action as RemoveHero).indexOfRemovedHero,1) // remove a hero
      return newState
    default:
      // return state
      // or for learning what happens under the hood:
      throw Error(`The action type "${action.type}" is not implemented`)
  }
}
As before, in the case of an ADD_HERO Type, we return the state enriched with the new hero. However, in the case of a REMOVE_HERO type, we return a copy of the state with the hero removed.
Note: if you try to splice the state itself, you will get following error message because state is immutable:
// state.splice(0,1) creates following error message:
TypeError: Cannot delete property '0' of [object Array] at Array.splice (<anonymous>)
As found in many other tutorials, we could allow to call the reducer function with any other action type in the default case and return the unaltered state. However, we are here for learning. Let us choose to throw an error for unknown action types. We will see in the following step, what we can learn from that.
Step 8 (optional): Create a Unit Test for the Reducer
We now can add a file for unit testing the reducer function:
touch src/app/heroes/reducers/hero-reducer.spec.ts
Let us add the following content:
// hero-reducer.spec.ts
import { heroReducer } from "./hero-reducer";
import { AddHero, RemoveHero } from "../actions/hero-action";
import { Hero } from "../models/hero";


describe('HeroReducer', () => {
  let initialState: Hero[]
  beforeEach(() => {
    initialState = [
      {name: 'FirstHero', description: 'This is the first hero' },
      {name: 'SecondHero', description: 'This is the second hero' },
      {name: 'ThirdHero', description: 'This is the third hero' }
    ]
  })

  it('called with AddHero action should return a state with the added hero', () =>
    {
      const addedHero = {name: 'AddedHero', description: 'This is the added hero' }
      const expectedState = [...initialState, addedHero]
      expect(heroReducer(initialState, new AddHero(addedHero)))
        .toEqual(expectedState)
    }
  )

  it('called with RemoveHero action should return a state with the correct hero deleted', () =>
    {
      const indexOfTheHeroToBeRemoved = 1
      const expectedState = [
        {name: 'FirstHero', description: 'This is the first hero' },
        {name: 'ThirdHero', description: 'This is the third hero' }
      ]

      expect(heroReducer(initialState, new RemoveHero(indexOfTheHeroToBeRemoved))).toEqual(expectedState)
    }
  )
})
Here, the beforeEach step defines the initial state for the two tests, while the first test calls the reducer function with the AddHero action and it expects the new hero to be appended to the list. In the second test, the RemoveHero action will delete the second hero from the initial hero list.
Step 9: Declare StoreModule in the apps Module
Now let us declare the StoreModule in the app module:
import {StoreModule} from "@ngrx/store";
import {heroReducer} from "./heroes/reducers/hero-reducer";

@NgModule({
  declarations: [
    AppComponent
  ],
  imports: [
    BrowserModule,
    AppRoutingModule,
    StoreModule.forRoot(
      { heroes: heroReducer }
    )
  ],
  providers: [],
  bootstrap: [AppComponent]
})
export class AppModule { }
Note: If you encounter an error message later on that starts like follows then it is most likely that the import is missing in the app modules file or in the Testbed declaration:
ERROR NullInjectorError: R3InjectorError(AppModule)[Store -> Store -> Store]:
  NullInjectorError: No provider for Store!
    at NullInjector.get (:4200/vendor.js:25309)
    ...
Note that we still will get the following error message, if we try to run the server with npm run start:
Error: The action type "@ngrx/store/init" is not implemented at heroReducer
This is the error message we have implemented in step 7 above. We can see, that the Store is initialized by calling the heroReducer with the special type string "@ngrx/store/init".
There are two possible solutions for this: the first quick&dirty solution is to return the original state in the default switch case in the heroReducer:
...
    default:
      // removed: throw Error(`The action type "${action.type}" is not implemented`)
      return state
...
A second solution better shows what happens under the hood: When the application is started, the state is initialized by calling the heroReducer (as defined in the app.modules.ts file) with the default INIT value @ngrx/store/init as defined in the @ngrx/store import. In this case, the reducer returns the initial state. This could be an empty list of heroes. However, we chose to populate the initial state with a single hero:
import {Hero} from "../models/hero";
import {ADD_HERO, AddHero, REMOVE_HERO, RemoveHero} from "../actions/hero-action";
import {Action, INIT} from "@ngrx/store";

const initialState : Hero[] = [{
  name: "My Initial Hero",
  description: "This is my Initial Hero"
}]

export function heroReducer (state : Hero[] = [], action: Action): Hero[] {
  switch(action.type) {
    case ADD_HERO:
      return [...state, (action as AddHero).addedHero]
    case REMOVE_HERO:
      const newState = [...state]
      newState.splice((action as RemoveHero).indexOfRemovedHero,1) // remove a hero
      return newState
    case INIT:
      return initialState
    default:
      throw Error(`The action type "${action.type}" is not implemented`)
  }
}
In addition, we generalize the action parameter to be of type Action. Now, the applications start correctly again.
Note: we had
Note: the initial value
Hero[] = []is required to avoid the following error message even though the initialization value might be never used:Error: src/app/app.module.ts:21:9 - error TS2322: Type '(state: Hero[], action: Action) => Hero[]' is not assignable to type 'ActionReducer<Hero[], Action>'. Types of parameters 'state' and 'state' are incompatible. Type 'Hero[] | undefined' is not assignable to type 'Hero[]'. Type 'undefined' is not assignable to type 'Hero[]'. 21 { heroes: heroReducer } ~~~~~~It looks like the reducer functions specified in the
app.modules.tsfile are not allowed to accept unknown states without initializing them.
Step 10: Create an Application State
Let us now create an application state. This is needed as a prerequisite for creating a component that makes use of the state. In our case, the application state consists of a list of heroes:
// src/app/app.state.ts
import {Hero} from "./heroes/models/hero";

export interface AppState {
  readonly heroes: Hero[];
}
Note that the application state can be extended any time by adding more than one
readonlyparameters.
Step 11: Create a ReadDelete Component
Step 11.1 Create Component
We still have not seen anything on the HTML page. It is still the default Angular page. This will change now.
We create a component that will allow seeing existing heroes and later on, we will also allow deleting heroes on the same page:
mkdir -p src/app/heroes/components;
(cd src/app/heroes/components; ng generate component readDelete)
This will create the following file:
// src/app/heroes/components/read-delete.component.ts
import { Component, OnInit } from '@angular/core';

@Component({
  selector: 'app-read-delete',
  templateUrl: './read-delete.component.html',
  styleUrls: ['./read-delete.component.scss']
})
export class ReadDeleteComponent implements OnInit {

  constructor() { }

  ngOnInit(): void {
  }

}
Step 11.2 Adapt the HTML Template
We define the HTML template like follows:
<!--read-delete.component.html-->

<div class="right" *ngIf="heroes">

  <h3>Heroes</h3>
  <ul>
    <li *ngFor="let hero of heroes | async">
    {{ hero.name }}:  {{ hero.description }}
    </li>
  </ul>

</div>
Step 11.3 Integrate Component to the app Component Template
We replace the content of the app.component.html file with a single line:
<app-read-delete></app-read-delete>
Step 11.4 Start the Application
With that, the list of heros can be seen, when we connect to the service. We start the service with
npm run start
and on http://localhost:4200 we see:
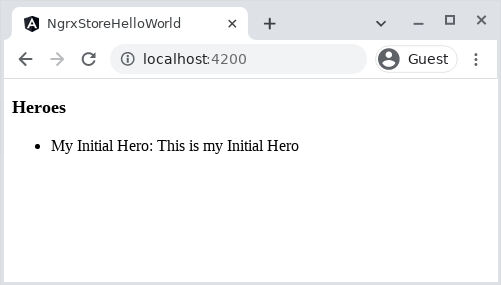
Okay, in your case, the list might be empty. For not seeing an empty list, we have initialized the hero-reducer with an initial hero like follows:
// hero-reducer.ts
import {Hero} from "../models/hero";
import {ADD_HERO, AddHero, REMOVE_HERO, RemoveHero} from "../actions/hero-action";
import {Action, INIT} from "@ngrx/store";

const initialState : Hero[] = [{
  name: "My Initial Hero",
  description: "This is my Initial Hero"
}]

export function heroReducer (state : Hero[] = initialState, action: Action): Hero[] {
  switch(action.type) {
    case ADD_HERO:
      return [...state, (action as AddHero).addedHero]
    case REMOVE_HERO:
      const newState = [...state]
      newState.splice((action as RemoveHero).indexOfRemovedHero,1) // remove a hero
      return newState
    case INIT:
      return state
    default:
      throw Error(`The action type "${action.type}" is not implemented`)
  }
}
Step 11.5 (optional): Fix the Unit Tests
app.component.spec.ts
Before:
import { TestBed } from '@angular/core/testing';
import { RouterTestingModule } from '@angular/router/testing';
import { AppComponent } from './app.component';

describe('AppComponent', () => {
  beforeEach(async () => {
    await TestBed.configureTestingModule({
      imports: [
        RouterTestingModule
      ],
      declarations: [
        AppComponent
      ],
    }).compileComponents();
  });

  it('should create the app', () => {
    const fixture = TestBed.createComponent(AppComponent);
    const app = fixture.componentInstance;
    expect(app).toBeTruthy();
  });

  it(`should have as title 'ngrx-store-hello-world'`, () => {
    const fixture = TestBed.createComponent(AppComponent);
    const app = fixture.componentInstance;
    expect(app.title).toEqual('ngrx-store-hello-world');
  });

  it('should render title', () => {
    const fixture = TestBed.createComponent(AppComponent);
    fixture.detectChanges();
    const compiled = fixture.nativeElement as HTMLElement;
    expect(compiled.querySelector('.content span')?.textContent).toContain('ngrx-store-hello-world app is running!');
  });
});
The last line expect-line can be replaced by:
expect(compiled.querySelector('h1')?.textContent).toEqual('Hello NGRX/Store');if we also add a title to our application like follows:
<!--app.component.html-->
<h1>Hello NGRX/Store!</h1>
<app-create></app-create>
read.component.spec.ts
You will see that the automatically added unit tests now fail:
$ npm run test
	NullInjectorError: R3InjectorError(DynamicTestModule)[Store -> Store]:
	  NullInjectorError: No provider for Store!
	error properties: Object({ ngTempTokenPath: null, ngTokenPath: [ 'Store', 'Store' ] })
	NullInjectorError: R3InjectorError(DynamicTestModule)[Store -> Store]:
	  NullInjectorError: No provider for Store!
	    at NullInjector.get (node_modules/@angular/core/fesm2015/core.mjs:11120:1)
	    at R3Injector.get (node_modules/@angular/core/fesm2015/core.mjs:11287:1)
	    at R3Injector.get (node_modules/@angular/core/fesm2015/core.mjs:11287:1)
	    at NgModuleRef.get (node_modules/@angular/core/fesm2015/core.mjs:21828:1)
	    at Object.get (node_modules/@angular/core/fesm2015/core.mjs:21505:1)
	    at lookupTokenUsingModuleInjector (node_modules/@angular/core/fesm2015/core.mjs:3358:1)
	    at getOrCreateInjectable (node_modules/@angular/core/fesm2015/core.mjs:3470:1)
	    at ??directiveInject (node_modules/@angular/core/fesm2015/core.mjs:14396:1)
	    at NodeInjectorFactory.ReadDeleteComponent_Factory [as factory] (ng:///ReadDeleteComponent/?fac.js:4:47)
	    at getNodeInjectable (node_modules/@angular/core/fesm2015/core.mjs:3565:1)
	Error: Expected undefined to be truthy.
	    at
	    at UserContext. (src/app/heroes/components/read-delete/read-delete.component.spec.ts:23:23)
	    at ZoneDelegate.invoke (node_modules/zone.js/fesm2015/zone.js:372:1)
	    at ProxyZoneSpec.onInvoke (node_modules/zone.js/fesm2015/zone-testing.js:287:1)
The reason for this is that the spec file does not know the store. We need to import it to the testbed the same way as we did in the app modules file:
import { ComponentFixture, TestBed } from '@angular/core/testing';

import { CreateComponent } from './create.component';
import {StoreModule} from "@ngrx/store";
import {heroReducer} from "../../reducers/hero-reducer";

describe('CreateComponent', () => {
  let component: CreateComponent;
  let fixture: ComponentFixture<CreateComponent>;

  beforeEach(async () => {
    await TestBed.configureTestingModule({
      imports: [StoreModule.forRoot(
        { heroes: heroReducer }
      )],
      declarations: [ CreateComponent ]
    })
    .compileComponents();
  });

  beforeEach(() => {
    fixture = TestBed.createComponent(CreateComponent);
    component = fixture.componentInstance;
    fixture.detectChanges();
  });

  it('should create', () => {
    expect(component).toBeTruthy();
  });
});
Alternatively, we can provide a store mock:
import { ComponentFixture, TestBed } from '@angular/core/testing';

import { ReadDeleteComponent } from './read-delete.component';
import {provideMockStore} from "@ngrx/store/testing";

describe('ReadDeleteComponent', () => {
  let component: ReadDeleteComponent;
  let fixture: ComponentFixture<ReadDeleteComponent>;

  beforeEach(async () => {
    await TestBed.configureTestingModule({
      providers: [provideMockStore({})],
      declarations: [ ReadDeleteComponent ]
    })
    .compileComponents();
  });

  beforeEach(() => {
    fixture = TestBed.createComponent(ReadDeleteComponent);
    component = fixture.componentInstance;
    fixture.detectChanges();
  });

  it('should create', () => {
    expect(component).toBeTruthy();
  });
});
In both cases, the specs are repaired.
Step 12: Add a Delete Button
Now that we have made sure that the list of heroes is not empty initially, we can easily delete a hero like follows: we add a delete function in the component
// src/app/heroes/components/read-delete.component.ts
import { Component, OnInit } from '@angular/core';
import {Hero} from "../../models/hero";
import {Observable, of} from "rxjs";
import {Store} from "@ngrx/store";
import {AppState} from "../../../app.state"
import {RemoveHero} from "../../actions/hero-action";

@Component({
  selector: 'app-read-delete',
  templateUrl: './read-delete.component.html',
  styleUrls: ['./read-delete.component.scss']
})
export class ReadDeleteComponent implements OnInit {

  heroes: Observable<Hero[]>

  constructor(private store: Store<AppState>) {
    this.heroes = store.select("heroes")
  }

  deleteHero(indexOfHeroToBeRemoved: number) {
    this.store.dispatch(new RemoveHero(indexOfHeroToBeRemoved))
  }

  ngOnInit(): void {
  }

}
We dispatch the Action RemoveHero with the
Now we can add a delete button in the HTML template and point to the
<!--read-delete.component.html-->
<div class="right" *ngIf="heroes">
<h3>Heroes</h3>
<ul>
<li *ngFor="let hero of heroes | async; let i = index">
{{ hero.name }}: {{ hero.description }}
<button (click)="deleteHero(i)">delete</button>
</li>
</ul>
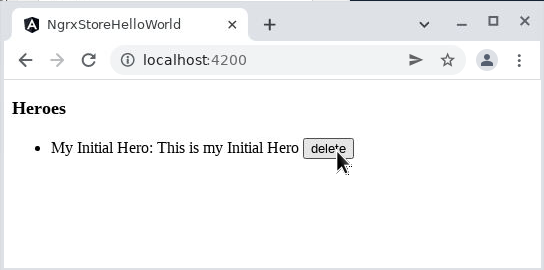
</div>This is, what it looks like after the start of the server:
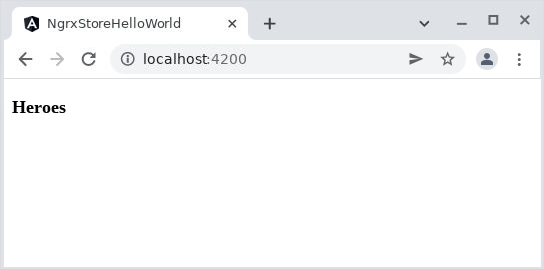
After we click the button, the „Initial Hero“ is gone:
Step 13: Add an Input Form for adding new Hero Items
Now that we have been able to read and delete hero items, we also want to be able to add new heroes. For that, we generate a new component:
mkdir -p src/app/heroes/components;
(cd src/app/heroes/components; ng generate component create)
Now let us define an input form for adding a hero:
<!--create.component.html-->
<div>
  <input placeholder="name" #name></input>
  <input placeholder="description" #description></input>
  <button (click)="addHero(name.value, description.value)"
</div>
The addHero method needs to be defined in the create component:
import {AddHero} from "../../actions/hero-action";

@Component({
  selector: 'app-create',
  templateUrl: './create.component.html',
  styleUrls: ['./create.component.scss']
})
export class CreateComponent implements OnInit {

  constructor(private store: Store<AppState>) { }

  ngOnInit(): void {
  }

  addHero(name: string, description: string) {
    this.store.dispatch(new AddHero({name: name, description: description}))
  }

}
To make the HTML template with a selector app-create visible, we need to add it to the app.component.html file:
<!--app.component.html-->
<h1 style="visibility: hidden">ngrx-store-hello-world App</h1>
<app-create></app-create>
<app-read-delete></app-read-delete>
I have set the visibility of the title to hidden, so I do not need to re-create the screenshots below.
Now our application looks like follows:
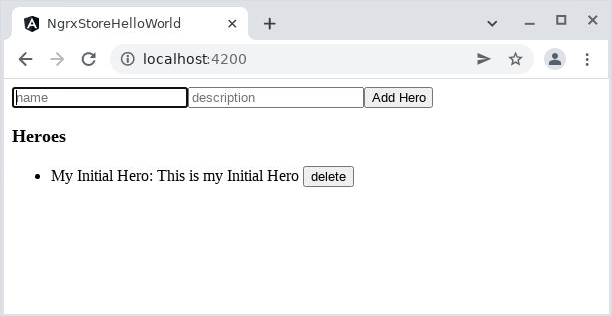
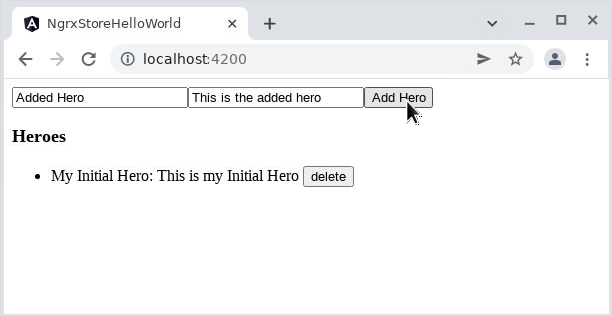
Not nice, but it should work already: we enter a name and description and click the Add Hero button twice:
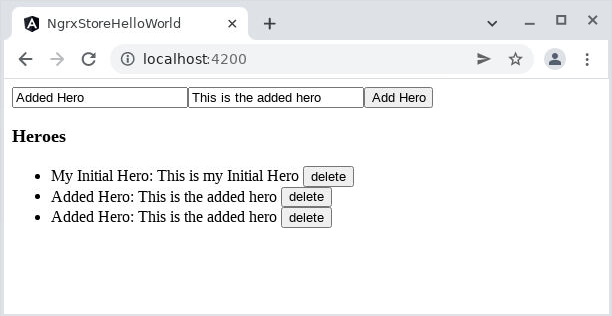
The new heroes will be appended to the list:
We still can delete any of the heroes. In this case, we delete the first one:
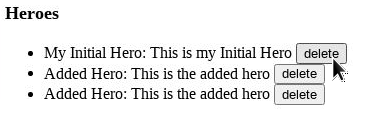
Now the initial hero is gone:

Understanding NGRX/STORE
Now we have a working example that stores the list of heroes in NGRX/Store. We can add or remove heroes from this list by dispatching the AddHero or the RemoveHero action, respectively. In this case, the NGRX/Store module will re-evaluate the current state by calling a reducer function, which takes the original state and the action and returns the resulting state. The current state in the store will be overridden by the new, resulting state.
Actions can also create side effects. This is something not yet shown in this hello world example.
Appendix: Debugging Tools
Chrome Browser Debugger
If something does not work in your case, you can open chrome’s „Developer tools“ panel by pressing the <F12> key. On chrome, you can also navigate to the panel via the triple dots, „More tools“ and „Developer Tools“ of Ctrl+Shift+I. A first hint of the problem can be seen on the Console.
Most of the other major browsers have similar functions (Firefox, Edge, …)
Redux DevTools
In Chrome, there is a nice tool that helps debug the state changes in the browser: the Redux DevTools. Try it out!